How to get space behind threads on kitless pens

Signed-In Members Don't See This Ad

spindlecraft

Member
Joined
Apr 6, 2014
Messages
56
Location
Philipsburg, PA
Friends,

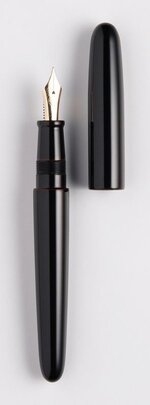
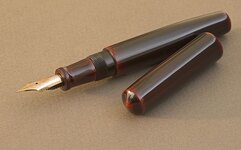
I find myself struggling to add space behind the body's threads where it will work with a cap. (see attached images)

Naturally, it's not difficult for me to simply turn down extra material behind the threads, but when I go to put the cap on, the cap wants to stop twisting as it reaches the end of the threads.

My initial inclination was to turn the material behind the threads down to a slightly smaller diameter, almost like a relief cut - however that doesnt seem to be doing the trick - nor do the attached images look like they take that approach.

So - I am left wondering if it has something to do with how I drill the cap. Do I need to drill a wider hole into the cap, at a matching depth of the space behind the threads?

Any thoughts, ideas or suggestions would be greatly appreciated!
 

Attachments

  • C813034A-D755-4C85-8F41-1683C1AD5667.jpeg
    C813034A-D755-4C85-8F41-1683C1AD5667.jpeg
    26.1 KB · Views: 228
  • 7343A416-DA53-4281-8269-5BE16FB9AD70.jpeg
    7343A416-DA53-4281-8269-5BE16FB9AD70.jpeg
    60.1 KB · Views: 226
Signed-In Members Don't See This Ad

magpens

Member
Joined
Feb 2, 2011
Messages
15,913
Location
Canada
This can be a somewhat tricky matter ....

You are right ... a relief cut behind the threads on the body is usually made. . (sometimes not, but usually ... better aesthetics, I think).
Cutting of this relief must be done very carefully to get the right depth of relief.
This cutting can be done with a narrow parting tool, usually with a squared end.

The maximum length of threads inside the cap will be (length of threads on body) + (length of relief on body) ....... I believe.

As a usual practice, there can be a relief length inside the cap at the beginning ....... I believe this will also work and will save some twisting to get the cap placed. . To cut this relief a boring bar ( squared cutter ) can be used ( thinking in terms of a metal-working lathe ).

You shouldn't need to drill wider in the cap. . ( but see my EDIT below )

You should carefully diagram your plan, calculate extent of threaded portions and relief portions, and do a practice on scrap material

EDIT :-
I have just re-read both yours and mine.
You say :- "Do I need to drill a wider hole into the cap, at a matching depth of the space behind the threads?"
I think you could do this if you have a drill of the correct diameter.
It can also be done with a boring bar adjusted to give you the right depth of relief.
So my second last sentence in my main answer above could be interpreted as an error ... or you could "drill wider" to get the desired relief if you have the right drill.
 
Last edited:
Joined
Aug 5, 2009
Messages
3,227
Location
Millersburg, OR
By the looks of the first picture I would drill the beginning of the cap with a slightly larger bit. I like ti have my caps come off with the third twist of the cap. I also usually make a relief cut after the threads that is narrower than the threads. I also drill the end of the cap with a bit larger than the size of the threads just to make putting the cap on a bit easier.
 

jalbert

Member
Joined
May 17, 2015
Messages
991
Location
Louisville, KY
Please don't do the thread relief (gutter) method. It yields very poor aesthetics, and creates a weak point where you don't want one, as the internal threads for the section usually run underneath. Removing material from inside the cap is the best method to get the cap to fully screw on, as well as control the number of turns it takes to screw on.
4ABCCC49-882A-4FB4-A66D-9E99454B0008.jpeg

using the above as an example, the lip of the cap stops right past the ink window, where the metal sleeve begins. I Measure the distance between the two arrows, plus a little extra, and set my boring bar for that depth (use a drill bit if you don't have a metal lathe and boring bar). I bore out the inner diameter to a bit larger than the diameter of the barrel, or until the cap smoothly goes on, without the inside of the cap rubbing on the outside of the barrel. If you want fewer cap turns, adjust the boring bar a little deeper and repeat.
 

darrin1200

Member
Joined
Mar 17, 2010
Messages
1,835
Location
Lyn, Ontario, Canada
There could be a few causes to your issue. Without knowing your complete method, it is very hard to pinpoint.
You may have not threaded deep enough into the cap. At which point, no matter how much relief you cut on the barrel, it won't go any deeper. If you think you have gone deep enough, check you tap to see at which point the full threads start cutting. On a starter tap, you can loose up to 5mm of full depth threads. I had my taps cut off to almost a bottoming tap. Only the first thread and a half are not full.
Did you step drill the cap, creating a narrower hole for the nib, up by the finial? If so, your section may be butting up to the lip and stopping.
This is actually the method I use in all my caps. I drill a hole just big enough for the nib, then the second hole is the size for my cap threads. This second drilled hole, goes almost all the way to the final depth of the section. I then use a boring bar to finish the hole to final depth, creating a squared lip that the front of my section will butt up against. This creates a, sort of, sealed compartment for the nib.
Even if you don't have a metal lathe, you can use a boring bar.

Boring Bar at RingSupplies
 

eharri446

Member
Joined
Mar 17, 2016
Messages
1,035
Location
Marietta, GA
Did you try turning the die around in the holder once you reach the end. That was what was in one of the write ups on making kitless pens that is in the library..
 
Top Bottom