Signed-In Members Don't See This Ad

cpd5899

Member
Joined
Jun 23, 2022
Messages
5
Location
Chicago
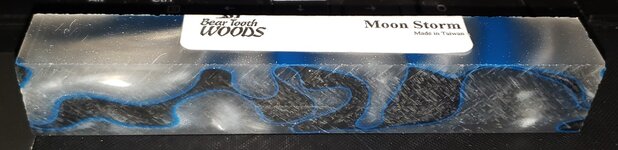
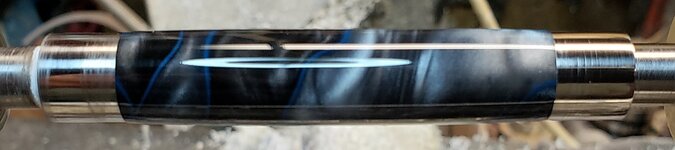
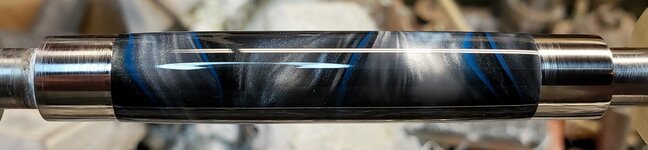
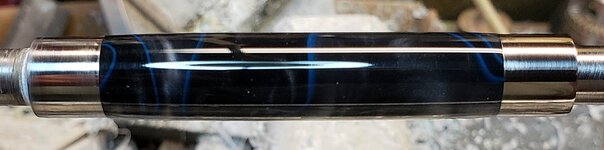
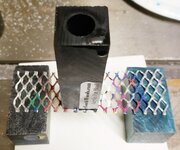
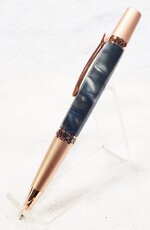
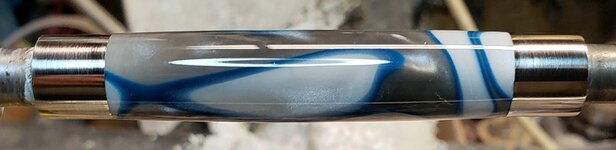
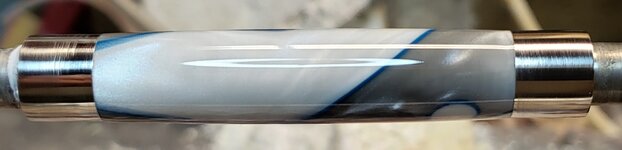
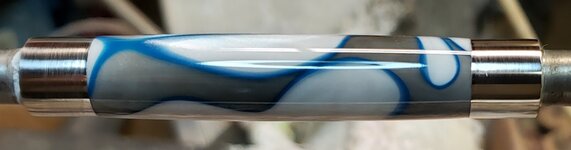
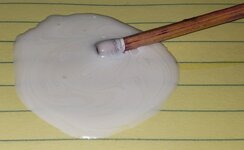
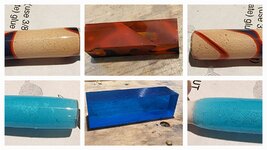
I'm having an issue!!! I took some blanks and wanted to see how different they each looked, having a painted tube in different colors. I painted one half in white and one half in black. I painted both the tubes and the hole drilled through the blank, as I was told the glue will show if you only paint the tubes. Why do the ones I painted white look like this?

Should I somehow sand the drilled hole? If so, how?

I've tried also putting Thin CA in the drilled hole prior to painting to try and fill those small scratches left behind.

Please tell me what I'm missing and doing wrong. 🙏
 

Attachments

  • 20220728_210258.jpg
    20220728_210258.jpg
    232.8 KB · Views: 182
Signed-In Members Don't See This Ad

Edgar

New Member Advocate
Staff member
Joined
Feb 6, 2013
Messages
6,890
Location
Alvin, TX 77511
How did you do the painting & how long did you let it cure?

I use Krylon spray paints - a couple of seconds spurt into each end of the tube & I spray the tube as well, then let them cure a minimum of 24 hrs, but usually 2-3 days. Works well for me, but everyone has their own technique & preferences.
 

jttheclockman

Member
Joined
Feb 22, 2005
Messages
19,082
Location
NJ, USA.
David welcome to the site. First can I ask why you are choosing those clear type blanks? Especially if you are just painting with white. Anyway those blanks will show every scratch and defect such as paint scapings when sliding tubes in. If you want to continue to use them then you will need to perfect your polishing skills because you will need to polish the inside of those type blanks. First you will need to sand the scratches you get when drilling and then progressively raise the grit level as you go. You may have to take it up to the 1200 grit to get a smooth finish. Then you need to use a spray paint because any brushing will leave shadow lines and or ridges. Forget the painting of the tubes. That will do nothing more if you can get a good finish on the inside of the blank. I suggest not using CA to glue tubes in and switch to a epoxy and tint the epoxy if you like. You need to let the paint dry and cure before gluing. You do not tell us all your steps such as glue used, paint being used, or if you sanded the blank smooth before painting. To me there are far tooo many other blanks that can do the same look that are more opaque. Those blanks make nice kitless pens. Good luck. I am sure other will chime in with more suggestions.

One other thing for sanding, just wrap sandpaper around a dowel that closely fits the size of the hole drilled.
 

jrista

Member
Joined
Aug 12, 2021
Messages
2,222
Location
Colorado
John pretty much nailed it.

The only thing I might add/alter is, I would still paint the tubes, just in case they scrape the paint as you slide them in. With care, you should be able to avoid that, but just in case.

I too am curious though why you are using such clear blanks. Those have a heck of a lot of translucency to them. If you use more opaque blanks, you shouldn't have quite the problem you are having.
 

cpd5899

Member
Joined
Jun 23, 2022
Messages
5
Location
Chicago
David welcome to the site. First can I ask why you are choosing those clear type blanks? Especially if you are just painting with white. Anyway those blanks will show every scratch and defect such as paint scapings when sliding tubes in. If you want to continue to use them then you will need to perfect your polishing skills because you will need to polish the inside of those type blanks. First you will need to sand the scratches you get when drilling and then progressively raise the grit level as you go. You may have to take it up to the 1200 grit to get a smooth finish. Then you need to use a spray paint because any brushing will leave shadow lines and or ridges. Forget the painting of the tubes. That will do nothing more if you can get a good finish on the inside of the blank. I suggest not using CA to glue tubes in and switch to a epoxy and tint the epoxy if you like. You need to let the paint dry and cure before gluing. You do not tell us all your steps such as glue used, paint being used, or if you sanded the blank smooth before painting. To me there are far tooo many other blanks that can do the same look that are more opaque. Those blanks make nice kitless pens. Good luck. I am sure other will chime in with more suggestions.

One other thing for sanding, just wrap sandpaper around a dowel that closely fits the size of the hole drilled.
So, I was just curious to see what the effect would be when they were finished. I used spraypaint for the tubes and blanks because some of the acrylics I have played with have turned down to be more translucent than I thought they would be. I did not sand that blank. If the blank is sanded that smooth, will it even hold the tube in place without a surface for the epoxy to bite into? How long do it take with sanding to get the blank smooth?
 

randyrls

Member
Joined
Feb 2, 2006
Messages
4,821
Location
Harrisburg, PA 17112
To join the thread; From the "pattern" (bumpy) it looks like the glue, or paint, or material reacted with each other. A drilled tube should not have that pattern. I use a standard rattle can to spray the inside of the tube and thick CA glue. I get even coverage of the CA. Since I note the drill size on the instruction sheet I keep for each pen style, don't have any problem with paint scraping off the inside.

Hope this helps.....
 

jttheclockman

Member
Joined
Feb 22, 2005
Messages
19,082
Location
NJ, USA.
So, I was just curious to see what the effect would be when they were finished. I used spraypaint for the tubes and blanks because some of the acrylics I have played with have turned down to be more translucent than I thought they would be. I did not sand that blank. If the blank is sanded that smooth, will it even hold the tube in place without a surface for the epoxy to bite into? How long do it take with sanding to get the blank smooth?
They paint glass so yes it will stick. Now of course you can get into specific paints made for glass which maybe of help but you can experiment with simple acrylics. Testors enamels and acrylics work well. Your other questions is like asking how long does paint dry. :) Sand till you see the old scratch marks removed from previous grits and work your way up. It is a small blank and wrapping paper around a dowel takes little time. Hook to a drill motor and goes faster. Whatever you do, do not leave any polish on blank or paint will not stick and just react with it and cause crazing. Remember this when working with blanks and painting tubes and inside blanks. The adhesion is only as good as the adhesive. Now when you paint the blank only you have 2 glue parts. One, the paint to the blank, and 2 the tube to the paint. If you paint the blank and the tube, now you have 3 points of adhesion you have to be concerned about and why I never paint both tube and blank and always just paint blank. You have adhesion of paint to blank, adhesion of paint to tube, and also now painted tube to painted blank. Plus the adhesive needs to be compatible to all.

Getting the inside of the blank is crucial before you sand the outside or you can drive yourself crazy trying to get scratch marks out and not knowing weather inside or outside. Again I would not use those type blanks for what you are doing. There are many examples here of people using those type blanks for kitless pens because they use no tubes. They then actually go through a polish regime to even clean them up more. When those blanks are turned down to the thin diameters we use they are like being clear anyway. very little tint is left. They do have translucent blanks that are abit heavier in color but the same effect you are after can be achieved. Good luck.


Here is an example of what I am talking about when members use for fountain kitless pens. There are many more examples of this in the Fountain Pen forum here. But they have to actually polish the inside of these blanks because you see it when done. Mark of a great turner.

https://www.penturners.org/threads/aqua-blue-transparent-acrylic.169256/
 
Last edited:

RunnerVince

Member
Joined
Dec 18, 2019
Messages
276
Location
Ogden, UT
All of this is why I detest using the acrylics, resins, etc. From the outside of the blank, you can rarely tell how translucent the blank will go when it's turned down to the next-to-nothing that a lot of pens require. So you have the additional headaches of deciding whether to paint the inside/blank, what color to paint, sanding/polishing the inside of the blank, paint/adhesive compatibility, etc. NIGHTMARE. Of course that means it's what a lot of customers want, so I do them even though I dislike them. But for gifts, personal pens, etc., I do blanks I know I won't be able to see through.
 
Joined
Aug 5, 2009
Messages
3,227
Location
Millersburg, OR
I like the look you are going for. Years ago I cast a mostly clear blank and painted the tubes black. as was mentioned you need to sand the inside if the blank. It doesn't have to be perfect. Then clean and paint the inside of the blank and the tubes. I like epoxy for gluing in the tubes and I would coat the inside of the blank to help reduce the air bubbles on the inside. I still have one of the blanks I cast with that look, I'm going to have to get it out and make something with it.
 

qquake

Member
Joined
Feb 8, 2004
Messages
5,007
Location
Northern California
I haven't had good luck with very translucent blanks, so I refuse to turn them. I don't mind semi-translucent, though, and you can dramatically change the look by painting different colors. This is an experiment I did a while back. Two halves of the same blank. I painted one black and the other white. They don't even look like the same blank. I painted the holes and the tubes, and colored the epoxy.
 

Attachments

  • blank01.jpg
    blank01.jpg
    159.5 KB · Views: 73
  • black01.jpg
    black01.jpg
    123.7 KB · Views: 80
  • black02.jpg
    black02.jpg
    128.2 KB · Views: 79
  • black03.jpg
    black03.jpg
    150.8 KB · Views: 81
  • black04.jpg
    black04.jpg
    342.2 KB · Views: 75
  • black05.jpg
    black05.jpg
    412.3 KB · Views: 77
  • black06.jpg
    black06.jpg
    137.3 KB · Views: 76
  • black07.jpg
    black07.jpg
    148.9 KB · Views: 69
  • white01.jpg
    white01.jpg
    118.7 KB · Views: 63
  • white02.jpg
    white02.jpg
    100.1 KB · Views: 62
  • white03.jpg
    white03.jpg
    105.1 KB · Views: 65
  • white04.jpg
    white04.jpg
    384.3 KB · Views: 63
  • white05.jpg
    white05.jpg
    259.3 KB · Views: 62
  • white06.jpg
    white06.jpg
    197.5 KB · Views: 62
  • white07.jpg
    white07.jpg
    216.9 KB · Views: 80
Top Bottom