budnder
Member
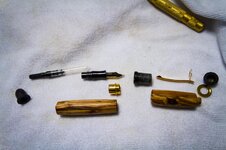
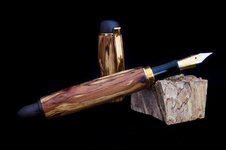
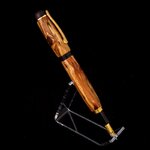
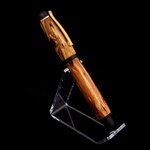
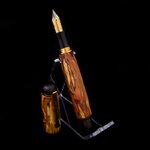
I like the Churchill Fountain kit on two personal taste issues - plastic nib (not metal) and it's press to post cap (no exposed threads). However, it's too dang heavy and I don't care for all the blingy trim rings. Here's my attempt at fixing those issues... which means I'm ditching the brass tubes, trim rings and metal finial and receiver, and just using the section, section threads, nib and clip. I epoxied things together. I used a piece of stabilized spalted Apple for the body and cap, and did the finial and receiver in African Blackwood. I finished it with Arrow Finish to try and maintain a wood feel.

The finial was pretty easy - got one I liked on the second attempt. I roughed it out on the lathe then finished it on the belt sander chucked up in a cordless drill.
The receiver took me three tries to get something that posted nicely in the cap threads. Same technique of finishing it on the belt sander while spinning in a drill. I shortened the receiver up a bit and made the body a little longer compared to the Churchill kit. I think the stock Churchill receiver is a little too long visually.
The cap and body were fairly straight forward, with the usual kitless challenge of holding and supporting the piece. I cut tenons on the cap and body to give the epoxy more than just the surface to hold onto.
I really like working with the Blackwood - it's like turning a crayon. Super nice feel to it also... makes me want to try and do a section with it next time. I'm curious as to how the epoxy (DEVCON) will hold up as a mechanism for affixing the finial. There's a little tension in there with because of the clip and the Blackwood doesn't seem like it would provide as much of a grip as some other woods.
The finished pen weighed in at 0.92 oz., which is almost spot on for what nice, non-kit fountain pens clock in at. Kit pens are at least double that. You can't really write with a kit Churchill when it's posted... the weight and balance is all wrong.
I'm really happy with this - much closer to being able to make the perfect fountain pen.