Bash kitless entry

Signed-In Members Don't See This Ad
See more from Fred Bruche

Fred Bruche

Member
Joined
Feb 11, 2018
Messages
977
Location
Philadelphia 19146
Hi Darrin (@darrin1200)

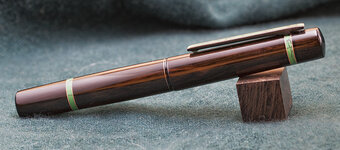
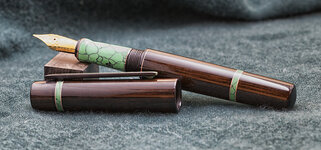
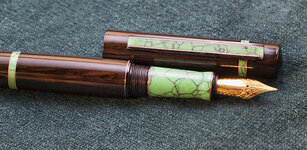
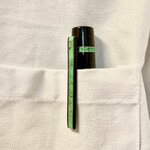
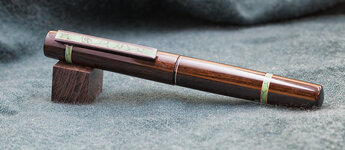
Here are the pictures for my entry to the Bash kitless entry this year.
For this fountain pen, I used some ebony for the body and cap (I thought it was Indian ebony but looking at the color it might be mun ebony), ebonite for the threaded bits. trustone variscite for the section and inserts, and 32 gauge copper for the various inlays. The parts I didn't make are the nib triplet (Jowo#6 gold plated). The finish is Gluboost CA. The threads are M13x0.8 triple start for the cap/body and M10x1 for the body/section.

I believe Pierre (@Pierre---) has no chance this year!!!

kitless-1.jpg kitless-2.jpg
kitless-3.jpg kitless-4.jpg

🤣😂🤣
 
Signed-In Members Don't See This Ad

Fred Bruche

Member
Joined
Feb 11, 2018
Messages
977
Location
Philadelphia 19146
Thanks, y'all! If I had finished it on time this would have been my kitless entry but Murphy stroked a few times from its favorite corner. I'll try to start even earlier next time :rolleyes:
 

Fred Bruche

Member
Joined
Feb 11, 2018
Messages
977
Location
Philadelphia 19146
It's a beautiful pen Fred. Care to tell us about the clip?
The clip was built with a similar approach as in my Summer Extravaganza entry last August. The band is part of the cap from the beginning, it gets turned and polished with the rest of the cap. Then drill a mortise (about the width of the clip) in which I will glue the clip's tenon. The clip started as a 6x6mm piece of ebony and I dug a 3x3mm groove in the center of one of the face (in this case the grove was the full-length of the clip). In this groove, I glued in a baguette of the variscite surrounded by copper. Once the glue had set for a while, the clip gets shaped by cutting away the "excess" ebony (bandsaw, scraper, file, sandpaper,..) and leaving a tenon at the place where it will be glued to the clip. More fine sanding, Glueboost finish, repeat, until it looks good enough to me. Initially, that tenon is about 4mm and is used to hold the piece while shaping it, and gets sanded to about 1.5mm before gluing it in the mortise. The last thing I did before gluing it was to build a small dome at the other end of the clip (using UV-cured resin) to match the height of the clip. Does that make sense? I didn't take pictures of this one but I have other prototypes I can take pictures of.
 

magpens

Member
Joined
Feb 2, 2011
Messages
15,911
Location
Canada
@Fred Bruche

Fred, that is an interesting way to make the clip .... I would never have thought of such a construction for a clip !!!

I realize that it's purpose is mainly ornamental.
 

Fred Bruche

Member
Joined
Feb 11, 2018
Messages
977
Location
Philadelphia 19146
@Fred Bruche

Fred, that is an interesting way to make the clip .... I would never have thought of such a construction for a clip !!!

I realize that it's purpose is mainly ornamental.
I haven't had the guts to pull on the end to test the resistance, but from the material used to make it I don't expect it would have any real flex possibilities. It is only glued at the tenon though, so I'm pretty sure a sheet of paper or two can slide between the cap and the end of the clip without generating any issue. But for sure it would be at least a roll-stopper :)
 

magpens

Member
Joined
Feb 2, 2011
Messages
15,911
Location
Canada
I haven't had the guts to pull on the end to test the resistance, but from the material used to make it I don't expect it would have any real flex possibilities. It is only glued at the tenon though, so I'm pretty sure a sheet of paper or two can slide between the cap and the end of the clip without generating any issue. But for sure it would be at least a roll-stopper :)

I myself have been looking for a really attractive roll-stopper .... your "clip" is an outstanding candidate .... subject to constraints you mention !! :D
Oh .... and also subject to its not-so-simple construction. . But its glorious attractiveness makes it a winner !!!! . I will consider and probably try it.
 

TDahl

Member
Joined
Dec 11, 2019
Messages
1,894
Location
Brentwood
That is an incredible pen. Thank you for sharing your process on the clip. I would be interested in seeing some of the photos of your prototypes you mentioned. Very well done!!
 

Dalecamino

Local Chapter Leader
Joined
Jan 2, 2008
Messages
14,572
Location
Indianapolis, In.
The clip was built with a similar approach as in my Summer Extravaganza entry last August. The band is part of the cap from the beginning, it gets turned and polished with the rest of the cap. Then drill a mortise (about the width of the clip) in which I will glue the clip's tenon. The clip started as a 6x6mm piece of ebony and I dug a 3x3mm groove in the center of one of the face (in this case the grove was the full-length of the clip). In this groove, I glued in a baguette of the variscite surrounded by copper. Once the glue had set for a while, the clip gets shaped by cutting away the "excess" ebony (bandsaw, scraper, file, sandpaper,..) and leaving a tenon at the place where it will be glued to the clip. More fine sanding, Glueboost finish, repeat, until it looks good enough to me. Initially, that tenon is about 4mm and is used to hold the piece while shaping it, and gets sanded to about 1.5mm before gluing it in the mortise. The last thing I did before gluing it was to build a small dome at the other end of the clip (using UV-cured resin) to match the height of the clip. Does that make sense? I didn't take pictures of this one but I have other prototypes I can take pictures of.
Thanks Fred, I got most of it. It looks amazing.
 

Pierre---

Member
Joined
Jun 10, 2012
Messages
415
Location
France
A stunning pen indeed. I love the wood-stone combo, of course the attractive and ingenious clip; and above all the tiny copper accents, very elegant, it could have been French! 🤣
I am lucky Murphy was right again. I have to work hard for next time... Congrats Fred.
 

Fred Bruche

Member
Joined
Feb 11, 2018
Messages
977
Location
Philadelphia 19146
Thanks, Pierre!! Oui oui ;)

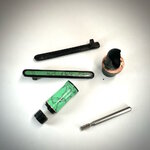
Quick picture of
- Murphy's damage: broken insert with copper after glue failure (I should have been more patient and let the glue fully cure), broken threads on section piece that had already lost the copper accent at the tip of the section.
- earlier clip prototypes that didn't get finished, I didn't like the rounded version of the upper one, the bottom one was not as bad but I thought there was a need for some copper accent in the clip.
- the Dremel bit I used to get the grove in the clip, 3mm wide and allows to get an even flat bottom.

Murphy.jpeg
 
Top Bottom