Working On A Glued Up 8 Stave Travel Mug

Signed-In Members Don't See This Ad
See more from W.Y.

W.Y.

Member
Joined
Aug 10, 2008
Messages
1,656
Location
BC, Canada
Started with the glued up cherry and walnut staves like this .
StavesGlued.jpg


First I turned a couple jam plugs for the holes in the ends.


JamChucks.jpg


Then I rounded the blank and made a tenon for a chuck.


Roundandtenonadded.jpg


Put it in a chuck and got set up for hollowing out the inside.

Readytohollowout.jpg


Here it is hollowed out and tenon cut tenon for the lip of the S S insert.


Hollowedoutwithtenonforcup.jpg


Reversed it and put top into chuck in expanstion mode before parting off the bottom.

Readytocutbase.jpg


Turned a slightly tapered plug for the bottom.

Taperedplug.jpg


Glued plug in place and turned a concave in the bottom and sanded it it to same 4000 grit as the rest of it.

Pluggluedin.jpg


Next will be 5 or 6 coats of polyurethene and then fasten the S S liner into it.
W.Y.
 
Last edited:
Signed-In Members Don't See This Ad

W.Y.

Member
Joined
Aug 10, 2008
Messages
1,656
Location
BC, Canada
nwcatman;

ditto on the support plans. and....what angle are the staves cut at?
__________________

22.5 degrees

jkoehler;
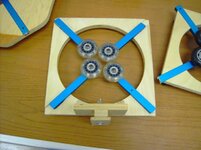
I made the steady rest myself from putting plans from various sources together to my own liking. The wheels are used roller blade wheels.
There have been many topics about making steady rests on my Woodworking Friends site with different design arrangements and I think there might also be a tutorial about one in my tutorials board.
Those steady rests are an essential piece of equipment for projects like this and they can be made from odds and ends of scrap wood and a couple bucks worth of wheels from a used clothing/etc store. You buy the pair of skates and use the wheels and chuck the rest out.

W.Y.
 

tommyd

Member
Joined
Jun 15, 2008
Messages
247
Location
murrieta, ca, USA.
that looks great.
i was wondering. where did you get the plans for the turning support?
i have been trying to find some plans in order to make one.

here is a picture of a steady rest made at one of our meetings but i don't have the plans for it. they are made out of T stock ( I think thats what they are called) and wheels off roller blades
 

Attachments

  • pictures 71508 001.jpg
    pictures 71508 001.jpg
    39 KB · Views: 186

W.Y.

Member
Joined
Aug 10, 2008
Messages
1,656
Location
BC, Canada
Tom;
That looks good. They are actually a no brainer to make and there are more designs of them than you can shake a stick at :wink:.
Was your picture taken before you supplied a means of locking the rails in place to keep the wheels against the wood or maybe it is on the back side and not shown .

W.Y.
 

DocStram

Member
Joined
Feb 16, 2006
Messages
3,429
Location
Pittsburgh, Pennsylvania
William .... Hi, we've never met before .. but, it's good meeting you!

I have a friendly suggestion for you. You've come this far with all of the pictures and descriptions of the steps for turning the mug, right? Well, here's an idea ..... how about writing it all up as a tutorial and submitting it to our IAP Library. It would really be a significant contribution to the members.

Plus, it would be the first "mug tutorial" in our archives.

Thanks so much! If you need any help writing the tutorial, don't hesitate to ask. I'll be glad to help you with it.
 

W.Y.

Member
Joined
Aug 10, 2008
Messages
1,656
Location
BC, Canada
Sure Al, I could do that for you to put in the IAP library. I was thinking of making a tutorial of it to put in my own tutorials board as well at Woodworking Friends after I get the finish on it and final pictures taken .
I would prefer to put it into a pdf but am not sure how to do that.
Is there a way to do it without going to the expense of a program . ?
Are there any easy ways to do that with an easy to follow program ?
Can I copy and paste something like I have described above and paste it into a site that will turn it into a pdf or would I have to do it step by step like I have so far.

W.Y.
 

W.Y.

Member
Joined
Aug 10, 2008
Messages
1,656
Location
BC, Canada
Leap ;
Thanks for that link .
I found however that I needed a good Office program to work in conjunction with it so I have spent many hours searching for one and have finally got everything downloaded so that I will be able to make up tutorials quite easily.
W.Y.
 
Last edited:

MobilMan

Member
Joined
Mar 30, 2008
Messages
676
Location
Safford, Arizona, USA.
William. Very nice mug. Like your choices of wood. I've thought about making some for a long time but haven't gotten around to it. Have one question tho. I know it can be done either way but why didn't you turn it into a cylinder before turning the inside? Wouldn't it keep the steady rest more even & maybe more centered?
 

DocStram

Member
Joined
Feb 16, 2006
Messages
3,429
Location
Pittsburgh, Pennsylvania
William, my friend .... I spent a little time at your website. I have two words for you ...... Holy Smokes!!

By the way, I hope you don't mind my talking about your work in the Casual Conversation forum. :biggrin:
 

W.Y.

Member
Joined
Aug 10, 2008
Messages
1,656
Location
BC, Canada
Here it is almost finished . Six coats of poly on the outside and one heavy seal coat of poly on the inside.
Only thing left to do now is to give the finish a few more days of curing and then give it a three stage Beall buffing. ..
W.Y.

340847773.jpg


Mobilman.
I just noticed your inquiry and I think I know what you are referring to
Have one question tho. I know it can be done either way but why didn't you turn it into a cylinder before turning the inside? Wouldn't it keep the steady rest more even & maybe more centered?

I think what you are seeing is an optical illusion. I noticed that myself after putting the picture on my computer. The piece is indeed turned round in that picture and the steady rest worked real well for supporting it while doing the hollowing.

W.Y.
 
Last edited:

W.Y.

Member
Joined
Aug 10, 2008
Messages
1,656
Location
BC, Canada
I had a hard time taking the pictures because of the high gloss on the finish . No flash and in the shade helped.

I was lucky that there was some birdseye figuring in the cherry wood in that one.
It was hard to show it in the picture but in the hand, the bottom birdseye shows a dogs face .

W.Y.


340855959.jpg
 

W.Y.

Member
Joined
Aug 10, 2008
Messages
1,656
Location
BC, Canada
Hi Al. (DocStram).

In a previous message you inquired regarding putting a tutorial about this in the IAP library.
That is quite alright with me . Go ahead and put the tutorial I just made in there on my behalf if you like and feel free to correct any errors or ommissions if you feel it is necessary.

Well, I finally downloaded some software to enable me to make tutorials in pdf format and got up enough nerve to try out the software .
It still needs some tweaking but this is my first attempt at making a pdf tutorial . Of course I have now installed it into my Woodworking Friends Tutorial board.

http://www.byoung.wynndel.ca/PDF's/Turning A Coffee Mug With S S Insert.pdf

Hope this helps anyone that wants to make some and it sure would be nice if you would post a picture of them if you do.
W.Y.
 
Last edited:

tommyd

Member
Joined
Jun 15, 2008
Messages
247
Location
murrieta, ca, USA.
Tom;
That looks good. They are actually a no brainer to make and there are more designs of them than you can shake a stick at :wink:.
Was your picture taken before you supplied a means of locking the rails in place to keep the wheels against the wood or maybe it is on the back side and not shown .

W.Y.

yes there are t nuts on the back side to lock rails in place.
 
Top Bottom