Turning and Finishing Burl Pens

Signed-In Members Don't See This Ad

Jim Campbell

Member
Joined
Oct 14, 2012
Messages
144
Location
Moraga, Calif
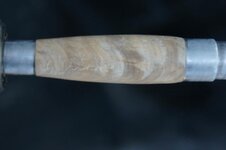
I have been challenged with an ongoing issue when turning burl pens. It's the pitting/pockets. I've read various blogs and it seems inevitable to have pitting in burls pens.

What ideas are out there to either prevent the pitting, or ways to fill the pits and finish the pen.

I apologize for the less than favorable photo, but hopefully you can see what it is I'm describing. The pen is currently sanded to 220.
 

Attachments

  • Pits_on_Burl.jpg
    Pits_on_Burl.jpg
    20 KB · Views: 511
Signed-In Members Don't See This Ad

seamus7227

Member
Joined
Mar 18, 2009
Messages
6,220
Location
Wichita Falls, TX
I would say sharper tools, lighter cuts. And if that doesn't help, try sanding it with 180-220 grit to get it to the dimensions you want. You can also create a CA slurry with saw dust to full in the voids.
 

BarbS

Member
Joined
May 30, 2012
Messages
55
Location
Wenatchee, WA
I've had this problem, too, and solved it in most cases with sharper tools, then oiling the burl and sanding with oil. It builds a good slurry to fill in smaller gaps. I can use the same sanding set up three or four times before dedicating new sandpaper to this use.
 

mharvey

Member
Joined
Jan 19, 2013
Messages
77
Location
Tracy Ca
go with ...sharper tools...sandpaper...and CA. If you are not using a carbide tip with burl....spend the $60...it will reduce...also...the pits are what give character...and just fill with CA after you sand with the courser sand paper...and depending on the wood...I use ebony dust...or some other...that enhances...oil sanding changed the color....as did wet sanding without CA first...but if it is pitting...use CA a lot to prevent tear outs.
 

nava1uni

Member
Joined
Mar 30, 2008
Messages
4,936
Location
San Francisco, CA, USA.
The pitting of burl is natural and it is what gives the character of the burl. If you sand using medium CA then the small pits will be filled. You should check out Russ Fairfield's videos on You tube. They are great finishing videos.
 

mrcook4570

Member
Joined
Mar 27, 2005
Messages
4,098
Location
Mason, WV, USA.
When you get near finished size, drizzle the blank with thin CA. After it dries (or hit it with accelerator), then make a couple of passes with a sharp skew. Repeat CA/skew/CA/skew etc. until you get to the size you want. The CA will help to harden the wood and prevent most, if not all, of the pits and tearout. For any that do remain, follow the above advice for creating a CA sanding slurry to fill in any defects.
 

pensbydesign

Member
Joined
Apr 12, 2005
Messages
842
Location
ware, ma, USA.
this looks to me to be more tear out than pitting sharp tools a must, i find a scary sharp skew to work best slower lighter cuts might help to
 
Joined
Mar 28, 2013
Messages
17
Location
Melbourne, Australia
Jim, I live in the land of very hard, hardwoods and it not just burls that bear out your tearing/ pitting experience.

In Australia we start with the highest quality steel plus as others have said they must be sharp, 2 make sure before you start liberally coat with thin CA on the blank ends, run the lathe fast and the most important of all be patient. Even moe so when you get to the end of the turning process, just take of powder. Always have a small container of shavings/dust for any patch ups.
Burl selection is also important , try and source a tight grained burl, this is recognised by the higher bulk density, in other words the volume to weight is much heavier.
Lets know how you get on.
Regards
Chris
 

Jim Campbell

Member
Joined
Oct 14, 2012
Messages
144
Location
Moraga, Calif
Turning Burls

Thanks everyone for the great advice. There is a concensus of using sharp tools. I also like the idea of filling in the voids with shavings.

One area I'm still not certain of, and which was mentioned, was turning speed. I used to turn fast. 3,000+ RPM. I found the ends of the blanks had a tendancy to crack. Perhaps some CA on the ends prior to the start of turning will cure that. I also had a fair amount of cracking on the ends when sanding at high speed.

So I've been slowing things down. Turning at 1800 and sanding at 600.

What's recommended for good quality steel? Any name brands?
 

Jim Burr

Banned
Joined
Feb 23, 2010
Messages
3,060
Location
Reno, Nv
I'm late to the party on this, but...
This is one of those times when stabilizing a burl may really help Jim. We normally associate stabilizing with punky or very soft wood. Since the grain structure of burl is all over the place, stabilizing really helps adhere the structure together.
 

glen r

Member
Joined
Feb 5, 2010
Messages
453
Location
Edmonton, Alberta, Canada T5W 1V8
Turn as fast as possible with as sharp as tools as you can possibly have and then sand at around 600. Sharp tools cut but do not scrape which causes heat, while sanding at high speed creates heat which you also don't want.
 

butchf18a

Member
Joined
Dec 3, 2010
Messages
503
Location
woodland, wa
My favorite burl is buckeye, notorious for natural voids and checks. When encountered, the size of the void determines what I'll do with it. Often sanding dust, or CA sanding slurry fills them nicely. On larger voids I like to add contrast by filling with turquoise inlace powder and CA.
 

turn4fun

Member
Joined
Mar 31, 2010
Messages
117
Location
Santa Rosa, CA
I just saw this thread and wanted to add a couple of thoughts. I personally like to find pits in burl pen blanks. It gives me a chance to make the blank even prettier by filling the pits with turquois, black, brown or some other color dust. My pens sell more quickly and for higher prices when I do. I'll use a metal pick sometimes to enlarge and re-shape the pit.. and maybe to add additional pits to give the blank a more balanced appearance. Just wanted to add my 2 cents.. Larry Rayher
 
Top Bottom