Turning 6061 Aluminum Rod

Signed-In Members Don't See This Ad

Chip Meister

Member
Joined
Jan 22, 2020
Messages
4
Location
Houston, Texas
Hi guys. Forgive me if this post is not in the right forum or if I missed seeing the answer in another post, as I could not find one. I have some 20 mm diameter 6061 aluminum rod.I'm actually going to make aluminum precision bench dogs that will be about 1-7/8" long. I'm bringing the rod to a nice mirrored polish finish on my Nova Comet II. My question involves drilling into the end of the rod. I have a G3 Chuck and a good Jacobs chuck tail stock. Technique wise I think I'm OK unless someone has anything to suggest. I've done a couple of samples where I did a small pilot hole And then, after cutting pieces of the polished rod apart to the final 1-7/8" length, I am chucking up that piece in the G3 and then drilling a 10 mm hole which later gets a very fine tap. I won't go into the tapping at this time as it's not important.

What is important is that I obviously want to get a nice straight centered hole, and the question I have for some of you is if any of you have drilled holes in 6061 aluminum before, is there a particular drillbit that you liked? I used one of my Festool split point HSS bits to start with, and after going in a little over 5/8", the bit basically stopped cutting. I realized later that I probably burned it up as I was turning the aluminum way too fast. And reading up on it now, it looks like I should be turning it no faster than 500 to 600 RPM, which is about as slow as I can go on the Nova. I was probably 3-4 times that before. I am using turning fluid and cleaning the bit with a brush frequently. My final hole should be about 1-1/8" deep. I did find a couple of 10mm Bosch cobalt drill bits that look like they should do the job well. They should arrive in the next day. In the meantime, I did find one other decent HSS 10mm bit In my shop and tried it on a new blank. I use the slowest speed setting and this time it drilled well producing nice shavings that clumped together with the oil as they were supposed to.

Thanks in advance for any help that anyone can offer.
 
Signed-In Members Don't See This Ad

magpens

Member
Joined
Feb 2, 2011
Messages
15,913
Location
Canada
I just use Norseman "Black and Gold" drill bits at a speed of about 250 RPM (seems like that is too low for your lathe) ... lubricated with WD-40, and clearing the hole every 1/4".

Make sure the end face of your rod is accurately square to the axis. Advance the drill chuck in tail-stock extremely slowly at the beginning (until the hole is full diameter plus quarter inch) and then still quite slowly thereafter.

I drill alum. pen blanks like this with holes up to 7/16" diameter and about 3.5" long with very good success.
 

jttheclockman

Member
Joined
Feb 22, 2005
Messages
19,082
Location
NJ, USA.
Being you very first post , let me say welcome to the site. As far as drilling aluminum you found out right away you need to slow the speed of the lathe down as well as the feed rate. I drill with standard norseman bits and have no problem. I even used a cheap set of Harbor Freight twist metal bits and no problem I use microfinish for a lubricant. I use this on stainless steel and cuts like butter so works well with other metals as well. Have also used Tap Magic as well.
 

Chip Meister

Member
Joined
Jan 22, 2020
Messages
4
Location
Houston, Texas
I just use Norseman "Black and Gold" drill bits at a speed of about 250 RPM (seems like that is too low for your lathe) ... lubricated with WD-40, and clearing the hole every 1/4".

Make sure the end face of your rod is accurately square to the axis. Advance the drill chuck in tail-stock extremely slowly at the beginning (until the hole is full diameter plus quarter inch) and then still quite slowly thereafter.

I drill alum. pen blanks like this with holes up to 7/16" diameter and about 3.5" long with very good success.
Thanks for this. Actually, I was wrong about my speeds. In low gear I can get down to about 300 RPM. The technique you gave is pretty much what I'm doing. I'll post pictures of these bench dogs after I have made a few. I got the inspiration from Lee Valley/Veritas, who sells what they call "Prairie Dogs" for about $30US per pair. Theirs are brass, but I decided to make mine from the 6061 aluminum which is 3/4" diameter. I'm really quite pleased with the mirror polish I am able to obtain by using the series of MicroMesh on the lathe, and then finishing up by buffing with Mothers Mag and Aluminum Polish.
 

Attachments

  • CDBCE705-935C-4172-BD58-98978C60A2DD.jpeg
    CDBCE705-935C-4172-BD58-98978C60A2DD.jpeg
    378.5 KB · Views: 193
  • 606BA133-0598-44CC-9939-C2998F2B7118.jpeg
    606BA133-0598-44CC-9939-C2998F2B7118.jpeg
    188.1 KB · Views: 190
  • 91EF8D22-5495-4571-A2A4-90A5B2950CAC.jpeg
    91EF8D22-5495-4571-A2A4-90A5B2950CAC.jpeg
    402.2 KB · Views: 195

Chip Meister

Member
Joined
Jan 22, 2020
Messages
4
Location
Houston, Texas
Being you very first post , let me say welcome to the site. As far as drilling aluminum you found out right away you need to slow the speed of the lathe down as well as the feed rate. I drill with standard norseman bits and have no problem. I even used a cheap set of Harbor Freight twist metal bits and no problem I use microfinish for a lubricant. I use this on stainless steel and cuts like butter so works well with other metals as well. Have also used Tap Magic as well.
Thanks for the reinforcement! 300 rpm will be my "new normal". I'm also using Tap Magic and like it.
 

Mortalis

Member
Joined
Aug 19, 2013
Messages
658
Location
Bardstown, Ky
Being you very first post , let me say welcome to the site. As far as drilling aluminum you found out right away you need to slow the speed of the lathe down as well as the feed rate. I drill with standard norseman bits and have no problem. I even used a cheap set of Harbor Freight twist metal bits and no problem I use microfinish for a lubricant. I use this on stainless steel and cuts like butter so works well with other metals as well. Have also used Tap Magic as well.
When my father and I were in the machining business we would only use Alum-Tap for cutting threads as it was too expensive for general drilling although we would use it from time to time. We would use Kerosene as it was les expensive and readily available, at the time (Kerosene heaters were all the rage back then). We also used standard jobber drills, nothing special or fancy. The key to aluminum is keeping the bits cool.
 

Jarod888

Member
Joined
Mar 11, 2012
Messages
449
Location
Brighton, Colorado
For your pilot hole, use a starter or centering bit. They have a small diameter point which transitions into a 60 degree cone. They are very stiff because they are short, and only have a single cutting surface, so there are not flutes. Pick the size which is closest to your 10 mm bit. Drill in until you reach the straight part of the bit and stop. Change to your full size drill bit and peck drill (retracting the drill bit often to clear chips) with plenty of lubricant. Tap magic aluminum is great stuff, but you can use kerosene, or wd40 also.
You can pick up a set of starter bits at harbor freight for less than 10$.

Norseman are very good bits, I use them alot for pens. The harbor freight cobalt set is a great buy when you can use a coupon for it. Around 70$ for a full letter, number and fractional size set.
 

Charlie_W

Member
Joined
Nov 16, 2011
Messages
5,918
Location
Sterling, VA USA
In addition to the previous comments/suggestions, I would recommend using a collet chuck to hold your round stock instead of your 4 jaw G3.

Beall has very nice collet chucks. You can order either with 5 standard collets or chuck only. Some will just buy the chuck and then buy a metric set of collets ....for example, 2mm-22mm (by mm) and then be able to fit any diameter in that range without first turning the material to fit a specific collet.
 

Woodster Will

Member
Joined
Aug 25, 2017
Messages
118
Location
Dorset, UK
Best to start the hole with a spotting drill. Some folks suggest a centre drill but these are designed for drilling a hole to take a centre.
 

howsitwork

Member
Joined
Jul 9, 2016
Messages
2,299
Location
Thirsk
Centre or spotting f will work . With aluminium a centre drill allows you to apply a little pool of lubricant (WD40 is excellent or neat paraffin works) into the cavity formed by the tip. This then allows you to have lubricant right at the cutting edge as you start to enlarge the hole.

Frequent removal and lubrication with slow speed is the way to go. If you have a collet chuck available use it.
 

leehljp

Member Liaison
Joined
Feb 6, 2005
Messages
9,314
Location
Tunica, Mississippi,
You guys are head and shoulders above me, but I jumped for joy when I discovered DeWalt Cobalt pilot point bits for a few jobs that required some precision drilling from my lathe. I was ecstatic with those and some Tap Magic. I also added an hand wheel on my Grizzly lathe that came without one - but was tapped for one. I needed to drill a hole through the hand wheel to use a tap rod to get the MT out when needed. The Dewalt was excellent, precise, centered and did not skate.
 

Chip Meister

Member
Joined
Jan 22, 2020
Messages
4
Location
Houston, Texas
Thank you everyone for your replies. I'm sure I'm really going to enjoy this forum as I just got him back into pen turning after many years where I used to have a Shopsmith. I love the Nova Comet II and I'm looking forward to going beyond the 7 mm slimlines that I have made so far. Again, this may not be the right forum for this post but I wanted to share my results of my three-quarter inch turned 6061 aluminum rod.

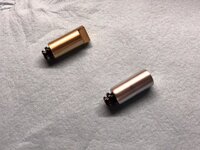
Again, I'm trying to replicate a part that Lee Valley Sells. They are called "prairie dogs" and they are basically a brass bench dog that hides just under the surface and then with a downward press, the magnetic latch allows the dog to pop up about 3/8 inch. This amount is adjustable with the latch itself. These dogs will work with workbenches that have a table thickness of 2 inches to 2 1/2 inches. Mine happens to be 2-1/4" thick. I originally made blind dog holes approximately 2 inches deep. So in my case, I just drop in the dogs with the plunger against the bottom of the hole and adjust the screw mechanism slightly and they're perfect. If you have through holes, Lee Valley supplies a couple of small steel plates with each pair of dogs. These plates screw in underneath your dog hole and can swing out-of-the-way if not needed.

These are wonderful parts and I will supply the part number below. However, at $15 a dog, I decided if I wanted to have a quantity of them positioned around my workbench, it would be a good life project to turn my own. The little plungers are something that I was able to find online; they are exactly the same and cost about three dollars each. Again I'll put the part number below. I found the 6061 aluminum rod on eBay. The rod is under $2.00 for each dog. And then there's my labor at about $50.00 per dog. Ok, but it is a fun project!

So for those of you interested in reading on I will summarize the results of this project, of which I am quite pleased. This was the first time that I had turned aluminum and I learned a couple of things about it as I did so. I hope you will find this useful.

Turning the 3/4" Rod

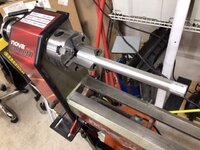
In my previous post I mentioned that I have a Nova G3 chuck. A couple of you rightfully suggested that I might get better results with a collet chuck. I plan to obtain a collet chuck perhaps in the near future. However, one thing that I didn't mention is that I have Nova's Pen Plus jaws on my G3 for this project. (Photo attached) Those are great for holding square blanks for drilling pens but they can also hold spigots or round rod up to almost 1" in diameter and up to about 9 to 10 inches long. The jaws did great and I have virtually no run out at the end of the rod. I should mention that the only time that the full rod was chucked up was at the beginning in order to get a nice finish on the entire thing and sand it down just a little bit so it fits smoothly in my dog holes. I was looking for about .745" diameter. For the tailstock, I used a heavy 60° live center which was easier to set into the end of the rod

Sanding and Finishing

My plan is to take the full rod at about 10" and do all my sanding and finishing at that point. I'm also reducing the diameter a little bit so that it fits the dog holes. This is much easier than first cutting up the individual dogs. Based on my experience in finishing the rod I have a couple of tips in case any of you want to work with this kind of aluminum rod in the future. I cut a couple of small pieces to test my finishes. To get a high gloss finish I used 100, 150, 180 and 220 sandpaper while turning at about 1500 RPM. I then applied Mothers Mag and Aluminum Polish at a pretty low speed and then buffed it out probably at about 1000 RPM or so. If you want a super brilliant finish, use the 2 inch micro mesh sanding pads and go through the entire 9 grits. The mirror finish will be extraordinary. After the micro mesh, I finished it with the Mothers polish. When I was done it looks like highly polished chrome plated steel.

To get a beautiful brushed aluminum finish, I went ahead and used the 100 through 220 grit sandpapers. I then switched to a green Scotch-Brite pad and finished it with a white Scotch-Brite pad. Note that if you want a nice brushed aluminum finish, you don't want to use something like the Mothers polish after the scotch bright pads as that will negate the brushed look and bring it back to a gloss. I actually prefer the brushed aluminum look as it barely shows fingerprints.

Drilling the Holes for Push Latches

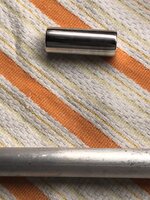
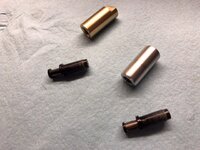
First I took my finished rod and cut it up into 1-5/8" long dogs. I happened to use a bandsaw for this but there are other methods. I then chucked these up One at a time in the G3 with its penpal jaws. This works very similar to chucking up a Pen blank prior to cutting a hole through the end of it. I used my nice Jacobs chuck on the tailstock. To start the hole I did use a #4 centering drill with a counter sink. I only drilled in with the small centering tip as I didn't go as far as the counter sink. Then I replaced the center drill with my 10 mm drill. As a matter of fact, the problem I was having that made me write you all in the first place was nonexistent. It turned out that my Festool 10mm drill bit was working just fine. I was working against myself yesterday by turning it at way too high of speed. Today I took my time, used cutting fluid, regularly cleared off aluminum chips and ran the lathe at 300 RPM. It took awhile to get a hole that was almost 1 1/8" deep but it takes a little while to drill aluminum properly. I was very happy with the results. The reason I am using a 10mm drill is because the magnetic push latch is a rather odd size. It is M11 x 1 mm. While this size is not the most common tap out there, I was able to find the correct tap and I'll give its part number below as well.

Tapping the Hole

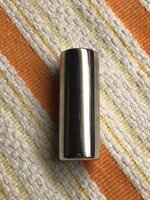
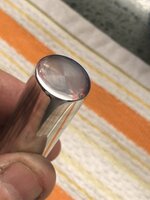
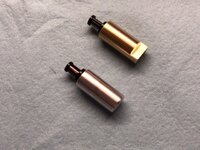
It was nothing special here. I just took my M11 x 1 mm tap in my tap wrench and carefully began to tap the hole. I left the piece in the G3 chuck so I was tapping horizontally. This actually was a comfortable position. As always with tapping, the first 3 to 4 threads are the critical ones as it sets you in the right direction. Again I took my time, use plenty of cutting fluid and worked my way through. All of this was done manually of course without the lathe on and I locked the indexing head stop. The results were great. I use compressed air and my vacuum to clean up the bench dog after I was done. I wanted to get the inside of the threaded hole perfectly clean because the small plastic threads of the push latch could easily cross thread otherwise. But everything worked fine and the push latch went on exactly as it was supposed to. After tapping I ran through my sandpaper grits and scotch bright pads to sand and polish the two ends of the dog. After obtaining the desired brushed aluminum finish, I screwed in the magnetic push latch and I was done! Note: in the pictures I have supplied the Lee Valley prairie dog is the brass color and has the flat on the end. The aluminum dogs (my version) showed up a little different color than the brushed aluminum that they appear in person. I chose to keep my dogs round.

Parts Used

100, 150, 180, 220 grit sandpapers
Green Scotch Bright Pads
White Scotch Bright Pads

Mothers Mag and Aluminum Polish

#4 centering countersink bit

10mm Bosch Cobalt Twist Drill Bits

Drill America M11x1mm HSS Plug Tap

Magnetic Push Latches from Westlund Distributing - $2.96 ea.

Lee Valley Prairie Dogs - $29.95/pair
 

Attachments

  • FC9AC54A-D62F-4C15-A2AD-FC4DD9AB8841.jpeg
    FC9AC54A-D62F-4C15-A2AD-FC4DD9AB8841.jpeg
    114.2 KB · Views: 155
  • 9B39B501-EE65-48DC-AB02-08E447FC01F7.jpeg
    9B39B501-EE65-48DC-AB02-08E447FC01F7.jpeg
    124 KB · Views: 178
  • 7736DE2D-6188-47C9-AF10-7AE12CD52819.jpeg
    7736DE2D-6188-47C9-AF10-7AE12CD52819.jpeg
    116.2 KB · Views: 161
  • C0551334-320F-4BD7-BA33-2146C4E10755.jpeg
    C0551334-320F-4BD7-BA33-2146C4E10755.jpeg
    117 KB · Views: 167
Last edited:
Top Bottom