Solarez Finish

Signed-In Members Don't See This Ad

keithncsu

Member
Joined
May 28, 2016
Messages
372
Location
Catawba, SC 29704
First attempts

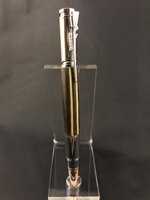
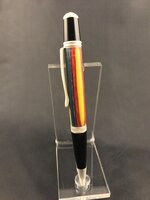
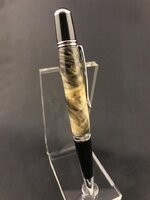
Got around to trying the solarez tonight. The two spectraply blanks were the first attempts. I did them simultaneously on the same mandrel. They didn't turn out quite as high gloss as I'd hoped. Next up was the stabilized buckeye burl. Made some adjustments from the first go round and it was definitely an improvement. Overall a much better option, for me, over CA. Only three coats of the thin hard version and it did not really affect the final dimensions all that much. Also, the $15-$20 flashlight from Amazon seemed to work fine in case others want that option rather than the $40 solarez light. Thanks to Tony for the initial R&D and help along the way!
 

Attachments

  • qgSBZ7M.jpg
    qgSBZ7M.jpg
    161.4 KB · Views: 285
  • fS4Ai2D.jpg
    fS4Ai2D.jpg
    170 KB · Views: 296
  • RkKy5wx.jpg
    RkKy5wx.jpg
    182.6 KB · Views: 362
Last edited:
Signed-In Members Don't See This Ad

jttheclockman

Member
Joined
Feb 22, 2005
Messages
19,140
Location
NJ, USA.
Got around to trying the solarez tonight. The two spectraply blanks were the first attempts. I did them simultaneously on the same mandrel. They didn't turn out quite as high gloss as I'd hoped. Next up was the stabilized buckeye burl. Made some adjustments from the first go round and it was definitely an improvement. Overall a much better option, for me, over CA. Only three coats of the thin hard version and it did not really affect the final dimensions all that much. Also, the $15-$20 flashlight from Amazon seemed to work fine in case others want that option rather than the $40 solarez light. Thanks to Tony for the initial R&D and help along the way!


Looks good Keith. Can you give us a little run down as to what product did you use?? How did you apply?? How many coats??? How do you think this stands up to a CA finish?? How about cost?? Is it that much higher cost?? Thanks.
 

keithncsu

Member
Joined
May 28, 2016
Messages
372
Location
Catawba, SC 29704
I used the thin hard version that Solarez/Wahoo sells. Applied it with a piece of foam craft paper. 3 coats on each pen. Used a drop about the diameter of a green pea per coat.

My attempts are not as high gloss as CA but I'm sure with more tweaking I can get closer. I prefer this to CA based on no fumes, not as much buildup in my opinion, and you have as much open time as you need since you control when it cures.

I opted for the middle sized bottle for roughly $25 including shipping. It should last a good while. Not sure how more to quantify that or how it would compare to a standard bottle of CA.
 
Last edited:

TonyL

Member
Joined
Mar 9, 2014
Messages
8,915
Location
Georgia
Thank you Keith. I just finished another one tonight. I will lightly sand and buff tomorrow - just too tired to finish now. You can easily get it to shine to a very high gloss using a buffing wheel (or MM and some plastic polish). In the beginning, I was applying only 3 light coats and they were somewhat lumpy so I probably sanded most of it off creating a satin finish.

Tonight, I tried 7 coats...no more than 3 drops per coat (on an Executive).
When I cured the final coat, I wrapped it in Saran Wrap and hit it with the uv light again for a few seconds. This overcomes some of the oxygen inhibition that I wrote about and we discussed. The "key" for me is to apply smooth coats to reduces sanding (and removal of the layers). I use the craft foam like a squee-gee but didn't apply much pressure and made sure I hit the ends. Just like every other finish I tried...it takes a little practice. I sold a bunch with the Solarez finish. I don't have a problem standing behind it. It i strong enough for surf boards and fishing lures; it should be fine. Thanks for sharing your experience with it. It will be my finish of choice for now.
 

keithncsu

Member
Joined
May 28, 2016
Messages
372
Location
Catawba, SC 29704
Yea after the three coats I hit it with some 600 grit to remove the tacky and shiny spots. Then I wet sanded through the 12000 MM. Then hit it with some of the meguires plastx. Finally got a feel on that last one and think I can make it better. Definitely a viable option to the pens plus for me. Just depends on the blank and look i want now.
 

TonyL

Member
Joined
Mar 9, 2014
Messages
8,915
Location
Georgia
You may want to give 5 to 7 smooth coats of 3 drops each a try remember you can play around with it until you hit it with the uv light. You probably achieved a satin or near-gloss finish because of over sanding..otherwise it does furnish a high gloss finish. After your last coat, just leave it in the sun for minute. The tackiness is just on the very surface of the last coast (on the oxygen-Solarez interface).

If I wasn't so lazy, I would make a video.
 

keithncsu

Member
Joined
May 28, 2016
Messages
372
Location
Catawba, SC 29704
Made a few more attempts with Solarez with better success. Until tonight. Not sure what I'm doing wrong as the finishes still aren't high gloss. Pretty sure I'm doing something wrong in the sanding to remove the tacky finish.

Tonight I tried to sand less just in case I was over sanding. After I sanding I wet sand with MM. Between each grit after wiping away the slurry, I could just see it immediately turn a matte finish. Did it all the way until the last few grits. Slight shine when done. A couple of coats of Plastx made it good and shiny but of course once the Plastx wears it dulls again.

Tony, what does your blank look like after sanding? Is it starting to turn white like an acrylic does? Do you sand until even a hint of tacky is gone? I left a very small tacky feel tonight thinking I was over sanding.

If I can't get the hang I may try the ultra thin that advertises no tacky layer. Not as cost effective per pen though...
 

TonyL

Member
Joined
Mar 9, 2014
Messages
8,915
Location
Georgia
Call me tomorrow. Yes, it is white when I sand it. And yes, it is slightly tacky, but don't touch it with your fingers until after the final coat. I just bought a new uv light that I am trying out. The issue is the oxygen inhibition. You will experience the same with the ultra thin. I have it. They all need sunlight or a lot of uv. If you cover with saran wrap between coats , just as an experiment, you will achieve non tack results. Also give Gary of wahoo a call. Maybe he will tell you something that he didnt tell me. In fact, I owe him a pen.


Sent from my SM-G900T3 using Tapatalk
 

keithncsu

Member
Joined
May 28, 2016
Messages
372
Location
Catawba, SC 29704
Definitely not touching until after I sand. Wondering if my uv light isn't as strong as I thought. Could be just not curing all the way? I do most of my turning at night so haven't been able to try real sunlight yet. I'll reserve final judgement until mother nature has a say haha!!!

Also based on your response I may not be sanding all the way. If yours is white I could probably stand to go a little longer. I usually stop right as I see it change to white. I'll try that as well. I'll keep practicing for sure.
 

TonyL

Member
Joined
Mar 9, 2014
Messages
8,915
Location
Georgia
I have found 5 plus heavy coats to work best using the craft foam. I just sand until any ripples are removed , just like I would C A the key is to try to apply smooth ripple free coat to minimize sanding and product removal. U will find the sun to do a much better job. I will let you know how the new lamp works.

Sent from my SM-G900T3 using Tapatalk
 

leehljp

Member Liaison
Joined
Feb 6, 2005
Messages
9,327
Location
Tunica, Mississippi,
I have found 5 plus heavy coats to work best using the craft foam. I just sand until any ripples are removed , just like I would C A the key is to try to apply smooth ripple free coat to minimize sanding and product removal. U will find the sun to do a much better job. I will let you know how the new lamp works.

I have been keeping up with this thread and really like the promise that Solarez offers.

"I just sand until any ripples are removed"

I have seen comments similar to yours from others on finishes lately, and am kinda puzzled. Whether there are ripples or not, my immediate action after final finish applications is to make sure it is round, and that is done by using a scraper (for me). Applying finish in building up coats is not a guarantee that it is "round". If there are ripples, sanding them does not necessarily get them round, but a minute' touch with a scraper will.

This points to the fact that I do build up a finish to .003 or .004 over, touch with the scraper and then polish sand to size. But, again my point is sanding has not been the best way to get ripples "round", in my experience. However, I have seen reference to "sanding round" two or three times in the past few months.
 

TonyL

Member
Joined
Mar 9, 2014
Messages
8,915
Location
Georgia
They are very thin ripples in the Solarez. The version of Solarez that I am using is like medium CA, but it behaves differently. It can be applied without incurring ripples by using very thin coats, but then the applicator catches on the rotating blank. This is all experimentation at this point. The scraper idea may be a way. Thanks.
 

Dalecamino

Local Chapter Leader
Joined
Jan 2, 2008
Messages
14,572
Location
Indianapolis, In.
I have found 5 plus heavy coats to work best using the craft foam. I just sand until any ripples are removed , just like I would C A the key is to try to apply smooth ripple free coat to minimize sanding and product removal. U will find the sun to do a much better job. I will let you know how the new lamp works.

I have been keeping up with this thread and really like the promise that Solarez offers.

"I just sand until any ripples are removed"

I have seen comments similar to yours from others on finishes lately, and am kinda puzzled. Whether there are ripples or not, my immediate action after final finish applications is to make sure it is round, and that is done by using a scraper (for me). Applying finish in building up coats is not a guarantee that it is "round". If there are ripples, sanding them does not necessarily get them round, but a minute' touch with a scraper will.

This points to the fact that I do build up a finish to .003 or .004 over, touch with the scraper and then polish sand to size. But, again my point is sanding has not been the best way to get ripples "round", in my experience. However, I have seen reference to "sanding round" two or three times in the past few months.
Excellent advice Hank. I have to confess, this has never even come to mind, since I've removed my tool rest to apply CA, then go straight to wet sanding. You just changed my way of thinking. :biggrin: Glad I caught this. Thanks!
 

KenV

Member
Joined
Oct 28, 2005
Messages
4,720
Location
Juneau, Alaska.
Think negative rake or shear scraper for those miniscule shavings. These are the scrapers with honed edges and small turned burrs.

Stewart Batty and John Jordan are where I learned. Old tech back to days of turning ivory billard balls.

I use mag eyes, but those with better vision may not need it.
 

jttheclockman

Member
Joined
Feb 22, 2005
Messages
19,140
Location
NJ, USA.
You can remove ripples easily by sanding too. No reason you can not. Take a piece of sand paper and wrap around a solid wood block and approach the blank. When you get a dull look all around the blank it has to be round unless you have a a lathe OOR problem. At least this is the way I see it. My opinion and I must keep stressing this point or else the PM's start coming.
 

TonyL

Member
Joined
Mar 9, 2014
Messages
8,915
Location
Georgia
Think negative rake or shear scraper for those miniscule shavings. These are the scrapers with honed edges and small turned burrs.

Stewart Batty and John Jordan are where I learned. Old tech back to days of turning ivory billard balls.

I use mag eyes, but those with better vision may not need it.
I bought the one that you recommended. It can circumcize a gnat.

Sent from my SM-G900T3 using Tapatalk
 

TonyL

Member
Joined
Mar 9, 2014
Messages
8,915
Location
Georgia
Think negative rake or shear scraper for those miniscule shavings. These are the scrapers with honed edges and small turned burrs.

Stewart Batty and John Jordan are where I learned. Old tech back to days of turning ivory billard balls.

I use mag eyes, but those with better vision may not need it.
Where do I get the mag eyes please?


Sent from my SM-G900T3 using Tapatalk
 

KenV

Member
Joined
Oct 28, 2005
Messages
4,720
Location
Juneau, Alaska.
Think negative rake or shear scraper for those miniscule shavings. These are the scrapers with honed edges and small turned burrs.

Stewart Batty and John Jordan are where I learned. Old tech back to days of turning ivory billard balls.

I use mag eyes, but those with better vision may not need it.
Where do I get the mag eyes please?


Sent from my SM-G900T3 using Tapatalk


Wal-Mart or Amazon are good sources

Mag eyes (or mageyes) are light weight headband magnifing assistance with interchangable lens inserts for different magnifications. Easy to wear and work with better face shields (or without).
 

TonyL

Member
Joined
Mar 9, 2014
Messages
8,915
Location
Georgia
They all self level on flat surfaces. And the thicker stuff self levels at 160 I haven't tried any slower. The issue is have to light wrap it with saran wrap so it cure hard without the oxygen inhibition. No matter how gently you apply the saran wrap, it spoils the leveling.

Sent from my SM-G900T3 using Tapatalk
 

TonyL

Member
Joined
Mar 9, 2014
Messages
8,915
Location
Georgia
No worries. And no need to ask when to call

Sent from my SM-G900T3 using Tapatalk
 

BRobbins629

Passed Away Dec 28, 2021
In Memoriam
Joined
Mar 8, 2006
Messages
4,037
Location
Richmond, VA, USA.
Just tried some thin hard building up over a snake skin at about 5 rpm. Seemed to work ok, but for me would probably prefer something a little lower in viscosity. I let it rotate for quite a while hoping to get a little more level. Once it gets a little warmer I will get into the shop and sand it round. Shows a lot of promise for many of the things I want to try. Thanks for bringing to our attention.
 

TonyL

Member
Joined
Mar 9, 2014
Messages
8,915
Location
Georgia
Bruce and I are using this now and experimenting with different application processes. I am using their Thin Hard formula and find that two coats applied with craft foam or a disposable brush work very well. We have also experimented with CO2 and different lighting " systems"while applying the finish to perfect the cure. It is not needed but makes for a super hard finish. Without the CO2, I have to sand a little more, but can still achieve a CA-like finish.

There are a handful of turners here that use a different Solarez product and report excellent results. I have not been able to achieve those results unless I use the process that I practice.

I just finished a pen with it on Thursday and mailed it to a fellow turner. It is a surprise, so I don't want to post the picture. He should receive it tomorrow.

It is my opinion, that if applied "right":
- It is more durable that CA (this is just anecdotal...I have dropped a barrel from a height of 7 feet and did not scratch it).
- Takes less time because only 2 or 3 coats or used with significant build-up and ostensibly less sanding - but must be applied right (not unlike a CA finish).
- It takes on a high gloss shine, but must be buffed or whatever system you use, very well; it is very hard.
- The cost is about the same as a decent quality CA when purchased in the 4 ounce size but you save on labor/time.
- You don't have to worry about water - the product is hydrophobic.

I can publish what Bruce and I are doing now, but I am still trying different approaches and would prefer to wait. However, I would be delighted to tell anyone over the phone what I do. It is no secret and just don't want it memorialized in an email until I am 100% satisfied that it is the best approach that I can practice. If I had a GoPro...which maybe I will buy, I would show folks what I do and what I am trying to perfect..maybe I wll buy one today.

I have used 4 or 5 of their formulas, and I like their Thin Hard product in the 4 ounce size the best from cost/finish/application perspective.

That's where I am..I really like the stuff. I have already given away half of my CA. I will still use CA, but starting to use it less often as a finish. I don't think Solarez will ever replace CA as a finish for the CA learning curve is shorter and it has a much longer proven track record. Just my 1/2 cent worth opinion.
 

leehljp

Member Liaison
Joined
Feb 6, 2005
Messages
9,327
Location
Tunica, Mississippi,
Tony,

I went to the web site and noticed another product called Matte Finish Doming Resin. While it is "doming" resin, it can be thinned with warming in hot water. My thoughts on the Matte is that it could be a finish for those who want or would consider a finish for protection but do not like the gloss.

Matte finishes make it more "woody" looking while giving protection. I don't think the majority of pen makers would like this but it does seem to be a possible option for those that want protection for the wood, want it to look more wood like and not be glossy.

Have you tried the doming? And what drawbacks do you see? Is doming Solarez a viable finish, in your opinion?
 

TonyL

Member
Joined
Mar 9, 2014
Messages
8,915
Location
Georgia
Thank you. I was told that by the owner/inventor that that would not be the right solution for me so I never tried it.
 

stuckinohio

Member
Joined
May 3, 2015
Messages
1,695
Location
Columbus Ohio
Tony,

Thank you for the response. I will surely try some, but might not be in the near future. I'll be watching this thread too now that I'm subscribed.

Lewis
 

BRobbins629

Passed Away Dec 28, 2021
In Memoriam
Joined
Mar 8, 2006
Messages
4,037
Location
Richmond, VA, USA.
My experience with Solarez Resins

A little over a month ago I made contact with Tony to get some info on his experience. Since then, the best thing I can say is I have a new IAP friend. Over the last 5 or 6 weeks we have talked, had video conferences, and attempted to collaborate on the best methods to apply and cure Solarez resins. While I don't think we're 100% there, I do believe we have come up with several techniques to create a high gloss, durable finish that when complete is at least equal to or even better than CA. Here are some of my observations, many of which are duplicates of Tony's.

1) Solarez Ultra thin: In terms of ease of use and quality of finish this would be my favorite. I have applied this on a slow speed turner with the small application brush supplied, and used a UV flashlight to cure while spinning. For most of the experiments I used 2 coats. Following cure, the surface was hard, but required a little sanding to be smooth enough for a pen finish. I used 220, 320 and 400 grit to smooth which left a matte surface. I followed with a Beall buff using TripleE, white diamond, and carnuba wax. The resulting surface was very hard and very high gloss.

There are 2 things about this coating that I didn't like. One was that is it not self leveling. With epoxy coatings on a slow speed turner, the epoxy will self level to the point that it is perfectly round. Not this material. The other is the cost and at this point only available in very small quantities (0.5 oz) for about $15. If this was priced comparable to their other similar coatings, I would not go any further.

2) Solarez Thin Hard: This is the material Tony and I spent the most time talking about. It is available in larger quantities and less expensive and therefore worth the time to make it work. It's downside is that the presence of oxygen on the surface inhibits the curing reaction. We both proved this by taking a small coated section and covering it with plastic wrap prior to UV exposure. After exposure and removing the wrap the underlying coating was very hard. Without the plastic wrap the surface has a tacky or rubbery feel even though underneath where the coating is protected from oxygen it is hard.

Our focus went to providing an inert atmosphere at the surface, exploring gases such as nitrogen and CO2. Not having ready access to either, and not wanting to invest a fortune in large scale equipment, we tried to develop a proof of concept with commonly used, low cost 16-20 gram CO2 cartridges. These hold between 8 and 10 liters of gas which should be enough to encapsulate the blank for the minute (typically much less) of total UV exposure.

At first we tried just blowing some CO2 over the blank while exposing to UV and had limited success. At least one trial gave a very hard surface and many yielded a surface that was still a little rubbery but much less tacky than in open air. All of these when sanded and buffed as above still left a very hard high gloss surface.

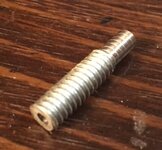
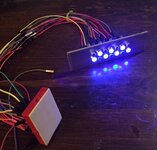
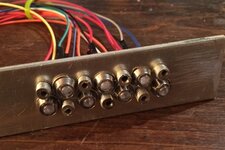
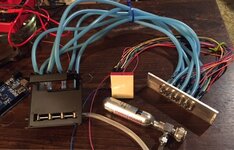
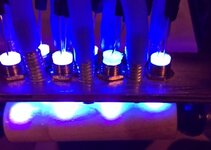
Being a gadget geek, I tried to see if I could make a system that would both provide UV light while providing a stream of inert gas. I made some nozzles from 1/4" threaded rod and mounted them along side some 395nm UV leds that i could mount over the blank. I've only made a few trials with this and wish I had a larger gas source, but It seems to work. The surface is not quite as hard as the plastic wrap experiment, but certainly harder and less tacky than when done without the CO2.

Bottom line: I'll probably be ordering more of both and can highly recommend if you want a high gloss surface.

Below are some picture of my experiments.
attachment.php

Nozzle machined from 1/4" threaded rod


attachment.php

LED bulbs hooked up and working; wired in parallel to 3.5V wall wart

attachment.php

Alternating LEDs and gas nozzles


attachment.php

Gas manifold attached to fixture

attachment.php

Fixture over blank
 

Attachments

  • IMG_0983.JPG
    IMG_0983.JPG
    29.8 KB · Views: 428
  • IMG_0984.JPG
    IMG_0984.JPG
    74.9 KB · Views: 459
  • IMG_0985.JPG
    IMG_0985.JPG
    56.7 KB · Views: 421
  • IMG_0987.JPG
    IMG_0987.JPG
    102.7 KB · Views: 438
  • IMG_0998.JPG
    IMG_0998.JPG
    52.2 KB · Views: 501

mark james

IAP Collection, Curator
Joined
Sep 6, 2012
Messages
12,751
Location
Medina, Ohio
Being a gadget geek, I tried to see if I could make a system that would both provide UV light while providing a stream of inert gas.

A gadget geek... Surely you jest Bruce! :giggle:

Edit: Kudos to both you and Tony! Some great knowledge documented here, as well as a fun project.
 
Last edited:

BRobbins629

Passed Away Dec 28, 2021
In Memoriam
Joined
Mar 8, 2006
Messages
4,037
Location
Richmond, VA, USA.
Bruce and Tony

Is the thin hard version so thin that a vertical orientation while curing isn`t practical ? Much easier to CO 2 flush the O 2 away that way .

Just ran a quick test. Its close. If you can do it quickly you may be okay. Not real runny, but seeing drops at the bottom.

Why do you think its easier to flush vertically? Any drawings? Just curious.
 

TonyL

Member
Joined
Mar 9, 2014
Messages
8,915
Location
Georgia
The Thin Hard will hold up (really down :) ) vertically in time for a cure.
It is really not that thin..it is between medium and thick CA depending on the ambient temperature. Even their more expensive Ultra Thin will stand up. Remember their product is used to repair surf board, so "thin" is relative. If you go to the Wahoo products site their MSDS posts the cp.
 

TonyL

Member
Joined
Mar 9, 2014
Messages
8,915
Location
Georgia
Being a gadget geek, I tried to
see if I could make a system that would both provide UV light while providing a
stream of inert gas.

Not being a gadget geek, I used 2 rubber bands to secure the CO2 cartridge and airline to the flash light. I will buy whatever you guys invent. :)
 
Signed-In Members Don't See This Ad

1080Wayne

Member
Joined
Feb 5, 2006
Messages
3,344
Location
Brownfield, Alberta, Canada.
Bruce and Tony

Is the thin hard version so thin that a vertical orientation while curing isn`t practical ? Much easier to CO 2 flush the O 2 away that way .

Just ran a quick test. Its close. If you can do it quickly you may be okay. Not real runny, but seeing drops at the bottom.

Why do you think its easier to flush vertically? Any drawings? Just curious.

I would try taking a CAB clear thin walled tube (the kind with a threaded metal cap) , glue a wooden 60 degree center to the bottom and a similar one to the cap leaving the appropriate distance between them for the pen barrel , hold the tube vertical , flush out the air with CO 2 and keep it vertical , apply Solarez finish to the barrel , insert it into the tube , screw on the cap , and apply UV .
 
Top Bottom