plans for a sled for tablesaw

Signed-In Members Don't See This Ad

WoodWizard

Member
Joined
Mar 16, 2009
Messages
84
Location
Racine,Wisconsin
Im wanting to do some segmented blanks...and would really like to keep ALL of my fingers! I don't have a band saw at my home, and don't feel like running 30 miles to get to the one I do have. So all I have here is a table saw. Does anyone have a set of good plans they made a sled off of?


Thanks
 
Signed-In Members Don't See This Ad

gketell

Local Chapter Leader
Joined
Dec 15, 2006
Messages
2,772
Location
Pleasanton, CA, USA.
This is from an email I sent out to someone a few weeks ago. I hope it helps others too.

---
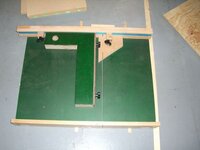
As for the sled, this is one that I threw together after my last one got left out in the rain by my son. It is based on info from numerous places. This picture shows it from the front so you could see the details of the T-track.

attachment.jpg


It is made out of 3/4" birch ply with red oak scraps as ends and sliders. I'm finding that it still isn't stiff enough so the next one will have box ends. (ignore the long strip on the right, that is just a piece of scrap under the sled).
I added the T-slot to the back to make it easy to adjust the rip fence. The rip fence itself is designed based on <http://www.davidreedsmith.com/Articles/VacuumRipFence/VacuumRipFence.htm>.

The black knob on the far left is the micro-adjust for the rip fence.

attachment.jpg


There is a 1/4-20 screw going through that block into the end of the rip fence. 1/4-20 means 1 turn is .05" and I marked the bolt with 5 even spaces so each space is .01" and I guesstimate between those. If I had a metal lathe I would make my own bolt so I could get finer threads.

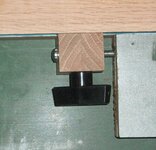
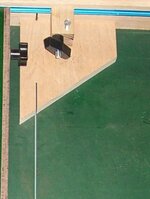
The angled block on the right is the cutoff sled cutting the actual inlay kerfs.

attachment.jpg


It is held tight to the fence by that vertical bolt. The end of the bolt is beveled and I drilled a beveled hole in the sled slightly too far out from the fence. When I tighten the bolt it hits the inside bevel of the counter-sink hole and pulls the cutoff sled tight. The angle is 37.5 degrees. I use the rip fence as a stop so that that each kerf is in the exact same place.

Lastly you asked about the specific blade. Originally I was using the LU96R010 which has a .091" kerf but it went dull and I couldn't find a exact replacement so the current one is the TK806 which has a nominal .098" kerf. Sadly mine has a slight wobble so my kerfs come out at .104". Just FYI, in case you didn't already know, Eagle always recommended the Freud 7-1/4" D0724 which has a .059" kerf. I just never wanted to put that on my table saw that I use for other stuff and I don't have a second saw.

Enhancements for the sled: I would make the back and front supports both taller and squarer (not a real word but you get the idea). I don't have a jointer so I used one piece of 1x12 red oak that I ripped in two, reversed the two pieces and glued them together with weights on my garage floor. They are "pretty straight" but not perfect. And, as you can see in the front one, I've almost cut through it already so it is no longer holding the sled flat. I would also use something better for the slides. The red oak binds more than I like. My last sled I used the UHMW plastic. It slid OK but was soft and wore out. Next time maybe Delrin. Lastly I would cut an notch at the bottom to catch sawdust. I currently have to blow it clear after every use or the sawdust affects the next cut.

Enhancements for the rip fence: I would make it taller. The knobs keep getting hit by the blade as I move the fence around. And I would use more of the 1/8" slices that hold the blank down. More to get the knobs further away from the blade. And I would figure out the longest piece I was ripping and only put air holes for that. I'm losing a lot of my suction through the holes in front of the piece being ripped. Oh, and I would find a way to use T-bolts in the base to tighten it to the fence. Right now I use a clamp. Lastly I would cut an notch at the bottom to catch sawdust. I currently have to blow it clear after every use or the sawdust affects the next cut.

Don't ever forget, turn off the saw before trying to reclaim your sliced segment. I got wayyy too close to the spinning blade for comfort once. It is worth the 2 minutes or so to shut it down, reclaim the wood and turn it on again.
 

Attachments

  • SawSled.jpg
    SawSled.jpg
    34.5 KB · Views: 3,650
  • SledMicroAdjust.jpg
    SledMicroAdjust.jpg
    63.2 KB · Views: 1,904
  • SledCutOffClose.jpg
    SledCutOffClose.jpg
    35.3 KB · Views: 1,908
J

jackrichington

Guest
Incra has a new product that would help you..parts to make all sorts of things for sleds and mitre stuff..grizzly & others sell the parts
 

WoodWizard

Member
Joined
Mar 16, 2009
Messages
84
Location
Racine,Wisconsin
what kind of track?

what do you think I should use for a slide track? This is a old skillsaw table..it has this little notch on both sides of the table
ts.jpg
 

randyrls

Member
Joined
Feb 2, 2006
Messages
4,829
Location
Harrisburg, PA 17112
This is from an email I sent out to someone a few weeks ago. I hope it helps others too.


Greg; I like your sled! You should create an article for the library.

One thing you might want to think of is a miter track and guide for the fence to keep it squarely aligned. The photo under "The black knob on the far left is the micro-adjust for the rip fence." shows the adjuster. If you made this longer, and added a knob to the bare screw head, you could adjust the fence kind of like the cross slide on a metal lathe.

I use a 7" circular saw blade on my TS when I need a minimum kerf. It isn't stiff enough for regular use, but I have no problem switching blades.

Incra sells adjustable aluminum sliders that are top notch in quality.

I may incorporate some of your ideas into my sled.

My sled is on the last page of this document:
http://www.coleman-family.org/Files/CelticKnotJig.pdf
 

rjwolfe3

Member
Joined
Feb 12, 2008
Messages
8,352
Location
Mansfield, Ohio, USA.
Keith,
I have that same problem with my Craftsman. I tried to make some jigs for it but those tabs kept messing everything up. I am now attempting to do everything on my bandsaw instead but I can't figure out a jig that will do segmenting.
 

WoodWizard

Member
Joined
Mar 16, 2009
Messages
84
Location
Racine,Wisconsin
Keith,
I have that same problem with my Craftsman. I tried to make some jigs for it but those tabs kept messing everything up. I am now attempting to do everything on my bandsaw instead but I can't figure out a jig that will do segmenting.
Im going to figure something out...like was said above...maybe making a jig that mounts over the whole table..( its not that big)
 

WoodWizard

Member
Joined
Mar 16, 2009
Messages
84
Location
Racine,Wisconsin
Keith,
I have that same problem with my Craftsman. I tried to make some jigs for it but those tabs kept messing everything up. I am now attempting to do everything on my bandsaw instead but I can't figure out a jig that will do segmenting.
Did you try making a sled that starts back behind the tabs? I just thought of that. The tabs on mine are only right at the start of the tracks
 

rej19

Member
Joined
Jul 19, 2008
Messages
821
Location
Indianapolis, IN
Woodwizard, I use a small craftsman table top saw for my segmenting that they no longer make. I then use the sled I made that I posted the link to in my previous post. I made wood runners that fit very close then I cut small slivers from a plastic sheet of material for shims. I glued those to the edges of my runners and it took out 100% of the slop. I waxed the runners and the slot and it works great. I bought a good quality thin kerf blade and it cuts great. I feel a whole lot more comfortable and in control of the blank with this set up than I did with a large table saw. Plus it only takes up about 18" square of my work bench. In my case space is a premium.
 

gketell

Local Chapter Leader
Joined
Dec 15, 2006
Messages
2,772
Location
Pleasanton, CA, USA.
same exact design, guys. just make your runners T shaped so the wide part goes under the tabs and the narro part goes between the tabs and the T is as tall as your slot is deep or a gnat's butt taller.

make your table wide enough to use both guide tracks. put in the right T-rail in with shims shoving it against the right side. put your left rail in with shims pushing it against the left side. set your sled down over the rails and screw through the sled into the rails. you will obviously need the pre-drill everything. now pull the the sled out (which will be tough since the shims are holding it). but once the shims are gone you know that the rails will hold everything square and snug since they have now slack anywhere.

gk
 

gketell

Local Chapter Leader
Joined
Dec 15, 2006
Messages
2,772
Location
Pleasanton, CA, USA.
If you made this longer, and added a knob to the bare screw head, you could adjust the fence kind of like the cross slide on a metal lathe.

yah, that would be good. in this case i just used what i had around. but the bigger the knob the more accurate and the greater the number of subdivisions you can have so instead og guesstimating to .003 maybe you could guesstimate to .0003. :biggrin:

gk
 

Paul in OKC

Member
Joined
Jul 26, 2004
Messages
3,093
Location
Oklahoma City, OK, USA.
same exact design, guys. just make your runners T shaped so the wide part goes under the tabs and the narro part goes between the tabs and the T is as tall as your slot is deep or a gnat's butt taller.

make your table wide enough to use both guide tracks. put in the right T-rail in with shims shoving it against the right side. put your left rail in with shims pushing it against the left side. set your sled down over the rails and screw through the sled into the rails. you will obviously need the pre-drill everything. now pull the the sled out (which will be tough since the shims are holding it). but once the shims are gone you know that the rails will hold everything square and snug since they have now slack anywhere.

gk

I have a small Ryobi that I am in process of making a sled for. Didn't bother with the T shape to fit the slot, just cut strips a tad wide and then sanded to fit the slots. Going to use both, as you said, and have the table be as wide as the table on the saw.
 

gketell

Local Chapter Leader
Joined
Dec 15, 2006
Messages
2,772
Location
Pleasanton, CA, USA.
hey don,

great simple sled! i also love your "taming the remotes" bucket. very classy. but perhaps this might be a better (and simpler to use) solution to the "too many remotes" problem:

830.1.0.jpg


http://www.logitech.com/index.cfm/remotes/universal_remotes/devices/377&cl=us,en#

one remote to rule them all. push "watch tv" and the remote will turn on the tv, set its input, turn on your cable box, turn on your surround sound amp, set its input, etc. then when you change channels it changes the cable box channel, volume up changes the surround sound system. no futzing with multiple remotes, no futzing w/ selecting whic devices to control for the fuction you want to change. push "watch a dvd" and it will turn off the cable box, turn on the dvd player, change the surround sound amp's input, change the tv's input, etc. great remote!!

((sorry for the thread hijack))
gk
 

DurocShark

Member
Joined
Jul 26, 2008
Messages
3,622
Location
Anaheim, CA
I have several of those, some quite expensive. None woth a cat turd pen. The only one that worked at all is the one that came with my dish pvr.
 
Top Bottom