Oops!! I think we have a problem here

Signed-In Members Don't See This Ad

byounghusband

Member
Joined
Oct 27, 2005
Messages
834
Location
Celina, Texas, USA.
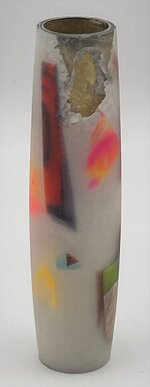
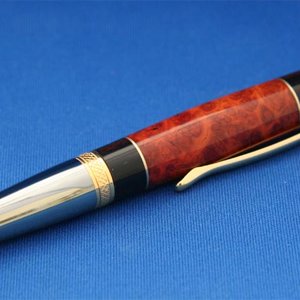
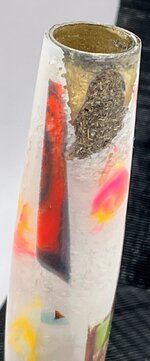
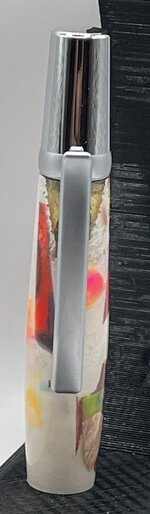
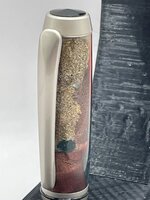
I got a Clear Alumilite Resin and cut offs blank from Jake Thompson. I made 2 Sierras out of it, well, one and this. I painted theinside of the blank, but the paint was either too cold or the epoxy and paint didn't get along. As I was turning it, I felt a strange spot on it, that I figure would turn away. Nope!! It lokes like with soft epoxy, or bad glue job, or I don't know. Anyway, This is what I have and I want to fix this. The repaired spot will live under the clip in the Sierra pen, but I need some ideas on the fix.
I have to make it more solid with thin CA, then:
1. more CA and wood dust
2. More CA and Key shavings from Home Depot. I fille din some voids in a pepper mill many years ago that turned out quite nice.
3. How about maybe UV Resin?? I have never tried that and thought it might be a possible fix with some material in it as well.

What do you think?? I just hate to see a good blank go to waste!!
 

Attachments

  • Blowout.jpg
    Blowout.jpg
    96.9 KB · Views: 147
Signed-In Members Don't See This Ad

1080Wayne

Member
Joined
Feb 5, 2006
Messages
3,344
Location
Brownfield, Alberta, Canada.
To my eyes , the key feature of that blank is the angularity and colour of the pieces . Even though most of it will be under the clip , I would be going through my collection of blank ends , looking for something I could make work . Key shavings would be better than wood dust . Have no experience with UV resin .
 

byounghusband

Member
Joined
Oct 27, 2005
Messages
834
Location
Celina, Texas, USA.
To my eyes , the key feature of that blank is the angularity and colour of the pieces . Even though most of it will be under the clip , I would be going through my collection of blank ends , looking for something I could make work . Key shavings would be better than wood dust . Have no experience with UV resin .
I like that idea too!! I knew that coffee can of scraps would come into play some day!!! Thanks!!
 

egnald

Member
Joined
Jun 9, 2017
Messages
3,144
Location
Columbus, Nebraska, USA
You could turn the blank down to the tube in the damaged area. Drill and glue on a cutoff of wood or other plastic blank. If you add some kind of thin separator material between them you would have a pretty standard kind of segmented blank. Good luck on your "save" — Dave
 

Bean_Counter

Member
Joined
Feb 27, 2013
Messages
960
Location
Lubbock, TX
Hate to say it but that blank is toast. if you keep it as a personal pen then go for the repair but I wouldn't try and sell it (not saying you are). Good luck and prove me wrong 😉
 

Dalecamino

Local Chapter Leader
Joined
Jan 2, 2008
Messages
14,572
Location
Indianapolis, In.
Do as Egnald says, but do the same on both ends so it looks like it is an intentional design. You'll be fine. I won't tell anybody.😁

As far as the reason for the blank coming apart, could it be a dull tool? I see a little chip at the top end that is still intact with the tube. Just a thought.
 

leehljp

Member Liaison
Joined
Feb 6, 2005
Messages
9,331
Location
Tunica, Mississippi,
Do as Egnald says, but do the same on both ends so it looks like it is an intentional design. You'll be fine. I won't tell anybody.😁

As far as the reason for the blank coming apart, could it be a dull tool? I see a little chip at the top end that is still intact with the tube. Just a thought.
Yes, Like one of my first segments:
Turned out good!
 

Woodchipper

Member
Joined
Mar 15, 2017
Messages
5,257
Location
Cleveland, TN
Segmenting covers a multitude of Oopsies. I had a pen that used the soft grip. Left off the soft grip, substituted a piece of solid pink acrylic and turned it. Would post if I could find the photo.
 

byounghusband

Member
Joined
Oct 27, 2005
Messages
834
Location
Celina, Texas, USA.
Well,
I finally took a crack at fixing the Blowout. I decided to go with my tried-and-true CA Glue and Key Shaving. It worked out, but I didn't get enough shavings in the spot. I flooded it with thin CA and watched it wick way under the blank, so I think my Epoxy job was the fault. I am able to hide much of it under the clip on the Sierra, so it will be a "my carry pen".
 

Attachments

  • BLowout Repair1.jpg
    BLowout Repair1.jpg
    134.1 KB · Views: 35
  • Blowout Repair Final.jpg
    Blowout Repair Final.jpg
    100.6 KB · Views: 36

byounghusband

Member
Joined
Oct 27, 2005
Messages
834
Location
Celina, Texas, USA.
And seeing that that blowout seemed to be a bad epoxy session on my part, here is the proof. This one was worse!! I had a blowout in the middle, Red Circle. I filled it much better than the Sierra and back on the lathe again. Got it turned down and CRAP!!! the blowout was bigger than expected. Green Circle. Filled it in as well and then back to the lathe. Got sanded to 600 and Oh MAN!! Another hole Red Arrow. I decided to use some powder and CA fort his one for a change of pace. Back to the lathe AGAIN!! Finally, I got it filled in and te clip on this Satin Nickle Barin will live another day.
I went inside after all that. I can take a hint!!

I need a lower end coupler for this pen to finish it, so final pics will come later.

I think I kinda suck at using 2-part epoxy and have never had these issues with Gorilla Glue, so I am probably gonna return to it as my go-to...
 

Attachments

  • BLowout 2.jpg
    BLowout 2.jpg
    282.1 KB · Views: 28
Top Bottom