My Way of Doing Pendants

Signed-In Members Don't See This Ad
See more from MrPukaShell

MrPukaShell

Member
Joined
Jan 23, 2008
Messages
361
Location
Simi Valley, CA, USA.
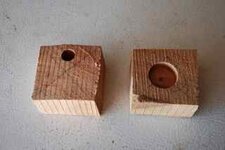
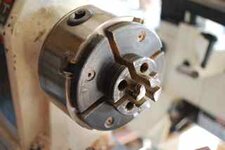
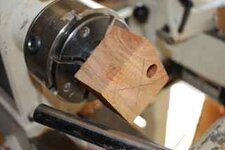
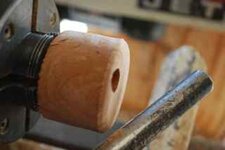
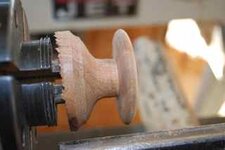
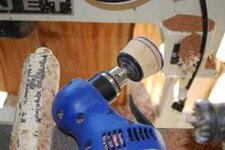
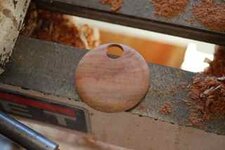
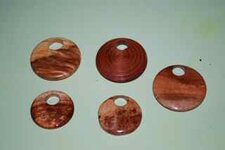
I have been doing pendants this way using scrap woods that I acquire along the way. Bowl scraps, "freebies" from the vendors and general stuff from around the shop. I start off with a piece of wood 2 X 2 X 1.5 +/-. I mark the center on each side and then use a compass to draw a circle. On one side I use a forstner bit and drill a hole about .5" deep in the center. On the other side I drill a 3/8 hole about an inch deep off center, usually about 1/4-3/8 down from the top of the circle. I mount it on a chuck with pin jaws and first turn it round. Then I do the face and round over the front edge. I then cut the back side and make the pendant the thickness I am looking for. I leave about a 1/2 inch tendon to hold the pendant to the body while sanding. I part it off with a parting tool and sand the back with a hand held drill with a sanding pad. A bath in wipe on poly and buff to a shine. I have put a few pictures together of the process so you could see what I was talking about. I really like the idea of the jigs with off center pin locations and the possibilities that go along with it. But this cost me nothing and like I said it is a great way to use up some scrap pieces. After you turn a few you will get the idea. I will usually mark up about 10 at a time one night and drill all of the holes. Next night turn and give them the bath. 3rd night buff and your done.

Comments welcome....
 

Attachments

  • DSC_0269.jpg
    DSC_0269.jpg
    9.3 KB · Views: 358
  • DSC_0272.jpg
    DSC_0272.jpg
    10.6 KB · Views: 357
  • DSC_0273.jpg
    DSC_0273.jpg
    10.5 KB · Views: 358
  • DSC_0274.jpg
    DSC_0274.jpg
    9.5 KB · Views: 347
  • DSC_0275.jpg
    DSC_0275.jpg
    9.7 KB · Views: 384
  • DSC_0277.jpg
    DSC_0277.jpg
    11.6 KB · Views: 403
  • DSC_0278.jpg
    DSC_0278.jpg
    10.8 KB · Views: 405
  • DSC_0286.jpg
    DSC_0286.jpg
    8.6 KB · Views: 503
Signed-In Members Don't See This Ad
Yet another way. Great work. Have you thought about parting off the pendants a little closer so you can get more than one from a piece?
 
That is neat, although does seem like a lot of wasted wood. Seels as thought you could part of 2 or 3 from that piece.
 
Apology for taking this off topic, but what brand of right angle drill are you using? I have been looking for one and cannot find them here in Japan. My get my daughter to get me one for Christmas.

Back to topic. I like the way you made the pendants! Great photos.
 
I got the drill off of ebay. In the catalogs and searches I was looking at the drills were always high dollar. I purchased the one I have for $20.00-30.00 dollars. I figured I could buy 3 or 4 at that rate. I have used it quite a bit and no problems as of yet. I would say 50 hours give or take of use.
 
That is neat, although does seem like a lot of wasted wood. Seels as thought you could part of 2 or 3 from that piece.

You are right about parting them off and I have done them that way. I did this one just to show how you and get almost the whole back done except the last kittle bit even with 1.5" thick piece of wood. With 2.0" piece I always get 2-3. For me it is more of a way to get rid of cut offs.
 
There is an article, TURNING OFF-CENTRE PENDANTS, in the August, 2009 issue of Woodturning (a GMC publication from UK). The author, John Lucas, uses stacks of veneer and removes two jaws of a chuck to shift the turning both up and down and out. Thus, the pendants are thick on one end as well as off-center.
 
Apology for taking this off topic, but what brand of right angle drill are you using? I have been looking for one and cannot find them here in Japan. My get my daughter to get me one for Christmas.

Back to topic. I like the way you made the pendants! Great photos.
you don't have to buy a right angle drill..you can get just the right angle and chuck it in the drill you have..I've seen for about 20.00 or so...
 
MRPUKA: thanks for taking the time to show your method & the very good pictures..your method thoughtful & cheap..I like it
 
Back
Top Bottom