Last year's Christmas project...

Signed-In Members Don't See This Ad
See more from TimS124

TimS124

Member
Joined
Apr 11, 2012
Messages
735
Location
Asheville, NC
My wife's side of the family draws one name per adult amongst her siblings and their families. Beats the heck out of figuring out something for each of them every year and it's much gentler on the budget as it saves a ton of shipping costs as they're spread out over multiple states.

Last year, I drew the name of her sister that had semi-recently taken up quilting. That gave me the incentive to finally try a project I've long wanted to do but always had an excuse to keep putting it off.

Turned out to be a great skill building project as it involves a bit of faceplate turning, a bit of spindle turning, a couple of tenons where a sloppy fit would really hurt…but none of it was particularly difficult.

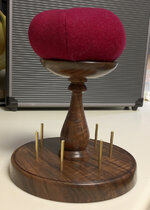
I started by making laser-cut templates for each part. That helped understand all of the shapes, but was generally overkill. The base template was the handiest as it made laying out the holes for the brass pins trivial.

The one in the enclosed picture is Walnut with boiled linseed oil and shellac. The wood was originally slated for a gunstock. A local lumber supplier had a bunch of rejected gunstock blanks about ten years or so ago. They each had a knot or some other problem that got them rejected. For about $10 each, I snagged a few and tucked them away for some day. I think this was only the second one I've cut into...

My wife (thankfully) helped me with the sewing of the pin cushion that sits on top. I also made one in Maple for her but had to sew that one's pin cushion myself so it would be a surprise…that pin cushion has more "character" than the one she helped with. :laugh:

I have a request/order for another one of these but it needs some changes to accommodate slightly different needs. I have the changes figured out but haven't gotten that far down my to-turn list…probably after the holidays.
 

Attachments

  • Shaker pincusion Dec '12.jpg
    Shaker pincusion Dec '12.jpg
    302.5 KB · Views: 308
Signed-In Members Don't See This Ad

TimS124

Member
Joined
Apr 11, 2012
Messages
735
Location
Asheville, NC
Nice idea, Tim. May I assume the brass pins are to hold thread spools?

Yes, sorry, I should've mentioned that (or posed a spool of thread on one). The photo was a quick phone-grab before I packed and shipped it off. I was close to not getting it shipped on time.

The one that I mentioned is still pending is supposed to be taller and have taller spool posts. The customer makes custom beaded jewelry and wants to be able to stack more bobbins on the posts so they need to be taller.

I'll likely add at least one more brass post in addition to making them about an inch taller.

She also wants the pin cushion smaller since she uses only a few needles. That should work well with keeping the piece's original perspective since it shrinks the top slightly as it gets pushed about 3/4" of an inch higher.

The real "fun" comes in spreading the extra height cleanly across the wooden post. That might take a few tries...
 

skiprat

Passed Away Mar 22, 2022
In Memoriam
Joined
Oct 19, 2006
Messages
7,812
Location
In a Skip in Wales
Ok, I've got to ask......how does the 'draw one name' thing work? It sounds like you each agreed to only buy gifts for the one you each picked (randomly?) Cool idea!!
With our two youngest now in uni, we've had to impose a budget. Max £50 between missus and me, a fair amount from us to them and only max £10 from them to us.Extended family is proving difficult......:(
 

Snowbeast

Member
Joined
Oct 5, 2010
Messages
173
Location
Killeen, Texas
Tim,

Very nice idea. I've been looking for some things for the wife person and this should fit the bill fairly well.

One quick question, though. How did you attach the pin cushion to the wood stand?

Thanx

TonyB
 

TimS124

Member
Joined
Apr 11, 2012
Messages
735
Location
Asheville, NC
Ok, I've got to ask......how does the 'draw one name' thing work? It sounds like you each agreed to only buy gifts for the one you each picked (randomly?) Cool idea!!
With our two youngest now in uni, we've had to impose a budget. Max £50 between missus and me, a fair amount from us to them and only max £10 from them to us.Extended family is proving difficult......:(

All of the names of the adults on her side of the family go into a hat. Her mom, stepdad, sisters, brother, brother-in-law, sister-in-law, me, and any adult kids…three generations of adults! :)

One person coordinates it all (this year, my wife handled it). She tells each person which name they have and that's the ONLY name (other than their own kids/parents) they provide a gift for.

There's a suggested limit of $30 and a suggestion to make something or buy from a local maker (though that's less commonly followed than the price limit). :big grin:

Our kids are also in college these days and we had the youngest in the three generations. In all, about a dozen names are in the hat so the savings can be pretty good especially factoring in not having to ship as many presents around.
 

TimS124

Member
Joined
Apr 11, 2012
Messages
735
Location
Asheville, NC
Tim,

Very nice idea. I've been looking for some things for the wife person and this should fit the bill fairly well.

One quick question, though. How did you attach the pin cushion to the wood stand?

Thanx

TonyB

Great question. I've never handled an original, I've not seeing decent descriptions of the cushion-to-stand attachment in the few antiques I've seen posted online, and there's no mention of it that I can recall in the book that had a measured drawing.

So, I made something up and it worked OK. There's a tiny, brass screw eye threaded into the top of the post. I countersunk it to make it as low as possible (probably could've skipped countersinking but wanted to be overly cautious as that was my first completed one).

The pincushion itself is globe-shaped. I use a long needle and heavy thread, coming up from the bottom of the pincushion, through the top, through a button, then back down through the pincushion….repeated at least once more.

That's all threaded through that brass screw eye and I tied it off under the pincushion. The cushion gets compressed when the thread is tightened (it helps to have a third hand that can keep some pressure on the top of the button).

The compression wants to springbuck after your hands are out of the way…which keeps the pincushion seated…covering the tiny hidden screw eye.

I used an odd little green frog-shaped button to add a touch of humor. I also found some nice ladybug buttons and others that I like better than just a boring button.

You could wrap a domed button in a scrap of the fabric used on the cushion itself but I like the contrast of something a bit whimsical on top.

I suppose the cushion could simply be glued in place but that's much messier if it ever needs to be replaced and I'd still need to do something to change the cushion's shape from a sphere into the traditional tomato-ish shape.

Tim S.
 

TimS124

Member
Joined
Apr 11, 2012
Messages
735
Location
Asheville, NC
Couple other notes on making these efficiently…

The post has a 1/2" tenon on each end. When I prepped the base and top cup for turning, I drilled a 3/8" hole…perfect size to thread a woodworm screw into which I held in a 4-jaw chuck.

The top is sort of a mini-bowl shape…scooped out inside though it tapers faster than the outside so that the walls thicken intentionally towards the center.

The woodworm screw stuck out a bit too much when I flipped the top cup around to shape its outside. So I made a simple plug/spacer that kept it out a bit without making it wobbly. It takes longer for me to explain than it likely takes to just space it and turn the outside.

After I've shaped, sanded, etc the base and top cup, I turn the spindle.

Notice I didn't jump right on drilling the base and top cup's holes to 1/2"! If I mess up the tenons and get them a bit undersized, I can try a 7/16" hole for the base or top. So far, I haven't needed to do that, but it's worth holding off on the center holes until you have the tenons dialed in.

I suggest drilling the holes for the brass pins before assembling the components! I set my drill press to stop 1/8" or so above its tables, marked the holes from a template, and knocked 'em out quickly.

If you assemble the post to the base before you drill, you might need a longer bit to be able to drill past the top cup. An easy mistake to make on your first one.

You can finish the three components individually before assembly if you're careful not to get oil or finish into the holes (another reason to not drill those prematurely). Keep the tenons clean too of course.

Prefinishing the parts makes it easier to wipe up any glue squeeze out after assembly.

I rounded both ends of the brass pins before assembly. They'll insert easier (I used a fairly tight hole) and you don't have to worry about pressing in the wrong end.

You can find a measured drawing of all except the pincushion (and how it attaches) in one of the three volumes of "Shop Drawings of Shaker Furniture & Woodenware". My copy of those books is somewhere around here (not sure where at the moment) so I'm not certain which volume has that one…I can track it down eventually if needed.
 

SDB777

Member
Joined
Feb 6, 2010
Messages
6,620
Location
Cabot, Arkansas USA
This was the name you drew from last year for this years gifting...or the item you had made for last years gift?


From reading the #1 posting, you used several different pieces to make this...is it all tenon/mortise assembly? Glued or something else?


Scott (purty neat) B
 

TimS124

Member
Joined
Apr 11, 2012
Messages
735
Location
Asheville, NC
This was the name you drew from last year for this years gifting...or the item you had made for last years gift?


From reading the #1 posting, you used several different pieces to make this...is it all tenon/mortise assembly? Glued or something else?


This was made in late 2012 for the name I drew for that year's gift. Since Christmas is looming large again this year, it was on my mind which reminded me to share the photos. :)

It has three wooden pieces:

- the base (about 6" diameter with a 1/2" diameter hole/mortise in the center)..turned like a bowl/plate (grain perpendicular to lathe's long axis)

- the top cup (2+ or so in diameter with a 1/2" diameter hole/mortise in the center)..turned like a bowl/plate (grain perpendicular to lathe's long axis)

-center post with a 1/2" diameter tenon on each end…turned with the grain running the length of the lathe's long axis (spindle turned)

The exposed part of the center post is a bit more than 3.5" (not counting the tenons).

The tenons were turned to a snug fit (but not so snug that they'd scrape out all the glue during assembly). They're just glued in place. No cross pins, no wedges to spread the tenon (a chair-maker's technique that would be overkill for something this simple).

The original drawing in the book I mentioned shows the bowl-turned pieces were originally about a half inch thick each. The center post's maximum width after turning, in the original measured drawing, looks to be about 1.5" diameter. Despite being a measure drawing, that dimension is NOT given (but the drawing includes a scale so any missing measurement can be quickly estimated).

Tim S.
 

TimS124

Member
Joined
Apr 11, 2012
Messages
735
Location
Asheville, NC
I found the book that had the original drawing. It's Volume 1 of Ejner Handberg's "Shop Drawings of Shaker Furniture & Woodenware". Page 75 has the measured drawing that I started with…I wouldn't call my version a precise copy.

I suspect the original turner(s) didn't bother with verify most of the measurements as they went. There's no real need to do that! Only the two tenons really matter…as long as they fit snugly in the base and top cup, everything else is a matter of taste/style/design.

I tediously laid everything out on the first one of these…and figured out right after I'd turned the prototype that I was wasting a great deal of time and effort.

Most of the components of the center post can be estimated based on the tool being used to shape them…a parting tool marks the shoulders of the tenons and its width can easily be used to judge where the next couple of shapes start…leaving just the sweeping s-curve in the middle which seems to vary in the few antiques I've seen online.

The center post is a bit more ornate than I would normally expect for a Shaker piece...
 
Top Bottom