HELP!!!

Signed-In Members Don't See This Ad

knitewriter

Member
Joined
Dec 26, 2011
Messages
33
Location
Durham, NC
OK, so I am still fairly new to the CA finish to pens, and I am looking for pointers. I have tried it on about 5 or so pens so far, and only one of them makes me slightly satisfied. I am currently using a medium thick CA with a BLO/CA application placing around 5-8 layers. The problem that I am having is that the shine seems to disappear and it just looks like the wood by itself. Should I use some kind of wax/buffing composition? Should I let it sit overnight and fully cure? Trying to figure out how to get that great quality I hear from everyone that uses the CA finish. :confused:
 
Signed-In Members Don't See This Ad

D.Oliver

Member
Joined
May 10, 2011
Messages
3,531
Location
Faith SD
You may not be getting enough coats of CA on, or rather you may be sanding through the layers that you had on there. Use a light touch with the sand paper.
 

Jim Burr

Banned
Joined
Feb 23, 2010
Messages
3,060
Location
Reno, Nv
What Derek said plus!!..
Start with a couple to four of thin to get a good base and penetration. You'll hear arguments about BLO...many of us leave it out, many leave it in. Then move up to the med CA for several coats. At any point here, see about knocking it down with a bit of 0000 steelwool and build from there! Remember your bushing tolerances and turn the ends for your style or skill level. Wet sanding..IMHO is best...at that point you have a huge layer of CA so might as well use the MM's and a pan of H2O to bring it out and make it smooth. Next...enjoy!!!
 
Last edited:

jmbaker79

Member
Joined
Dec 21, 2011
Messages
410
Location
Raleigh, nc
From a fellow wake county turner, and fairly new to pen turning. Usually go with a coat or two of medium, and then finish of with thin ca for as many coats as you please. Found that a very light touch with your MM seems to be the trick as to not sand through the ca coats. I like to hold the mm pads by the edge and let the flex they give be the only amount of pressure they receive. Still waiting to let one sit a few days before sanding, as it is always so close to finished I have a hard time waiting. I recently switched to using craft foam, to apply ca opposed to paper towels, after reading a post about it here on IAP. Seems to allow much more ca to contact the blank and seems to take a few less coats then before...
 

gbpens

Member
Joined
Jul 1, 2011
Messages
821
Location
Homer Glen, IL
If you are simply sanding through the finish it will be spotty, some dull areas some shiny. If the whole thing is dull you are either sanding the daylights out it or the BLO is dulling the finish. Try skipping the BLO and see what you get. Also, the finish sanding is best done wet, not dry. You will be happier with the result. Let us know how you over come the problem.
 

Haynie

Member
Joined
May 20, 2011
Messages
3,516
Location
Page Arizona
Practice on a scrap piece of wood. I found, when I had this problem, that I was getting a little too crazy with the sanding.

Does this happen before or after you sand?
 

knitewriter

Member
Joined
Dec 26, 2011
Messages
33
Location
Durham, NC
Thanks to everyone for the tips. I will try to leave out the BLO and see if that helps at all. Also, I have not been as vigilant as it seems I need to be about sanding with MM. That might be the issue.

The most recent piece that I have had this issue on was a piece of Lacy Red Oak. It looks (this is after a week of use) that the finish is non-existant. But I have another piece of Honey Locust that still has a shine to it; downside to that pen is there is a foggy/hazy look to it (probably from a bad HUT polish). I will definately keep y'all updated to my progress.

Thanks!
 

Carl Fisher

Member
Joined
Jun 7, 2011
Messages
2,761
Location
Cape Coral, FL
Ok, a couple of quick question before jumping to suggestions.

Is the shine disappearing BEFORE you sand? If so, do you stop with the application before it starts to grab your applicator (paper towel or whatever you use)? Are you applying BLO before or after the CA? Have you been using all the same type of wood and if so, what is it?

I've never been a fan of BLO, but many use it with various levels of success.

Now for the questions to ask if your shine is disappearing AFTER sanding. What grits are you starting and ending with? Wet or dry sanding? Is your sand paper coming off with a white slurry or wood colored sanding dust?

Answer any/all of those and you may get some more targeted answers that fit the issue.
 

knitewriter

Member
Joined
Dec 26, 2011
Messages
33
Location
Durham, NC
Ok, a couple of quick question before jumping to suggestions.

Is the shine disappearing BEFORE you sand? If so, do you stop with the application before it starts to grab your applicator (paper towel or whatever you use)? Are you applying BLO before or after the CA? Have you been using all the same type of wood and if so, what is it?

I've never been a fan of BLO, but many use it with various levels of success.

Now for the questions to ask if your shine is disappearing AFTER sanding. What grits are you starting and ending with? Wet or dry sanding? Is your sand paper coming off with a white slurry or wood colored sanding dust?

Answer any/all of those and you may get some more targeted answers that fit the issue.

To answer the big question -- both, so I will answer all questions. =) It is on different types of woods, so that might be some of my issue also. =/

Generally I stop with the application before it starts to grab my applicator (paper towles). I am applying a later of BLO on the blank, then CA for the first layer, then a dab of CA ontop of BLO (kinda stacked on my applicator) for every subsequent layer. As for my sanding habbits, I have mostly done dry sanding, but have attempted the wet sanding a few times, and haven't noticed a large difference, except on acrylic blanks. And the dust afterwards (when I actually do the MM sanding like I should) is generally white-ish.
 

D.Oliver

Member
Joined
May 10, 2011
Messages
3,531
Location
Faith SD
Do you have any local penturners that you could get together with? Watch how they do it and in turn they can watch your process and maybe iron out whats going on? I use BLO on some woods and I've found that "less is more" You need very little. Just a very small drop will suffice. Too much BLO can lead to cloudiness.
 

Lenny

Member
Joined
Jan 6, 2009
Messages
3,475
Location
Searsport, Maine
I eliminated the BLO from the process and haven't looked back .... Try it without ... then try it with it ... see which way works better for you.

Here is what I do ... Sand with the lathe running with 400/600/1000/1500 grit. After each grit stop the lathe and sand by hand the length of the pen, rotating the headstock by hand as you sand.
After sanding, dust the blank off and apply a little CA accelerator with a paper towel to clean the last bits of dust.
Slow the lathe down some to apply the CA glue. I prefer to drizzle it over the spinning blank, holding the paper towel underneath and making a few QUICK passes back and forth to smooth it out. Start with 2 or 3 coats of THIN. Then continue on with Medium. Occasionally hit it with accelerator, maybe every second or third coat. Keep adding coats ... 3 thin, 6 med. would be a minimum.... 10 -20 coats is much Better!! :)

Now, if you have a fairly smooth build of of CA you can go right to the MM pads. I use these, and cut them in half, saving one set for when the first wears out...
MicroMesh Soft Touch Variety Pack

(If things are a little rough, try just touching the spinning blank with a sharp Skew using a light touch).
After going through all the pads I follow up with a coat of Novus 2 ... wait for it to dry and then buff while spinning with a soft cloth. Next I polish with Meguiars PlastX ....applying it with a soft cloth at my lathe's highest speed applying a little pressure with the cloth between my fingers. Finally, I will sometimes but not always apply a coat or two of Renaissance Wax buffing it on the lathe with a soft cloth.

Adding this clarification: Initial sanding is done dry unless it is an acrylic or polyresin. Sanding the CA finish with the micro Mesh pads is ALWAYS done WET!
 
Last edited:

NYWoodturner

Member
Joined
Feb 17, 2012
Messages
82
Location
New York
I had never tried CA finish before I joined this sight. Finishes were what plagued me the most. I would spend days layering on coats of poly - letting them dry - sanding them back in pursuit of that perfect finish.
Then I read through the finish form and got the nerve to try. The game changing tip for me came from Padre: Using play foam as an applicator and eliminating the BLO. First try out of of the chute was probably the best finish I have ever put on a wooden pen. I will never use another finish.
(I am in awe of all of the knowledge shared on this sight...)
Try the play foam - its a game changer

Scott
 

knitewriter

Member
Joined
Dec 26, 2011
Messages
33
Location
Durham, NC
So, overall I wanted to thank everyone! I am going to get some foam and give this another try, that's after I give it a solid try without BLO and WET sanding thru the MM pads. One last question for the group....where should I use the buffing compound and the HUT Plastic Polish? Or should I leave these out completely? And also for wet MM sanding, should I soak the pads or just add water right before I sand?
 
Last edited:

ALA

Member
Joined
Jan 21, 2012
Messages
343
Location
Bassett, Va.
Lots of good advice here. There is probably a Woodcraft store in your area. They have free demos that could be really helpful. I watched a demo and was still having problems. I went back later for some supplies (kinda pricey) and was talking to one of the clerks about the CA finish. We went to their shop and he turned piece of wood and showed me how he finished with CA. Helped me a lot. I still have a lot to learn but I've come a long way...
 

tim self

Member
Joined
Oct 2, 2008
Messages
2,150
Location
Atoka, Oklahoma
So, overall I wanted to thank everyone! I am going to get some foam and give this another try, that's after I give it a solid try without BLO and WET sanding thru the MM pads. One last question for the group....where should I use the buffing compound and the HUT Plastic Polish?

I use it AFTER applied with a soft rag after the final sanding with MM.

Or should I leave these out completely? And also for wet MM sanding, should I soak the pads or just add water right before I sand?

Some use a bowl of water, Some use a spray bottle. I use the bottle simply cause I hate bugs and other junk in my bowl.

Tim
 

TerryDowning

Member
Joined
Apr 27, 2011
Messages
520
Location
Newhall, CA
I recommend using paper towels or something else that will tear away easily.

Do not use cloths or rags on your spinning stuff. The rag can wrap around the spinning bit and pull your finger in with it.
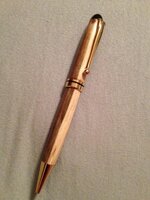
Here is my process
I apply CA to desired thickness depends on if I need to build up to desired thickness to cover up an overturning error or fill a void. Typically I apply 1 or 2 applications of thin followed by 6-8 applications of medium with a shot of accelerator between medium applications. I'm going to try the foam especially if it will save me on CA. Currently using 2-3 drops on a paper towel applicatior per application.

Once I have the thickness correct (measuring here I shoot for about .001 - .005 overbuilt) I start sanding.

I dry sand with 320 just until the surface is flat and the shine has been knocked off. (this is why dry sanding here) If you see shiny strands or lines, then you still have ridges and the surface is not flat. Sometimes I need to back off to 220 if the ridges are too big (too heavy a hand on the application or lots of CA from the build-up.) Don't forget to measure where the components will meet the blank after knocking the ridges off. You may need to add more CA or sand a bit more off to get the thickness right. It's a game of give and take to get the thickness correct, at this point the diameter of the blank should match the mating part.

Once the surface is flat and the right thickness, the remaining job is to progressively remove scratches (polish). I wet sand through 600 stopping between grits to sand along the axis of the pen and wipe off the previous grit. Don't overdo it here, you're just removing scratches not removing material. Some people do this by hand without the lathe running.

Next I use maquire's scratch X 2 (It's what I have on hand for getting scratches out of the car finish and works well) I have also used brasso with good results. I just us a drop or 2 on a paper towel. If I'm going for a satin finish, I'm done.

For a glossier finish, I switch to buffing along the axis of the pen. IMHO and personal preference buffing achieves a superior shine, is much faster, and way cheaper than the MM pads. Buffing wheels and compounds were $3-4 each at sears (I spent less than $25 for three wheels and compound which will last for years) I use a shopsmith so I can mount 2 wheels at once. There are tutorials for making a buffing mandrel similar to the beall triple buff for your lathe as well. There are also some nice tutorial videos at exotic blanks. http://www.exoticblanks.com/index.php?option=com_content&view=category&layout=blog&id=37&Itemid=66 How to #8 - Buffing
Some people only use the tripoli (brown) and white compounds. I added the blue as it is a true polishing compound is less greasy than the red and has no cutting action at all.

How I buff. I made a mandrel like the one in Ed's video to hold the blank against the buffing wheels.

I start with Tripoli (brown compound) on a sewn cotton wheel (stiffer than the flannel and provides some cutting action)
first use a cutting action pushing against the rotation of the wheel (usually the top of the wheel pushing away from you) this gets the last of the visible sanding scratches off of the pen. Makes sure all sides of the pen run against the buff. Don't push hard let the buffing wheel do the work.
Then use a coloring action moving the pen with the rotation of the wheel (the bottom of the wheel again pushing away from you)

Next use White Diamond (white compound) on a loose flannel wheel using a coloring action

Finally use the Blue Plastic compound on a loose flannel wheel using a coloring action.

Uses different wheels for the different compounds, apply compound sparingly, a little goes along way.

Buffing takes maybe 3 minutes including changing over the wheels.

This is how I do it and I like the results I'm getting YMMV.
 
Last edited:

leehljp

Member Liaison
Joined
Feb 6, 2005
Messages
9,314
Location
Tunica, Mississippi,
Some good suggestions already.

First of all, most people do use Paper Towel, so "new to turning" folks do to. I use it about 1/3 of the time but mostly use something equivalent to the foam that now seems to be gaining some popularity. (I use nitrile or rubber gloves).

The reason for "dull" after several coats is several fold.

Reason # 1 is because 80% - 90% of the CA is absorbed in the Paper Towel. NOT nearly as much goes on as one might think.

Reason # 2 is "pressure". Sanding pressure is a hugely relative term. More pressure and just a tad too much will sand off quickly what has been applied.

Reason # 3. IS Sandpaper Grit. Pens are not furniture, yet most people treat it like furniture and use far far too low a grit to begin sanding CA.

Reasons # 4, 5 . . . etc - Bad/Old CA, moisture, BLO and others. 1 in 100 or so (maybe greater or lessor odds) will have a specific problem due to those items that 99% will not, - It does happen.

Similar to Lenny, I rarely use BLO unless I want to emphasize the grain pattern in some cases. BLO is not as necessary as often perceived, and as always, the more complicated and items added in the more chances for something to go wrong.
 
Last edited:

knitewriter

Member
Joined
Dec 26, 2011
Messages
33
Location
Durham, NC
Ok, so I finally got out to my shop and gave some of this a try. To start, I still used a bit of BLO before my CA application so I could raise the grain and sand with 600 then go to the CA from there. For application I used some foam (as was recommended) put on 5 coats and then sanded thru MM 12000 grit. After that did a white diamond buff and applied HUT polish as a finale. I realized where I went wrong so many times and that was that here was not as much CA on the pen as I thought, and I also (since I have no accelerant) did not allow the CA to fully cure on a few attempts. Add in some patients and time and here is the pen I turned. (was some wood donated to me by a neighbor. Unsure of the type, but great for practicing my finishing technique)
 

Attachments

  • image-3852454056.jpg
    image-3852454056.jpg
    47.1 KB · Views: 215

knitewriter

Member
Joined
Dec 26, 2011
Messages
33
Location
Durham, NC
Finally Achieved!

OK, so I have finally seen, done, and understand the greatness that is the CA finish. =) Here is what I did, and what helped me to achieve that glass-like finish.

First things first 0.o I went out and bought some accelerator for the CA glue. It really does make all the difference for me. Trust me, it will be worth the $13 to get it.

So, after initial rounding and shaping, I sand the blanks from 100-600 grit paper. Depending on the type of wood, I may even go finer than 600, but that is the minimum I go to.
After that I lightly coat the blanks with some Boiled Linseed Oil to bring out the grain, then run 600 grit over again. From there I apply a coat of CA to the blank, rubbing a paper towel to evenly spread it. I spray to shots of accelerant on the blank, wait a few seconds, then put a second and third coat using the same method. After the third coat I sand down with more 600 grit paper to ensure the smooth finish. From there I add two more coats of CA(same method as before), followed by another sanding of 600. Once I have the desired number of coats/ shine on the blank, I begin wet sanding with the MM from 1500-12000. Once thru the MM I apply a white wax/ buffing compound and use higher speed to ensure that mirror finish.

Honestly, it was a lot of trial and error. I didn't want to purchase the accelerant, but I am really glad that I did. It has been a long process of trial and error, but I would like to thank all of you for the pointers and tips you offered.
 

Attachments

  • cedarslimline.JPG
    cedarslimline.JPG
    13.9 KB · Views: 195

deewaltguy

Member
Joined
Apr 20, 2011
Messages
3
Location
Maryland
I've just begun using ca as a finish, but I find the bushings are hard to remove from the tubes.
How have others solved this?

Thanks,

Pat
 
Top Bottom