I'm very new to pen turning, having recently completed my fourth pen. An ongoing issue that I am having is with my ca finishing. I use the lathe on its lowest rpm (500) to apply the ca. I drip about 3 or 4 drops while my paper towel is under the blank. Then I wait 1 or 2 minutes for it to dry. I did this 12 times then when I would sand (1500, 1800, 2400, 4000, 12000 grit) for about 30 seconds each blank. After I was done sanding, it seemed that most of the finish had come off. It was a very inconsistent sheen. I tried going to 15 applications and holding the wet sanding pad more lightly but this resulted in not getting it perfectly smooth (ca buildup in spots). Then I tried sanding more and the finish just came off again. Im not sure what to do

You are using an out of date browser. It may not display this or other websites correctly.
You should upgrade or use an alternative browser.
You should upgrade or use an alternative browser.
Help with ca finish
- Thread starter Andyww
- Start date
Signed-In Members Don't See This Ad
Signed-In Members Don't See This Ad
Skie_M
Member
After applying 12 layers of CA, wet sand at 1000 grit for around 10 - 15 seconds ... check to see if it's smooth and uniform in the scratch pattern.
Apply Plast-X or similar plastic polish, jump to high speed to buff ... turn off lathe to check scratch pattern again.
Apply 3 - 6 more layers of CA if needed (these should now go on VERY smooth).
Wet-sand with 1000 up to 12,000 micromesh for 3 - 5 seconds per pad ... use lighter pressure on the lower grits, medium pressure with the highest grits. Don't forget lateral sanding between you grits (lathe off, lightly sand in line with the spindle as you rotate the blank by hand to remove/break radial lines around the barrel).
Polish again with Plast-X or similar plastic polish, and check your results. Apply a wax top-coat like Turtle Wax Hard Surface or similar waxes, or buff with carnuba wax.
It would also help, if you want to sand down to a perfectly smooth finish, to start with applying Thin CA (to soak into the wood surface and fill in minor imperfections), and then switch over to Medium CA to build thicker layers, but you may have to wait perhaps 5 minutes between each coat.
Skie_M
Member
Just till it's dry to the touch (not tacky) ... if I feel the slightest tug, I know I messed up the surface and I need to do a quick touch up sand (wet 1000 grit) and apply a few more layers.
The thin CA likes to fill in 1000 grit (and similar grain size) scratches quite effectively. Your 1500 grit would work too, but I think 2000 grit wouldn't be quite aggressive enough in getting the major defects removed. Anything rougher than 500 grit would probably remove way too much way too fast.
Even if you have 12 layers built up, they are very thin ... remember that most of your CA actually ends up soaking into your applicator pad, unless you are using a craft foam pad or a little pen parts baggie, which won't soak up CA ....
If you use that method, you will want to use MUCH LESS CA per application.
I also use BLO (boiled linseed oil) just before the first application of CA ... helps to make it go on even smoother. My BLO comes from Minwax Stain'n'Seal (natural amber color). Helps to make the grain REALLY pop, and the CA application freezes it like that.
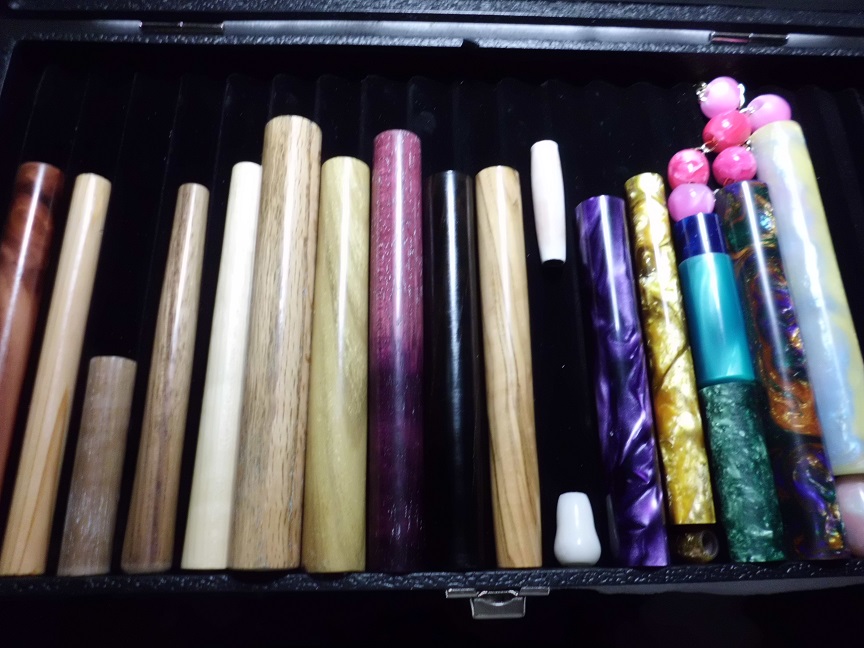
This is a picture of my Samples box. You'll notice that I turn a lot of blanks round, and then sand, finish, and polish them while they are still full length blanks. This helps my potential customers see what a finished pen may look like, and also helps me to streamline the process of making a pen ... it's already round, I just need to chuck it, cut to length, drill, ect ... I turn all my barrels round before cutting and drilling, so this does save me some time as well.
You'll see the finish results I get here from merely sanding up to 1000 grit (dry, bare wood), cleaning the wood (you see I didn't clean the one third from the left at all, I was in a hurry), applying my finish (minwax + ONE COAT of CA), wet sanding at 1000 grit (very lightly, under 5 seconds), polish with Plast-X.
The beads in the top right are all off-cuts from Breast Cancer Awareness pens.
The thin CA likes to fill in 1000 grit (and similar grain size) scratches quite effectively. Your 1500 grit would work too, but I think 2000 grit wouldn't be quite aggressive enough in getting the major defects removed. Anything rougher than 500 grit would probably remove way too much way too fast.
Even if you have 12 layers built up, they are very thin ... remember that most of your CA actually ends up soaking into your applicator pad, unless you are using a craft foam pad or a little pen parts baggie, which won't soak up CA ....
If you use that method, you will want to use MUCH LESS CA per application.
I also use BLO (boiled linseed oil) just before the first application of CA ... helps to make it go on even smoother. My BLO comes from Minwax Stain'n'Seal (natural amber color). Helps to make the grain REALLY pop, and the CA application freezes it like that.
This is a picture of my Samples box. You'll notice that I turn a lot of blanks round, and then sand, finish, and polish them while they are still full length blanks. This helps my potential customers see what a finished pen may look like, and also helps me to streamline the process of making a pen ... it's already round, I just need to chuck it, cut to length, drill, ect ... I turn all my barrels round before cutting and drilling, so this does save me some time as well.
You'll see the finish results I get here from merely sanding up to 1000 grit (dry, bare wood), cleaning the wood (you see I didn't clean the one third from the left at all, I was in a hurry), applying my finish (minwax + ONE COAT of CA), wet sanding at 1000 grit (very lightly, under 5 seconds), polish with Plast-X.
The beads in the top right are all off-cuts from Breast Cancer Awareness pens.
Attachments
Skie_M
Member
Boiled Linseed Oil is available from many big box stores as well as many wood shops ... I get mine in a half-gallon can from Wal-Mart, but I hardly ever use it... I like the Minwax, which I got in a 1-quart can over a year ago, and I haven't gone through a quarter of that yet. I like it a lot because it helps darken and deepen the wood grain, making it shimmer and sparkle (chatoyance), and as it's also a SEALER, it helps fill in the wood grain as well before the first layer of CA goes on.
edit - half a gallon of BLO from Wal-Mart was around 6 bucks, I think ...
the 1-quart can of Minwax came from McCoy's Lumber Company, cost me 11 dollars ... still well worth it!
edit - half a gallon of BLO from Wal-Mart was around 6 bucks, I think ...
the 1-quart can of Minwax came from McCoy's Lumber Company, cost me 11 dollars ... still well worth it!
Last edited:
Skie_M
Member
I don't wait at all ... I apply the CA over top of my Minwax IMMEDIATELY ... I even use the same paper towel applicator that I used to apply the Minwax.
There are methods that use alternating BLO and CA layers. BLO works just like accelerator.
Here are some videos.
https://www.youtube.com/results?search_query=pen+finish+BLO
Here are some videos.
https://www.youtube.com/results?search_query=pen+finish+BLO
Skie_M
Member
I hear a lot of people say that boiled linseed oil is an accelerator for CA, but I find that my first coat of CA can be put on quite leisurely ... takes perhaps 15 - 20 seconds before I'm in danger of having my applicator start to try to fall apart on me because the CA is seizing on the blank. My pure CA applications afterwards are all 3 seconds or less ... because at about 5 seconds it starts to seize, and I prefer to have a pristine look and smooth surface on my barrels and blanks.
It's something to do with the polymerization process that the BLO initiates in the CA, I think...")
It's something to do with the polymerization process that the BLO initiates in the CA, I think...
Dave Turner
Member
There are probably as many different methods to apply a CA finish as there are IAP members. Which one is correct? Whichever one works best for you.
I never use BLO prior to CA application. I tried it several times and it did not seem to make any difference, so I eliminated the step.
I prep my wood surface by sanding it to 400 grit (with the grain) and then wiping it with denatured alcohol (called DNA here on the boards). The alcohol is particularly important for oily woods, such as Cocobolo, where I may wipe it several times.
I use thin CA for my first coat. I just drip a few drops onto the blank while I rub below with a folded paper towel (I only use Bounty brand). For my next 10 to 12 coats, I use medium CA, placing a couple of sizable drops directly on the folded paper towel before applying it to the blank. I wipe in on with a light touch, the idea being to leave as much CA on the blank as possible with as little remaining on the paper towel as possible. I don't mind if I get a few small ridges or an irregular surface on the blank. It will sand smooth. If I get any really high ridges or focal high spots, such as from filling a focal low spot or two with a drop of CA (something I may have to do with some large grained woods), I'll use a skew on the turning blank with light cuts to finely shave the high areas down to the point where I can easily sand them away.
I tried using the little baggies and foam pads for CA application and this did not work nearly as well as paper towel for me. It did build up a thicker CA surface more quickly, so I use it for corncobs or other material where I need to fill in large irregularities on the blank.
I've found that the brand of CA makes a big difference. I use the Satellite City brand found at Woodcraft. I've tried a couple of other brands with discouraging results. I'm sure lots of other brands will work well- they just may vary on the technique you need to use with them. Find one you like and stick with it.
I also do a quick spray of aerosol accelerator between each coat of CA, which eliminates any waiting. Again, the brand and format of accelerator make a big difference. I tried a pump spray bottle and ruined several blanks. The pressurized spray can of NCF Quick works best for me.
Make sure you apply each layer of CA all the way to the ends of the blank. You don't want the ends to have a thinner CA coating. I usually start my CA paper towel wipe at one end and work towards the other, alternating which end I start with for each layer.
Once I have all 12 layers of CA on, I'll start my sanding with 300 grit dry sandpaper, sanding until all the irregular ridges are smoothed down giving the surface a uniform dull matte finish. If you still see a few shiny lines, you've not sanded enough IN THOSE REGIONS. These represent un-sanded CA hiding between some ridges. Take care not to over or under sand the ends of the blank. Stop using the 300 grit as soon as the surface is uniformly dull, with no shiny lines (I highly recommend you use magnification when examining your blank surface after wiping it down with a paper towel). If you have a persistent focal shiny spot or two when everything else is uniformly dull, this likely represents a focal low spot in the wood from the grain or a tiny defect. Rather than sand everything else down to this level, just add a small drop of medium CA to these holes, let it dry, then shave the excess protrusion down to surface level using a skew as described above. You should then be able to easily sand to a uniform dull surface.
Now its a matter of going to finer and finer grits of abrasive. I'll use 400 grit dry sandpaper, then proceed to the wet micromesh pads, starting with the Green (1800) one. You only need to sand until you've removed all the scratches from the prior grit. How do you tell? You use a magnifier to closely examine the surface. I've found it also helps, if needed, to do my final sanding with a grit along the long axis of the blank with the lathe off. This lets you easily see if any of these scratches remain after you sand with the next finer grit using the turning lathe (since the finer grit produces circular scratches around the turning blank whereas the prior grit's scratches will be longitudinal along the blank - any longitudinal scratches remaining means you must sand some more). Once you've made it to the Tan (3200) micromesh pad, you no longer have to worry about removing too much CA.
Again, this method works great every time for me. It may not work for others depending on their techniques or brands they use. That's what makes this craft so interesting.
leehljp
Member Liaison
I am a pragmatist. I can't for the life of me figure out why we use paper towel for applying CA. It wastes SOOOO much CA. I went that route for a couple of years until I realized how much I was wasting IN the paper towel as compared to how much was actually getting onto the pen.
Of course I was in Japan and CA was available only 1 and 2 oz sizes at 2 times the price of USA - that helped me come to my senses. CA should be used for finish, not making paper towel hard. And PT absorbs soooo much. PT does act as a mild accelerator.
Of course I was in Japan and CA was available only 1 and 2 oz sizes at 2 times the price of USA - that helped me come to my senses. CA should be used for finish, not making paper towel hard. And PT absorbs soooo much. PT does act as a mild accelerator.
Dave Turner
Member
Something else I forgot to mention. When I was starting out, I found a digital caliper to be very helpful. Measure and record the exact diameter of each end and the middle of your blank. Apply your CA coats, then remeasure these locations to see how thick your CA layers are and how uniform you are applying them. When sanding your CA, measure the diameters to see how much you've sanded off (and how much is left on) the blank. These measurements give you a good feel for how your techniques are effecting the CA coating.
Also, your goal should be to have the final finished diameter at the end of the blank at or slightly above (by a few thousandths of an inch) the measured diameter of the component you will be pressing into the brass tube. Frequent measurements of the diameter will let you develop your techniques so you know how low you need to turn/sand your blank so that the CA surface is left at the correct level. You can't rely on bushings for this.
Also, your goal should be to have the final finished diameter at the end of the blank at or slightly above (by a few thousandths of an inch) the measured diameter of the component you will be pressing into the brass tube. Frequent measurements of the diameter will let you develop your techniques so you know how low you need to turn/sand your blank so that the CA surface is left at the correct level. You can't rely on bushings for this.
GregMuller
Member
Craft Foam Pad
What is a craft foam pad?
What is a craft foam pad?
What is a craft foam pad?
Its the craft foam sold in well craft stores.
https://www.google.com/webhp?sourceid=chrome-instant&ion=1&espv=2&ie=UTF-8#q=craft foam
jttheclockman
Member
The one factor that stands out here is what CA are you using??? Is it thin or medium and what brand???
Everyone has a method and I am a towel guy and love it. It all about how you apply. I use 3 coats of thin and 5 to 6 coats of med and done. MM and polish and out the door.
There are litterly 1000000000's of threads on CA finishing here and the different methods. You need to find your own that works for you. I suggest you find some utube videos and they will show first hand those methods. I wish you luck. Remember right in your very first line of this post. 4th pen. There are people here doing their 40th pen and have not got a CA finish down yet. Do not get frustrated. Take notes of things you tried. It has now been suggested to use oil. There are ways of doing that also but to me not necessary. Good luck and have fun.