Finishing Alumilite

Signed-In Members Don't See This Ad

gablett

Member
Joined
Jun 29, 2022
Messages
14
Location
Michigan
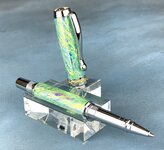
Looking for some input from anyone with experience working with this product. I've tried many, many different methods and they all work fairly decently but sometimes Im just not wowed by it and I wonder if I could use some better methods or improvements.

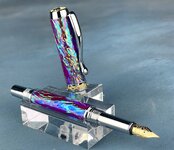
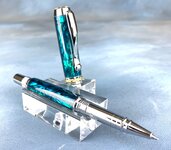
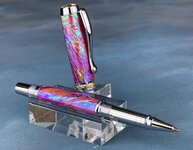
I've tried micromesh before and I just could not get a great finish. Maybe I'm doing something wrong with it but I get a better finish with sandpaper and buffing. Currently I wet sand with abranet from 400-600. Sometimes I drop to 320 if I feel the need. I then use wet sand paper to 1,500. Then I would buff using the Beall system. I recently added the 'buffing kicked up a notch" wheels with even finer grit compound from Caswell and then my final step is blue rouge and a clean wheel. I didnt notice a huge difference adding those two wheels but it doesnt take much time and if it improves the finish at all Im good with it. I get a very good finish, but sometimes its not perfect no matter how I try. I have tried using plastic polishes, Meguiars (110 and then 210), Novus, Plastx, and all the others and I can't get that same level of shine and I see no improvement when I use them after the aforementioned process.

It seems so many people use micromesh I second guess myself that I am doing something wrong and should be able to get a great finish with it. So I guess Im just having one of those self doubt moments and questioning my process. So if anyone wants to share any tips or what they use specifically with alumilite I would love to hear it!
 
Signed-In Members Don't See This Ad

1shootist

Member
Joined
Dec 2, 2018
Messages
818
Location
Frisco,Tx
Mequiars Plastx works very well on alumilite and is reasonably affordable at $8 on the net.

On sandpaper, Mirka goldflex soft works wonders on alumilite, ebonite, acrylic.
 
Last edited:

gablett

Member
Joined
Jun 29, 2022
Messages
14
Location
Michigan
I finish all my Alumilite using Magic Juice and get a very good shine.
Mike
I have tried this product once. I followed the instructions exactly and didnt get a very good end product. Not sure what I did wrong, as I have heard it does give a good result.
 

gablett

Member
Joined
Jun 29, 2022
Messages
14
Location
Michigan
So to update I decided to try Zona paper. So here is what I did.

I turn with sharp tools so I started with wet sanding 400 abranet, then 600, and then all the zona papers. It was actually a nice finish but far from perfect. So I tried a plastic polish and it improved it but still not enough. So I buffed with white diamond, then the 2 finer polishes from Caswell and then blue rouge. It was a 99% finish. Its still just not like glass. I mean its smooth as can be but if I look at it in my bright lathe light I can see small scratches. Maybe thats normal and most people wouldnt look at it under a high output LED light. But I see some pictures of finished products, which might not be alumilite because I can get a perfect finish with polyester but I hate working with it, that are like looking in a mirror glass smooth. Not sure what to do. But I am impressed with Zona much more than micromesh.
 

TDahl

Member
Joined
Dec 11, 2019
Messages
1,894
Location
Brentwood
I have used a combination of micro mesh and wet sand paper using every grit from 400 to 15000. I then used One Step plastic polish (Meguiars works well) the use buff with blue rouge followed by Ultra Fine and Fine polishes from Caswell (definitely need to follow that order even though it doesn't seem to make sense.) I have been happy with the finishes. Polyester Resin does give a glass like finish.
 

gablett

Member
Joined
Jun 29, 2022
Messages
14
Location
Michigan
I have used a combination of micro mesh and wet sand paper using every grit from 400 to 15000. I then used One Step plastic polish (Meguiars works well) the use buff with blue rouge followed by Ultra Fine and Fine polishes from Caswell (definitely need to follow that order even though it doesn't seem to make sense.) I have been happy with the finishes. Polyester Resin does give a glass like finish.
Im beginning to wonder if Abranet just doesnt mesh well (no pun intended) with polyurethane resin. Im going to switch to entirely regular wet dry sand paper. Which Meguiars product do you use? Yes I would have thought blue would be last. But I will be sure to give this method a shot as I have all of these products. Thank you.
 

JohnU

Member
Joined
Jan 31, 2008
Messages
4,956
Location
Ottawa, Illinois
There isn't a problem with your process. It's with the resin. It's hard to get a natural shine out of a softer resin like Alumilite Urethane resin. Harder resins like polyester resin (PR) shines up much easier with a micromesh finish. With softer resins you need to apply a finish like CA. This gives you something to polish to a nice shine.

I would suggest using a flexible CA. I prefer Gluboost because it's made to be used as a finish unlike most CA that are made for gluing. I don't sell or work for them, there product just works for me. Good luck and I'm sure you will get plenty of good advice to try.
 

KenB259

Member
Joined
Dec 24, 2017
Messages
3,576
Location
Michigan
There isn't a problem with your process. It's with the resin. It's hard to get a natural shine out of a softer resin like Alumilite Urethane resin. Harder resins like polyester resin (PR) shines up much easier with a micromesh finish. With softer resins you need to apply a finish like CA. This gives you something to polish to a nice shine.

I would suggest using a flexible CA. I prefer Gluboost because it's made to be used as a finish unlike most CA that are made for gluing. I don't sell or work for them, there product just works for me. Good luck and I'm sure you will get plenty of good advice to try.
Gluboost works well for me too, it's been my goto for about a year.
 

mmayo

Member
Joined
Jan 12, 2013
Messages
2,959
Location
Tehachapi, CA
I'm odd I guess but all of these pens shown are alumilite and none have CA or gluboost. They were sanded to 400 grit and buffed until an even shine developed using the first two buffing wheels of the Beale buff system.

If someone does not mix the alumilite correctly it hazes. I apply CA to those and hope those making my blanks other than JohnU take care. JohnU does every time.
 

Attachments

  • A2552788-DF45-4FF6-AEE1-8A4BEEA41463.jpeg
    A2552788-DF45-4FF6-AEE1-8A4BEEA41463.jpeg
    350.1 KB · Views: 106
  • 34197B2C-05A3-4AAB-A8BC-CF6653CD3620.jpeg
    34197B2C-05A3-4AAB-A8BC-CF6653CD3620.jpeg
    363.1 KB · Views: 91
  • B46F6404-1F54-42DB-AB3C-213037A5E694.jpeg
    B46F6404-1F54-42DB-AB3C-213037A5E694.jpeg
    309.6 KB · Views: 97
  • 66F7F48B-EF86-4F60-8D2B-D4DA4181FF59.jpeg
    66F7F48B-EF86-4F60-8D2B-D4DA4181FF59.jpeg
    279.7 KB · Views: 92
  • B04F897F-262D-408D-A146-95726552FDF6.jpeg
    B04F897F-262D-408D-A146-95726552FDF6.jpeg
    413.4 KB · Views: 96
Last edited:

JohnU

Member
Joined
Jan 31, 2008
Messages
4,956
Location
Ottawa, Illinois
I get glass-like finishes with Alumilite Clear Slow - all the time
It's not impossible to get urethane resin to shine but if you do one with a CA finish to compare, you'll see a difference between the two. CA acts like a coat of glass on top of the resin and will shine better. It will also last longer and not dull as easily with normal use like straight urethane resin will. It all comes down to what you like and how much time you want to put into the finish. I don't think there's a wrong way, just options.

I began applying Gluboost finishes to my resin pens because I can achieve the shine quicker (with less work) with the finish than with straight resin, but that's just my routine now.

Thanks Mark! I appreciate the kind words and support! Let me know how much I owe you.😉
 

gablett

Member
Joined
Jun 29, 2022
Messages
14
Location
Michigan
I get glass-like finishes with Alumilite Clear Slow - all the time
Would you mind sharing your merhid
I'm odd I guess but all of these pens shown are alumilite and none have CA or gluboost. They were sanded to 400 grit and buffed until an even shine developed using the first two buffing wheels of the Beale buff system.

If someone does not mix the alumilite correctly it hazes. I apply CA to those and hope those making my blanks other than JohnU take care. JohnU does every time.
wow. So it is possible. And that is immensely less complicated than my current process. Maybe I'm over thinking this. Do you sand with just regular 400 grit wet dry paper?
 

mmayo

Member
Joined
Jan 12, 2013
Messages
2,959
Location
Tehachapi, CA
Would you mind sharing your merhid

wow. So it is possible. And that is immensely less complicated than my current process. Maybe I'm over thinking this. Do you sand with just regular 400 grit wet dry paper?
good dry 400 grit paper, sometimes Abranet 400 no coarser grits ever. Lately I've added a quick back and forth laterally with gray scotch Brite- the finest I have last. Be patient buffing and keep buffing until the shine is very apparent. Be careful of overheating. Again be patient at the buffing wheels. I spend the most time with alumilite, much more than inlace acrylester or acrylic acetate..

most importantly- they sell fast. I get many repeat customers and they would tell me if they were unhappy (they don't).

with the blanks with glitter you have to coat with CA just like a wood pen.
 
Last edited:

gablett

Member
Joined
Jun 29, 2022
Messages
14
Location
Michigan
So I experimented again last night and wet sanded from 3M wet/dry 600 - 800 - 1000 - 1500 - all zona paper, meguiars 110 - 210 - Plastx - Caswell plastic ultra fine and then fine and there are still some visible scratches under a high powered light. Maybe I am being too picky but I am getting very frustrated. I noticed almost no improvement with any of the liquid polishes and minimal when buffing.

For sanding I was concerned maybe Abranet was too aggressive so I stopped using that. I focused on using a very light touch and keeping the paper moving. I sand at about 1000 RPM. I spent more time than I typically do sanding. Buffing I was careful not to get the blank too hot and buffed in multiple different directions.

Only thing I can figure is maybe backing down to 400 grit? It seems to me a lot of the above method is overlap? I read somewhere that Zonas starting paper is around 400 grit so there seems to be huge overlap there. Not sure where to go from here. Maybe I need to go back to using tripoli and white diamond. But I again assumed that was a big overlap and step backward after using Zona. And I am to this point very unimpressed with liquid polishes.
 

gablett

Member
Joined
Jun 29, 2022
Messages
14
Location
Michigan
Many of us here have suggested a CA finish, but seems you are discounting that advise.
I am not necessarily discounting the advice I just want to exhaust my options before I add that step to the process. It seems many get a wonderful finish using products I already have.
 

Niels

Member
Joined
Apr 29, 2022
Messages
68
Location
eindhoven
I have the same problem you have. I use diamond cast penblanks and I sand em 400 600 and then micromesh. Then I use meguiars plast x.
But then I put on my reading glasses and take a magnifier 10x and I see little lines.
It got me thinking. I ordered a pen from this Indian guy when I didn't know so much and I wanted to make pens. Before I found this forum.
It's from Ranga pens he has a video on YouTube. And he has lines too when I look at his pen like I do to mine. And he buffs.
So meaby I'm being to critical. Meaby you will always keep lines if you look close enough.
I remember when I got the pen I was impressed by the way it was shining and now I see the flaws. But are they flaws?
I don't know its just something I'm thinking off.
My lathe had to go to the shop and I can't experiment it's pretty frustrating.
Plus here in the Netherlands there are not so many penmakers so I can't compare.

Anyway. Meaby we are being harsh on ourselves?
 

gablett

Member
Joined
Jun 29, 2022
Messages
14
Location
Michigan
I have the same problem you have. I use diamond cast penblanks and I sand em 400 600 and then micromesh. Then I use meguiars plast x.
But then I put on my reading glasses and take a magnifier 10x and I see little lines.
It got me thinking. I ordered a pen from this Indian guy when I didn't know so much and I wanted to make pens. Before I found this forum.
It's from Ranga pens he has a video on YouTube. And he has lines too.
So meaby I'm being to critical. Meaby you will always keep lines if you look close enough.
I remember when I got the pen I was impressed by the way it was shining and know I see the flaws. But are they flaws?
I don't know its just something I'm thinking off.
My lathe had to go to the shop and I can't experiment it's pretty frustrating.
Plus here in the Netherlands there are not so many penmakers so I can't compare.

Anyway. Meaby we are being harsh on ourselves?
I'm thinking there might be truth to that. Under normal house lighting it looks great. Its only when I look with a critical eye under high intensity LED lighting that I see the flaws. And as is the case with everything, we know where to look for the flaws. I want to make the best quality product I can so thats probably why I look so carefully and am always trying to improve.
 

Niels

Member
Joined
Apr 29, 2022
Messages
68
Location
eindhoven
I think that's a good aim. I do it too but if you do what's recommended and you do it thoroughly it should be sufficient.
Then meaby we should rethink our aim? It's like sharpening. The more you read about it, hear opinions and watch videos the more confused you get.
In Holland we say. You can't see the forest because all the trees are in the way.
 

jrista

Member
Joined
Aug 12, 2021
Messages
2,241
Location
Colorado
So I experimented again last night and wet sanded from 3M wet/dry 600 - 800 - 1000 - 1500 - all zona paper, meguiars 110 - 210 - Plastx - Caswell plastic ultra fine and then fine and there are still some visible scratches under a high powered light. Maybe I am being too picky but I am getting very frustrated. I noticed almost no improvement with any of the liquid polishes and minimal when buffing.

For sanding I was concerned maybe Abranet was too aggressive so I stopped using that. I focused on using a very light touch and keeping the paper moving. I sand at about 1000 RPM. I spent more time than I typically do sanding. Buffing I was careful not to get the blank too hot and buffed in multiple different directions.

Only thing I can figure is maybe backing down to 400 grit? It seems to me a lot of the above method is overlap? I read somewhere that Zonas starting paper is around 400 grit so there seems to be huge overlap there. Not sure where to go from here. Maybe I need to go back to using tripoli and white diamond. But I again assumed that was a big overlap and step backward after using Zona. And I am to this point very unimpressed with liquid polishes.
If you are still seeing scratches, it may be that you are being too aggressive with the lower grits. I find that abranet is pretty rough. I use abranet with my bigger turned items, but for my pens I switched to Norton and Zona. The Norton, or Klingspor which is also excellent, have a grit characteristic that just seems to work better for pens (wood or resins). I use the black wet/dry for pens, and will do the first two grits dry, then wet from then on (and for all Zona). It is worth spending some time on the first three grits, and some time on the last couple, to make sure you are really getting through any random deeper scratches.

Thing to note about polish and buffing...if you haven't cut through deeper scratches, then polish and/or buffing will not remove them. Polish can soften them, but a deeper scratch is, scale wise, significantly larger than the grit of polish or buffing compound, and they are just not really capable of eliminating such scratches. You need to deal with them with sandpaper.

I usually start at 400 or 600, then spend some time at 800 and 1200 to make sure I remove all of any larger scratches. I then progress pretty quickly through the rest of the grits, and spend some time with the last two zona. Most of these grits I'm sanding wet. If the polishing compounds are revealing some notable scratches, I'll back up a few grits and lightly sand until all the scratches are even (with zona paper, that gives you 1 micron scratches). Then I go back to polishing.

That end stage of resin finishing can take some time. Whether you are polishing or buffing. You just gotta keep at it until you are satisfied with the results, and don't be afraid to back up a grit or two (or few) if you cannot take care of all the scratches with the finest grits.
 

Niels

Member
Joined
Apr 29, 2022
Messages
68
Location
eindhoven
But the question then is. If I use a 10x magnifier can I work scratch free or will I always have scratches then? I'm talking little lines not big scratches.
How do you know what to aim for
 

RGVPens

Member
Joined
Oct 4, 2021
Messages
408
Location
Mission TX
I've started useing Dr. Kirk's Micro Magic from Craft Supplies. I like the finish better than some other things I've tried.
Watch this: https://www.woodturnerscatalog.com/p/17/6058/dr.-kirks-Micro-Magic-Polishing-Wax

I would get some GluBoost, I get mine from Ed at ExoticBlanks, and try a few blanks like JohnU mentioined before trying other things. In my opinion JohnU is one of the "Jedi Masters" of blanks on this forum. I use his method when doing Alumilite and have always had good results.
 

leehljp

Member Liaison
Joined
Feb 6, 2005
Messages
9,331
Location
Tunica, Mississippi,
But the question then is. If I use a 10x magnifier can I work scratch free or will I always have scratches then? I'm talking little lines not big scratches.
How do you know what to aim for
How do you know what to look for: To some, if you cannot see it with the naked eye, It is OK. And that is fine. But in the area of higher end pens, particularly hand finished very shiny ones, collectors and connoisseurs may examine with a loupe. I am the kind that I am always prepared, but that is not my personal motive; I just want it to be the best that I can make it.

Another reason is that even with the best lighting, once the pen is out in the sunlight, scratches can be seen that aren't noticeable in most room lights.

Buffing and polishing is usually what takes one beyond visible to the naked eye. Buffing and polishing may be with moderate pressure at the most and then move to lighter touches and then to a light touch.
 
Last edited:

rixstix

Member
Joined
Jan 10, 2007
Messages
648
Location
Canistota, SD USA
My experiment yesterday proved to me that my micro scratches were introduced when I moved to the plastic polish. I typically use TriMite to 1200 & move to Novus 2/1. Yesterday, I used TriMite through all grades & skipped the Novus. Much better shine. Everything above 1200 by hand, off lathe. I had to use a 10x loupe to check.
 

jrista

Member
Joined
Aug 12, 2021
Messages
2,241
Location
Colorado
But the question then is. If I use a 10x magnifier can I work scratch free or will I always have scratches then? I'm talking little lines not big scratches.
How do you know what to aim for
Technically, there are always scratches. The question is whether they are visible or not. Grits are progressive, and designed such that each successive grit will cut through half the depth of the previous. By the time you get to ~10k grit you are down to a couple of microns, Zona gets you down to 1 micron, and by 25-30k, 50k, you are down to a fraction of a micron. At that level, you do technically still have scratches, but they should be fine enough...and soft enough (i.e. not hard edged) that the naked eye cannot see them without some significant assistance.

A good test is looking at the highlights in sunlight. If there are any scratches left that will be noticeable to the naked eye, then that's when you'll see them. Either that, or get close to a nice bright light source.

Good polishing or buffing takes some time...it doesn't happen quickly, and if you really want to work out scratches down to a few microns in size (which could be seen by someone who looks more closely), then spend the time to polish/buff them out.
 

Aurelius

Member
Joined
Feb 26, 2021
Messages
102
Location
Pittsburgh, PA
My experiment yesterday proved to me that my micro scratches were introduced when I moved to the plastic polish. I typically use TriMite to 1200 & move to Novus 2/1. Yesterday, I used TriMite through all grades & skipped the Novus. Much better shine. Everything above 1200 by hand, off lathe. I had to use a 10x loupe to check.
It sounds like you might have dried bits of the Novus unintentionally raising the grit. I'm not sure there is anything that can be done if it's already happened other than getting a new bottle and doing your best to keep the opening clean every time you use it. Wipe it down with a damp clothe and you should be ok.
 

rixstix

Member
Joined
Jan 10, 2007
Messages
648
Location
Canistota, SD USA
It sounds like you might have dried bits of the Novus unintentionally raising the grit. I'm not sure there is anything that can be done if it's already happened other than getting a new bottle and doing your best to keep the opening clean every time you use it. Wipe it down with a damp clothe and you should be ok.
Extremely unlikely. A bit of research indicates Novus 2 = 1200 grit which explains things. Don't know why I didn't look sooner.
 

Niels

Member
Joined
Apr 29, 2022
Messages
68
Location
eindhoven
If I use abranet sandpaper 400 - 600 then use micromesh and polish with meguiars plast-x and I use it perfectly as I should. Could I theoretically be able to get a near perfect finish?

Or do I use special sandpaper 400-600-1000-2500-5000 and then buff with 2 wheels blue andn white compound. Could I get a near perfect finish then.

Then I can decide where to put my money and aim at?

Which option gets the best results and is easiest and quickest to do?

I'm confused
 

jrista

Member
Joined
Aug 12, 2021
Messages
2,241
Location
Colorado
If I use abranet sandpaper 400 - 600 then use micromesh and polish with meguiars plast-x and I use it perfectly as I should. Could I theoretically be able to get a near perfect finish?

Or do I use special sandpaper 400-600-1000-2500-5000 and then buff with 2 wheels blue andn white compound. Could I get a near perfect finish then.

Then I can decide where to put my money and aim at?

Which option gets the best results and is easiest and quickest to do?

I'm confused
Sand up to the highest grit you can, then polish or buff. There is no harm in sanding to a higher grit than a starting polishing compound, BTW... If you sand well (not too much pressure that you create deep scratches), then sanding to high grit means you cut down the scale of any scratches to minimums before you polish or buff. Should make it easier to polish or buff, even if you start with a lower grit compound (say 1800 grit polish).

Polish, BTW, is a high grit abrasive suspended in a liquid. Buffing compound is a high grit abrasive suspended in a solid, a solid which softens under the heat of buffing. In either case, we are usually talking about pretty high grits. In some cases it may be around a few thousand, sometimes tens of thousands, in terms of grit. The difference between sanding to a high grit, and polishing or buffing, is that sandpaper (even when sanding wet) will usually leave fairly sharp scratches, while polishing of buffing will slowly grind down edges making them "softer", which changes the way they catch and scatter light.
 

gablett

Member
Joined
Jun 29, 2022
Messages
14
Location
Michigan
If you are still seeing scratches, it may be that you are being too aggressive with the lower grits. I find that abranet is pretty rough. I use abranet with my bigger turned items, but for my pens I switched to Norton and Zona. The Norton, or Klingspor which is also excellent, have a grit characteristic that just seems to work better for pens (wood or resins). I use the black wet/dry for pens, and will do the first two grits dry, then wet from then on (and for all Zona). It is worth spending some time on the first three grits, and some time on the last couple, to make sure you are really getting through any random deeper scratches.

Thing to note about polish and buffing...if you haven't cut through deeper scratches, then polish and/or buffing will not remove them. Polish can soften them, but a deeper scratch is, scale wise, significantly larger than the grit of polish or buffing compound, and they are just not really capable of eliminating such scratches. You need to deal with them with sandpaper.

I usually start at 400 or 600, then spend some time at 800 and 1200 to make sure I remove all of any larger scratches. I then progress pretty quickly through the rest of the grits, and spend some time with the last two zona. Most of these grits I'm sanding wet. If the polishing compounds are revealing some notable scratches, I'll back up a few grits and lightly sand until all the scratches are even (with zona paper, that gives you 1 micron scratches). Then I go back to polishing.

That end stage of resin finishing can take some time. Whether you are polishing or buffing. You just gotta keep at it until you are satisfied with the results, and don't be afraid to back up a grit or two (or few) if you cannot take care of all the scratches with the finest grits.
What grits of sandpaper do you use? It seems to me that the first level of zona starts at around 700 grit? So if you go to say 2000 sandpaper and the start zona isn't that a lot of steps backward? Or is zona a polish and not sanding?

And yes I agree I have removed a lot of my issues by stopping using abranet. I think it's too aggressive for soft resin. I think I was making worse scratches than the tools made. I'm currently using 3m wet dry paper. Is Norton a higher quality paper?
 

Niels

Member
Joined
Apr 29, 2022
Messages
68
Location
eindhoven
Sand up to the highest grit you can, then polish or buff. There is no harm in sanding to a higher grit than a starting polishing compound, BTW... If you sand well (not too much pressure that you create deep scratches), then sanding to high grit means you cut down the scale of any scratches to minimums before you polish or buff. Should make it easier to polish or buff, even if you start with a lower grit compound (say 1800 grit polish).

Polish, BTW, is a high grit abrasive suspended in a liquid. Buffing compound is a high grit abrasive suspended in a solid, a solid which softens under the heat of buffing. In either case, we are usually talking about pretty high grits. In some cases it may be around a few thousand, sometimes tens of thousands, in terms of grit. The difference between sanding to a high grit, and polishing or buffing, is that sandpaper (even when sanding wet) will usually leave fairly sharp scratches, while polishing of buffing will slowly grind down edges making them "softer", which changes the way they catch and scatter light.
Ok I have sandpaper up to 5000 grit. And I wanted to go that direction. Then my question is How do I polish? I have been looking at the videos of Stephen Just/ Just turnings from Australia and in his video 3/5 where he makes the nib section for the JoWo nib he cleans the nib section after sanding with a fluid and he polishes with cotton pads which are used to remove make-up. in the process he applies several steps of polish. I now only have meguiars Plast-x.

Could you give me some advice of which polishes are good to use and which steps to take in that? And what is a good fluid to clean in between?
 

wimkluck

Member
Joined
May 24, 2010
Messages
287
Location
Gaanderen Netherlands
It may be that abranet is the Europain grit and the other paper you use is the amercican grit. The are not the same.
I start with 280/320 -400-500-600 abranet 800 abranet 1000 -1500-2000-3000 -6000-8000-10000.
280-400 dry sanding 500-600 wet abranet dry 1000-3000 wet
6000-10000 is a liquid with papertowel.
If the finish is not good then i have made a mistake in sanding with the coarse grits Always under the 400.
Or i pressed to hard with the liquid sanding and got to much heat.
 

gablett

Member
Joined
Jun 29, 2022
Messages
14
Location
Michigan
It may be that abranet is the Europain grit and the other paper you use is the amercican grit. The are not the same.
I start with 280/320 -400-500-600 abranet 800 abranet 1000 -1500-2000-3000 -6000-8000-10000.
280-400 dry sanding 500-600 wet abranet dry 1000-3000 wet
6000-10000 is a liquid with papertowel.
If the finish is not good then i have made a mistake in sanding with the coarse grits Always under the 400.
Or i pressed to hard with the liquid sanding and got to much heat.
I did not realize that and now that I look up the conversion charts that may be part of the problem. I did not realize there was a difference.
 

gablett

Member
Joined
Jun 29, 2022
Messages
14
Location
Michigan
So for anyone who is keeping score, this is where I am at:

I learned that the 3M paper I have been using is P grit from 400-800 and then ANSI after that. I learned that P grit is coarser than ANSI by a decent margin so I was actually starting at about 320 which is too low for soft alumilite. Abranet is also graded as P grit. So I have moved to starting with a very light sanding at P600 which is about 380. The problem lies when going from P800 to 1000. Thats actually like going from 450 to 1000 grit. Thats a big jump. I need to order Norton sandpaper that is all graded in ANSI grit, or at least I believe it to be.

So my current process involves sanding at about 1800 RPM ( someone suggested that a slow lathe speed is not always the best practice) with very light and even pressure with P600 through 3000. I dont spend long on each grit, but mostly on the first and last. I then use the final 4 grades of ZONA paper, skipping the first two as those seem to go too far backwards from where I stop at 3000. Im mostly looking to polish at that point. I then go to the buffer and buff with Ultra fine and fine from Caswell. Then I give it a final polish with blue plastic polish and then a clean soft cotton wheel.

I dont make pens, so this picture of what I made last night wont exactly fit the theme here but Im proud nonetheless and it wouldn't be without all the help I have received here. I have not yet tried super glue, but I intend to in the very near future. A member here was kind enough to send me some samples of Gluboost completely free of charge, which was very generous and kind. I will report back on how that goes.

As far as finish is concerned I'd say this is 99.7% perfect finish. Im thinking maybe super glue is the only way to get 100%. This is the wet shaving brush handle that I made with this process. I pour all my own blanks. Thanks for the help and pardon the fibers on it, I should have blown it off first but I was too excited.

IMG_9999.jpg
 
Signed-In Members Don't See This Ad

gablett

Member
Joined
Jun 29, 2022
Messages
14
Location
Michigan
Just wanted to update everyone that I got the Norton sandpaper that was recommended. I got 400-2000 and it feels incredibly different than the home depot 3M wet dry paper I was using. The P scale is definitely different. So in starting at P400 I was starting way to low for the finish my tools leave. And the jump from P800 to 1000 is too big for the 1000 to get the scratches out. Im excited to try this new paper out for the first time. Im going to do some experimenting with the finish I start with whether I need 400 or if I can skip to 600. Thanks for all the help guys.
 
Top Bottom