El Grande questions?

Signed-In Members Don't See This Ad

Lenny

Member
Joined
Jan 6, 2009
Messages
3,475
Location
Searsport, Maine
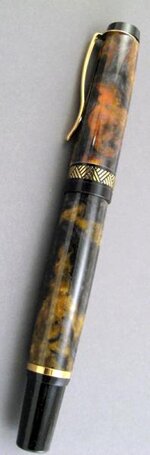
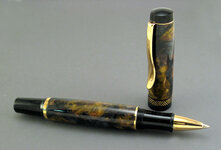
I just picked up a few of the Berea El Grande kits and find the instructions and methods used much different from any other pen I have done to date.

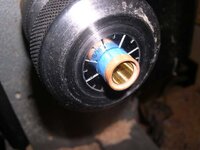
The cap end has two tubes a smaller one that fits in the 11mm hole and a large (short) one that fits in the top end.

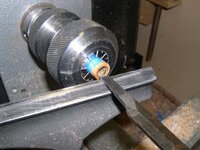
On the upper cap blank you are required to cut the blank to 1 7/8" and then drill a 11mm through hole. . I have drilled the hole and THEN cut the blank back to 1 7/8" :wink:... now for the odd part .... you are then supposed to drill the cap end of this blank to a depth of 3/4 " using a 33/64" bit. Ok, I have done that too! :) .... BUT now, according to the instructions, you insert the tubes with NO glue and place them on the mandrel and using the bushings, turn to size! :eek::eek::eek:
Now it seems to me that any blank once the holes are drilled, is a little sloppy.... of course it doesn't matter once the tube gets glued in you can use your barrel trimmer or disc sander setup to "true" the ends.

How in heck do you expect to get good results with this method?
Am I missing something? Should I just keep going and expect everything to work out? Should I attempt to use a barrel trimmer even though the tubes are loose?

I can't say this set of components will become one of my favorites! :frown:

Thoughts and opinions welcome.
 
Signed-In Members Don't See This Ad

PennedDown

Member
Joined
May 19, 2009
Messages
207
Location
McKinney, TX
Lenny,

I'm wondering the same thing. I've made a lot of El Grande's.
A 31/64" bit for the lower barrel and a 33/64 for the upper barrel (I use a 13.3 mm for the upper)
 

broitblat

Member
Joined
Feb 9, 2006
Messages
3,226
Location
Bellevue, WA, USA.
The kits that requires two tubes in the top are different than the normal "El Grande". The "El Grande Streamline" uses two tube sizes for a more dramatic taper in the cap. I made a few of these a while back, and it's not as difficult as it sounds (I'm not sure I actually followed the directions, though). Berea also has the "El Grande Elite" on special which uses the more "normal" techniques you're probably used to.

-Barry
 

Lenny

Member
Joined
Jan 6, 2009
Messages
3,475
Location
Searsport, Maine
The kits that requires two tubes in the top are different than the normal "El Grande". The "El Grande Streamline" uses two tube sizes for a more dramatic taper in the cap. I made a few of these a while back, and it's not as difficult as it sounds (I'm not sure I actually followed the directions, though). Berea also has the "El Grande Elite" on special which uses the more "normal" techniques you're probably used to.

-Barry

Yes, Barry ... you are right, it is the Streamline. So did you use a barrel trimmer or some other method to true up the ends of the blank before turning? Maybe I'm making too big a deal of it but I just see lots of room for error here and resulting gaps between material and components.

Perhaps I should just continue and worry about fine tuning the ends later with a sanding mill.:)
 

JMT

Member
Joined
Jan 25, 2011
Messages
37
Location
NE Tacoma
Yeah....I agree...pretty strange. I'd have to actually make one to see how well that system works out. Looks like a good opportunity for the step-tubes. (Which means you have to then go buy a step bit for the step tube.....grrrr...)
Anyway....good luck.
 

Lenny

Member
Joined
Jan 6, 2009
Messages
3,475
Location
Searsport, Maine
Well, I went ahead and attempted to turn the cap they way they describe in the instructions by fitting the two different sized tubes in the blank loose with no glue and mounting them with the bushings for turning. The result, as I suspected, is an out of round turning! :mad:
 

soligen

Member
Joined
May 11, 2010
Messages
1,085
Location
Sterling Heights, Michigan
I havent done this specific kit, but I dont see why you cant glue the tubes first. All I can think is that they fear the tubes will break free in the stress of pressing, but with the right procedure, this can be mitigated.

First, make sure the hole for the large tube is not drilled too deep so tube bottoms out in the hole. This way the back is it is supported inside during pressing.

When pressing into the smaller tube. use a drill bit or transfer punch inside the big end to support small brass tube while pressing. You want the end of your support punch to directly contact the brass tube - best if the small brass tube sticks into the bigger whole a tad, otherwise see next option.

Another option: in the smaller tube, if you have a collet chuck and a small side scraper, you can thin the inner wall of the brass slightly (best done before glue up) so the finial does not fit so tight, then use epoxy instead of a press fit. This is a technique I've used on other kits (I had to grind my own tool - used an old starter set)
 
Last edited:

soligen

Member
Joined
May 11, 2010
Messages
1,085
Location
Sterling Heights, Michigan
I just recalled that I took some pics of the tube thinning procedure a couple weeks ago for a pen I was afraid would not stand the stress of pressing. You don't want to take much off.

I also just realized that if you turn with bushings, you cant thin the tube before glue up. You would need to be able to chuck the barrel so it spins true.

First pic shows the set up and my home made tool (lathe was not spinning for pic). The second is the result.

Hope this helps. Good luck.

PS Edit In, You will also notice in the after pic that I used the same tool to cut the recess for the clip, but for this thread, it's the inside of the brass I'm trying to show you.
 

Attachments

  • DSCN1153.JPG
    DSCN1153.JPG
    36.6 KB · Views: 244
  • DSCN1154.JPG
    DSCN1154.JPG
    27.7 KB · Views: 230
Last edited:

spnemo

Member
Joined
Aug 21, 2010
Messages
261
Location
Tustin, MI
I ordered a bunch of these as well. After reading the directions, I decided that these are great candidates for "kitless" pens.
 

Lenny

Member
Joined
Jan 6, 2009
Messages
3,475
Location
Searsport, Maine
Dennis, John and Sean, Thank you for your suggestions!

I guess I've got some studying to do. :biggrin:

I will take another look at it .... Last night I was ready to return them!

Thanks again!
 

Lenny

Member
Joined
Jan 6, 2009
Messages
3,475
Location
Searsport, Maine
Come on Lenny, Gear yourself up for the challenge and just turn one.
It is only a piece of wood you will be wasting

Well actually in this case a piece of PR .... my second cast. :biggrin:

I did go ahead (and then a little behind) ... and now armed with some better info I hope to go forward again! :tongue::)
 

maxman400

Member
Joined
May 25, 2009
Messages
3,111
Location
Omaha Arkansas
Gee Lenny, you scared me :eek: I just got in a bunch of the El Grande's so I checked them all out and none of mine are the double tubes.:rolleyes: Thank goodness, but I have an issue with the bushings. The ones for the cap will not fit in the tubes they jam up just as they start. I thank the bushings are just a hair to big. Good Luck with yours. :)
 

Lenny

Member
Joined
Jan 6, 2009
Messages
3,475
Location
Searsport, Maine
Gee Lenny, you scared me :eek: I just got in a bunch of the El Grande's so I checked them all out and none of mine are the double tubes.:rolleyes: Thank goodness, but I have an issue with the bushings. The ones for the cap will not fit in the tubes they jam up just as they start. I thank the bushings are just a hair to big. Good Luck with yours. :)

Yes, I should have said El Grande Streamline. :)
I did have one tube that was crushed.:eek:
Maybe your tubes need a little chamfering? :confused:
 

Lenny

Member
Joined
Jan 6, 2009
Messages
3,475
Location
Searsport, Maine
I think this is a clear case of "throw out the instructions" for this kit.

If I had just glued the tubes in from the get go my results would have been better. I found myself fighting the out of round issue due to my trying to turn it as per the instructions with the tubes loose fit. :mad:
Once I glued the tubes in and got things carefully trued up as best I could I thought I was home free. As I was polishing the cap end blank a big bump developed right at the point where the large and small tube meet. I had to re-turn that area carefully with a skew and once that was smoothed up I was finally able to resand and polish.

Anyone turning these kits for the first time should check out the link johnu posted above or look over soligen's methods .... but whatever you do... in this case .... don't read the directions!

By the way the blank I used is from my second PR cast. :)
Opps ... the first photo was taken before I realized I hadn't tightened the cap on.:redface::rolleyes:
 

Attachments

  • IMG_4501csm.jpg
    IMG_4501csm.jpg
    13.9 KB · Views: 229
  • IMG_4513sm.jpg
    IMG_4513sm.jpg
    48.5 KB · Views: 227

randyrls

Member
Joined
Feb 2, 2006
Messages
4,821
Location
Harrisburg, PA 17112
Another option: in the smaller tube, if you have a collet chuck and a small side scraper, you can thin the inner wall of the brass slightly (best done before glue up) so the finial does not fit so tight, then use epoxy instead of a press fit. This is a technique I've used on other kits (I had to grind my own tool - used an old starter set)


Dennis; I have made material prone to cracking in the past. I used a transfer punch to "expand" the brass tube slightly at the ends so the fitting is a slip fit, then put a drop of thick CA on the inside of the tube, and insert the fitting with a twisting motion.

Use a punch just smaller than the tube. Insert the punch about 1/4" into the bare brass tube and twist it sideways until the fitting just slips into the brass.
 

Lenny

Member
Joined
Jan 6, 2009
Messages
3,475
Location
Searsport, Maine
Lee, one thing I discovered with this kit (and don't really have a solution for it) was when using a polyresin blank the larger tube shows thru differently then the lower tube does on the cap blank. I reverse painted the blank and the tube, but it created a visible shading difference at the transition. Not sure if that description makes sense ... I couldn't find pics (probably because I didn't want it seen...:biggrin:)
 
Top Bottom