Closeup photos?

Signed-In Members Don't See This Ad

Woodchipper

Member
Joined
Mar 15, 2017
Messages
7,206
Location
Cleveland, TN
Tried everything for photos of recent pens to display on the venue website. Tried everything, different settings, flash, etc., etc., nothing works. I took photos of four pens but are too far away to see any detail. Might need to skip a drink and buy a good macro lens.
Here is a list of the camera and lenses I used: Canon T7, EF 18-55mm IS (marked as Macro on the lens body but didn't work with Macro setting), EF 28-168mm IS; other lenses are for long distance photos. Thanks for your input. Also posted on a photography forum for advice.
 
Signed-In Members Don't See This Ad
I used the below criteria and AI generated a response. I have used many of the suggestions in the response but found that Post Processing does much of the heavy work for getting Macro shots without a true Macro lens. Atached is one of my favorites using my Nikon and 18-55mm. Still can be zoomed into and retains clarity.

"how to use Canon T7, EF 18-55mm IS to get good macro photos"

Using the Canon T7 with the EF-S 18-55mm IS lens for macro photography requires understanding its limitations and using creative techniques to maximize results.

Understanding the Limitation: The 18-55mm IS lens is not a true macro lens. It has a maximum magnification of 0.35x, meaning the subject appears only 35% of its actual size on the sensor—far short of the 1:1 ratio required for true macro photography. The "Macro" setting on the T7 only optimizes focus for close-ups and does not enable true macro capabilities.

Practical Techniques for Better Results:

  • Zoom to 55mm: Use the longest focal length (55mm) to get as close as possible to your subject.
  • Manual Focus: Switch to manual focus and slowly move the lens closer to the subject until you achieve sharp focus. The lens can focus as close as 0.25m (0.8ft) at 55mm.
  • Use Extension Tubes or Close-Up Filters: To increase magnification:
    • Extension tubes (e.g., 12–30mm) move the lens farther from the sensor, allowing closer focusing and higher magnification (e.g., up to 0.65x with a 50mm lens and 30mm tube).
    • Diopter lenses (+1, +2, +4, +10) can be stacked to increase magnification. Stacking +4 and +10 can give a significant boost, though they may reduce image quality and require manual focus.
  • Stabilization: Use a tripod or stabilize the camera to avoid blur, especially at slow shutter speeds.
  • Aperture and Focus: Use small apertures (f/7.1–f/8) to increase depth of field, which is very shallow in close-up shots. Use the center focus point for precise focus.
  • Lighting: Use a flash (built-in or external) with flash compensation (e.g., -1 to -1.3 stops) to avoid overexposure and add fill light, especially in low-light conditions.
  • Post-Processing: Crop images to improve composition and use software like DPP4 or Photoshop to enhance detail.
Alternative Option: Consider upgrading to a true macro lens like the EF-S 35mm f/2.8 Macro IS STM (which has a ring light and true 1:1 magnification) or a used EF 50mm f/2.5 Macro for better results. These are affordable and available on trusted used marketplaces like KEH or MPB.

In summary, while the 18-55mm IS lens can't achieve true macro, using extension tubes, diopters, manual focus, and proper lighting can help you capture compelling close-up shots.
 

Attachments

  • 1481199564118L.jpg
    1481199564118L.jpg
    97.7 KB · Views: 3
Last edited:
Have you checked the library? Take a look at Pen Photography - Concept and Practice. There is no such lens as "EF 28-168mm IS". Did you mean the Canon EF 28-135mm f/3.5-5.6 IS USM lens? If so, the Canon T7 and 28-135mm lens should be perfectly capable of taking excellent pen photos. The 18-55mm lens should produce good results too, but you may run into perspective issues shooting close up.
 
I used to do a bit of closeup photography. Back in the day I got screw on closeup lenses. Just took off the UV/protector and screwed on the add on lens. Came in a variety of "plus" diopters - +!, +2 or +3. They could be stacked to get even better magnification. I did a quick search and they're still out there. Lots cheaper than a true macro lens.
Or - try your phone. They do amazing stuff now.
 
Ted, love to experiment. Been out of touch with photography for several months. Example: went to photograph the pens. Two dead batteries! Will try the diopters.
 
Your lenses are probably not your limitation. I would expect either the 18-55 or the 28-135 to be able to fill most of the frame with a pen and still get it in focus. I would recommend manual focus instead of letting the camera try to autofocus. If you find your camera manual online, you should be able to find how to use "live view" and the zoom buttons on the top right of the back panel to get a 10x view of what your lens is seeing in real time. That makes precise manual focus like shooting fish in a barrel.

The trickiest part about getting a good-looking pen photo is lighting. Without getting into a super long dissertation on it, the two things you probably want are a light source large enough, and way to control where that light spills.

Light in photography is often described as either "soft" or "hard." Soft light is what you want for most product photography. That means instead of casting hard-edged shadows, it tends to "wrap around" the subject and create a much more even, flattering look without harsh shadows; sometimes without much shadow at all. The way to get that is by making sure that the light source is larger than and/or closer to the subject. That's why photography studios that do portraits usually have gigantic softboxes and shoot-through umbrellas. They're spreading out the source of the light (usually a flash) so that it's much larger compared to their (human) subject. The good news is, your subject is a relatively small pen. That means you don't need to spend $300 on a 6' octobox to get nice soft lighting. You just need some kind of diffuser that is ideally larger than the pen. Lots of DIY options exist. You could point your flash or light source at an 8x10 square of white matboard and have the light bounce off of that as a reflector. If it's close to the pen and just out of frame, you should get really nice soft light.

If you're going for a light background, it doesn't much matter if your light spills all over the place. In my most recent crack at taking some nice photos of pens I've made, I really wanted a dramatic black background. That made it much more important to control the light and make sure it was hitting the pen, but not hitting the background, to the extent possible. I did that by using what's called "flags" (in my case just pieces of black whatever I could find) to block the light as it came out of my light panel, so that it would hit the pen, but not spill onto the black background. Without these, the background was more gray, and not convincingly "dark", so the pen didn't pop out like I wanted it to.

It occurs to me as I type that when you say you've tried with the flash, you might be referring to the built-in on-camera flash on your T7. I'll advise you to skip that entirely. The direction the light comes from is every bit as important as how soft it is and how well the spill is controlled. Almost nothing looks very good with light coming at it directly from the front, 2 inches above the lens. You'll want to use a different light source. That could be an inexpensive manual speedlight (the Godox TT520II is under $50). It could be an LED panel (which is what I'm currently using to photograph my pens). It could be a cheap clamp light with a regular lighbulb from Home Depot.

Anyway this has gotten long. Let me show you a picture of my setup and the results. You'll find that the lighting is hands-down the most important difference between a good and less-good pen photo. Even a cheap phone camera will make a great photo if the lighting is good. Your T7 and existing lenses should be more than up to the task.

Setup photo. Notice reflective black plastic base to sit on, matte black leather background (a notebook I had handy). Light coming from the right - as close as I could get it without being in the frame, to make it maximally soft. To the left of the pen a regular sheet of white printer paper to act as a reflector, and bounce back some of the light onto the left side of the pen so the contrast between the right and left wide wouldn't be as dramatic. The light source angled away from the background to keep light off of it and let the background stay dark. The flag on the left side of the light source primarily to stop light from shining directly into the lens and causing a flare. Sorry for the rotation of the photo. The forum doesn't seem to have a way to set the orientation.
IMG_5669 2.JPG

Phone photo from my 4-year old iPhone SE (the model with the least impressive camera). Same basic lighting setup, but before I added the black background or controlled the light spilling. Still easy to see how nice the soft light makes the pen look, regardless of camera.
IMG_5668.JPG

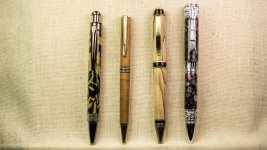
A few end results taken with the actual camera and the exact setup shown in the first photo.
IMG_9653.jpgIMG_9657.jpgIMG_9660.jpgIMG_9665.jpg
 
The manual was the first thing downloaded after I got the camera. Tried manual and other settings. For me, the fun and learning experience is experimenting with different settings. I have taken photos that were so bright, they were white. Others, dark. Have worked to meet in the middle somewhere.
Here is my light setup that has been posted many times.
IMG_6520.JPG
 
That looks pretty workable. Yes, getting the correct exposure can be tricky, but with digital it's fairly easy since you can just shoot and check and make adjustments for free.

Looking through your profile and the photos you've posted, I wonder if you might find a simple white balance adjustment goes a long way. If you shoot RAW then you can adjust white balance all you want with no image degradation after the photo is taken. If you're shooting JPG, you're better off adjusting it in-camera. Your camera should have an incandescent light setting that help balance out the warm orange tones and provide more accurate color rendering.

Besides that, I'd throw the camera on a tripod, use your 28-135, zoom it in all the way (most zooms have their best close-focus when racked out to the longest focal length), frame your shot, focus, and set the aperture to something like f/11. ISO can be set to 100, and the shutter speed can land where it may - your subject is holding still and your camera is on a tripod, so even if it takes 30 seconds to get proper exposure (it won't... but it might take like 2 or 3 seconds depending on how bright those lights are), you'll still get a really clear image, without having to compromise on other exposure settings. If you're getting shake, try using the self-timer. With slow shutter speeds, even vibration caused by pressing the shutter button while you're on a tripod can cause blur. The self timer lets the vibrations from pressing the shutter release subside fully before the exposure actually starts.
 
Back
Top Bottom