
You are using an out of date browser. It may not display this or other websites correctly.
You should upgrade or use an alternative browser.
You should upgrade or use an alternative browser.
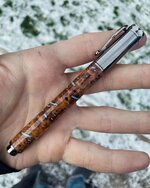
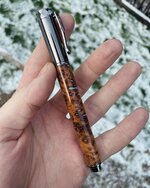
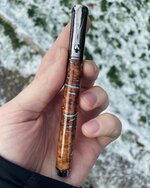
Caribbean Rosewood Burl & Turquoise
- Thread starter ZanderPommo
- Start date
Signed-In Members Don't See This Ad
See more from ZanderPommo


Once all filled I hit it with a spray of accelerator just in case, then turn juuuuust proud of finished size and do it again to any spots that are still unfilled.
After that there may be some voids too small to fill, so I put some medium CA on 220 grit sandpaper and create a sawdust/CA slurry at low speed. Then hit it again with accelerator, sand to finished size to 600 grit and apply my CA finish.
I like that last step, the medium CA on 220 grit, I'll have to give that a try sometime.


Signed-In Members Don't See This Ad
mark james
IAP Collection, Curator
Beautiful pen/blank. I have not seen Rosewood Burls with inclusions very often, but your turquoise inlay is very appealing. I love it! Thanks for sharing. 
ZanderPommo
Member
Thanks! I bought a huge burl cap without realizing the full extent of the inclusions until I found them in 90% of the blanks I ended up with, which I believe is why they didn't sell well. First burl cap I've lost money on, but lesson learned. It's incredibly dense though so it makes for good easy practice for doing inlays in voids. And now I have a lifetime supply to try different inlay techniquesBeautiful pen/blank. I have not seen Rosewood Burls with inclusions very often, but your turquoise inlay is very appealing. I love it! Thanks for sharing.
mark james
IAP Collection, Curator
Burls are like chocolates! And for what you did, I might suggest you may have a great solution and an attractive visual for the remainder.Thanks! I bought a huge burl cap without realizing the full extent of the inclusions until I found them in 90% of the blanks I ended up with, which I believe is why they didn't sell well. First burl cap I've lost money on, but lesson learned. It's incredibly dense though so it makes for good easy practice for doing inlays in voids. And now I have a lifetime supply to try different inlay techniques
egnald
Member
Gorgeous! - Dave
ZanderPommo
Member
I turn down the blank till it's maybe 1.5-2mm proud of finished size, take it off the lathe and then use a tiny scoop to fill the voids, tapping repeatedly to ensure they get filled, then drop in a couple drops of thin CA which wicks through very quickly, and hardens almost immediately.I really like the way the turquoise looks in the rosewood and the black titanium is a perfect pairing. Nicely done Alex!!
How did you do the turquoise?
Once all filled I hit it with a spray of accelerator just in case, then turn juuuuust proud of finished size and do it again to any spots that are still unfilled.
After that there may be some voids too small to fill, so I put some medium CA on 220 grit sandpaper and create a sawdust/CA slurry at low speed. Then hit it again with accelerator, sand to finished size to 600 grit and apply my CA finish.
ZanderPommo
Member
Haha, thank you, we'll see. I'm not sure there was enough interest in these. I'll probably just throw them in as freebies here and there.Burls are like chocolates! And for what you did, I might suggest you may have a great solution and an attractive visual for the remainder.
Cool, thanks for the detailed explanation.I turn down the blank till it's maybe 1.5-2mm proud of finished size, take it off the lathe and then use a tiny scoop to fill the voids, tapping repeatedly to ensure they get filled, then drop in a couple drops of thin CA which wicks through very quickly, and hardens almost immediately.
Once all filled I hit it with a spray of accelerator just in case, then turn juuuuust proud of finished size and do it again to any spots that are still unfilled.
After that there may be some voids too small to fill, so I put some medium CA on 220 grit sandpaper and create a sawdust/CA slurry at low speed. Then hit it again with accelerator, sand to finished size to 600 grit and apply my CA finish.
I like that last step, the medium CA on 220 grit, I'll have to give that a try sometime.
ZanderPommo
Member
Helps a lot to avoid applying 30 coats of CA to fill all the inevitable "pinholes".Cool, thanks for the detailed explanation.
I like that last step, the medium CA on 220 grit, I'll have to give that a try sometime.
Lew
Member
I don't know why these wouldn't sell. I think that's absolutely beautiful
brilliant process, thanks for sharingI turn down the blank till it's maybe 1.5-2mm proud of finished size, take it off the lathe and then use a tiny scoop to fill the voids, tapping repeatedly to ensure they get filled, then drop in a couple drops of thin CA which wicks through very quickly, and hardens almost immediately.
Once all filled I hit it with a spray of accelerator just in case, then turn juuuuust proud of finished size and do it again to any spots that are still unfilled.
After that there may be some voids too small to fill, so I put some medium CA on 220 grit sandpaper and create a sawdust/CA slurry at low speed. Then hit it again with accelerator, sand to finished size to 600 grit and apply my CA finish.
ZanderPommo
Member
I think it was simply because prior to being filled, the blanks just look like work.I don't know why these wouldn't sell. I think that's absolutely beautiful