Any interest in pen maker specific drill bit holder?

Signed-In Members Don't See This Ad

Smitty37

Passed Away Mar 29, 2018
In Memoriam
Joined
Nov 23, 2009
Messages
12,823
Location
Milford, Delaware 19963
I can do that.

Are there any kits out there that still need a 12mm bit? I omitted that size because I either didn't see any current kits or just overlooked it in the bushing reference files.
Jr Gent 1 call for 12mm on some of the older instruction sheets. Newer instructions call out a fractional that you have on your design.

Le Roi Elegant Royale use a "U" bit but they might be the only kit that does

For Reference 9.5mm is almost identical to 3/8th and can probably be used most places where 3/8 is called for and visa-versa.

This seems like a pretty good idea Carl.
 
Last edited:
Signed-In Members Don't See This Ad

Carl Fisher

Member
Joined
Jun 7, 2011
Messages
2,761
Location
Cape Coral, FL
I think I used the 3/8 when I did your v2 kits since a 9.5mm wasn't readily available at the time of the beta and it worked out good. The letter U bit I think can be covered by a 3/8 as well. I've done those Royale kits and didn't even question using a 3/8 on them unless they have changed since the betas?

That said, a U or a 9.5mm could find a home in that open space for those who need it. It won't be labeled or as clean but I'm going to leave that gap there for people to add their one-offs as needed.

I think there is probably enough call to add a 12mm. It's .1 larger than a 15/32 which is significant enough if you're reverse painting or something. I believe I have a 12mm in my stash but haven't checked lately.
 

sbell111

Member
Joined
Jan 16, 2008
Messages
3,465
Location
Franklin, TN
I like the idea. I would be down for one.. One empty spot for a pen mill might be good.. although, maybe it is getting too large with that. Just a thought.
The problem with that is that there are pen mills sized to most of these tube sizes, so you would need several holes just for the mills.

Actually that reminds me of my initial thoughs when seeing this thread and something that I've been needing to build:

My initial thoughts on this thread were that my shop builds more than just pens and I often don't stick to the recommended bit sizes as for some kits they create a hole that either has too much slop for the tube or is too tight (this is especially true if I've painted the tube). Therefore, I'd prefer to stick to my two index boxes for my bits.

However, what I have been intending to build and just not got around to it is an indexed holder for all of my pen mills so that I could easily grab the correct sized one. Something very similar to Carl's design is what I was envisioning.
 
Last edited:

jyreene

Member
Joined
Feb 17, 2009
Messages
1,476
Location
Overseas location
Best I can tell there are only 2 bits that I've excluded that are only good for 2 kits that I could find information on. One of which isn't even a pen kit really and the other is for an alternative metric (12mm) bit for which an SAE bit is actually the first choice in the instructions. The letter P bit that is in there isn't really necessary as none of the kits use them. That frees up one spot anyway. I do agree that I need to keep this to what can fit in a small flat rate box. Anything larger and shipping becomes a problem. That means the largest I can go is 8 5/8" x 5 3/8" so there is some wiggle room over what is configured now. But at what point does it become too big for the bench so to speak I guess is my concern. Take a SFRB and put in a free spot on your bench and see if that's acceptable to give up that space. What I might look at doing is having 2 options. One as shown with the letter bits in place and one that omits the letter bits but offers holes to fit MT2 accessories such as your mandrel and centers. The problem I have to watch out for with that is stability of loading up heavy live centers and such to the outside of the platform. Oh and if any of the kitless guys are interested, I'm working out a kitless setup in my head. There will be a spot for a 1" die, tap, and drill bit for each of body, section, clip, and a few extra holes for feed taps.

I'd be down for a kitless and the one shown here.
 

Smitty37

Passed Away Mar 29, 2018
In Memoriam
Joined
Nov 23, 2009
Messages
12,823
Location
Milford, Delaware 19963
Best I can tell there are only 2 bits that I've excluded that are only good for 2 kits that I could find information on. One of which isn't even a pen kit really and the other is for an alternative metric (12mm) bit for which an SAE bit is actually the first choice in the instructions. The letter P bit that is in there isn't really necessary as none of the kits use them. That frees up one spot anyway. I do agree that I need to keep this to what can fit in a small flat rate box. Anything larger and shipping becomes a problem. That means the largest I can go is 8 5/8" x 5 3/8" so there is some wiggle room over what is configured now. But at what point does it become too big for the bench so to speak I guess is my concern. Take a SFRB and put in a free spot on your bench and see if that's acceptable to give up that space. What I might look at doing is having 2 options. One as shown with the letter bits in place and one that omits the letter bits but offers holes to fit MT2 accessories such as your mandrel and centers. The problem I have to watch out for with that is stability of loading up heavy live centers and such to the outside of the platform. Oh and if any of the kitless guys are interested, I'm working out a kitless setup in my head. There will be a spot for a 1" die, tap, and drill bit for each of body, section, clip, and a few extra holes for feed taps.

I'd be down for a kitless and the one shown here.
Not that it matters, but I think the Rizheng instructions still call out 12mm even though they have actually changed the kits. I think no one will miss it if you leave it out.
 

Carl Fisher

Member
Joined
Jun 7, 2011
Messages
2,761
Location
Cape Coral, FL
I added it. It honestly didn't take up any more room since the metric ones were so spaced out anyway.

I'm playing around with the CAM side now to see if I can get a proof of concept milled up in the next day or two.
 

ChrisN

Member
Joined
Mar 23, 2013
Messages
730
Location
Denver, PA
C'mon, you missed the most important drill bits - center drills! Skip the MT holes and replace them with spaces for 3 or 4 center bits. JMHO!
 

BJohn

Member
Joined
Feb 13, 2014
Messages
820
Location
Cabot, Arkansas
I would also be interested in one. I did not take the time to read all the posts but di anone mention a place for the jacobs chuck key.
 

Carl Fisher

Member
Joined
Jun 7, 2011
Messages
2,761
Location
Cape Coral, FL
Hi John.

It was mentioned. I've left a gap between the SAE/Metric side and the Letter bits side that allow users to drill a few extra holes for anything additional they may want.
 

Skeleton2014

Member
Joined
Jan 24, 2013
Messages
497
Location
Lynnwood, WA. USA
Would be interested in one... I have a 12mm bit but for the life of me can't remember which kit I bought it for. I bought and definitely use the "U" type for one of Smitty's kits. I found that with the 3/8" bit they were just too loose and required lots of epoxy to make up for the gap between the tube and blank (and forget about using CA no matter how thick).
Jeff
 

Carl Fisher

Member
Joined
Jun 7, 2011
Messages
2,761
Location
Cape Coral, FL
Ok, I have added the 12mm back in and I'll replace the P with a U since the P isn't needed for any kit and the U is.

I'll do some playing around this weekend in CAD and finish up the initial design. Hoping to get some test cuts in this weekend but need to play with the bit hole sizing to find what fits best.

I'll post more when I have something to post.
 

Carl Fisher

Member
Joined
Jun 7, 2011
Messages
2,761
Location
Cape Coral, FL
BTW, if anyone is interested here is the spreadsheet I've been working from. This has all of the pen specific bits, decimal equivalent and alternatives where available. This also has a bunch of kitless information such as tap to drill sizes and a few other odds and ends.

I find it very useful as a reference and it consolidates information that is currently spread across multiple library articles.

http://www.fisherofpens.com/blog/public/Drill-and-Tap-Ref-and-Inventory.xlsx
 

Carl Fisher

Member
Joined
Jun 7, 2011
Messages
2,761
Location
Cape Coral, FL
I believe I have my CAD files just about where I'm happy with them. Now it's time to talk materials.

Wood doesn't seem to do well engraving text this size mechanically (vs. laser which I don't have). It looks okay, but not great.

I'm thinking 1/2" corian but am open to other solid surface type materials that I could color fill without worrying about bleeding into the grain. The minimum size I need to make the part plus enough for hold down is 5.5" x 10" for the upper tier at 1/2" thick. The bottom platform can be anything.
 

Carl Fisher

Member
Joined
Jun 7, 2011
Messages
2,761
Location
Cape Coral, FL
I have 10 pieces of 12x12 in jasmine white coming which is good for 20 units. I'll color fill with black on the engraving. It seems scrap corian is fairly easy and inexpensive to come by.

It actually works out to be cheaper than even cheap pine from the box stores per unit which is good.
 

Carl Fisher

Member
Joined
Jun 7, 2011
Messages
2,761
Location
Cape Coral, FL
So the corian is exposing some issues with either the CAM application or my CNC that didn't show up in wood. The holes aren't exactly round but have a small flat spot in various positions.

I'm going to have to touch base with the guy who made the CAM software I'm using and see if he's had problems coding circles.

And my engraving is still a bit off center from the holes, but I'm getting closer.
 

Flynny

Member
Joined
Aug 29, 2011
Messages
74
Location
Burlington, MA
Carl

I just went back and read all the prior posts. I agree that it should be bits only and nothing extra like mills, centers, etc. JMHO
John
PS Can't wait for the finished product.
 

Carl Fisher

Member
Joined
Jun 7, 2011
Messages
2,761
Location
Cape Coral, FL
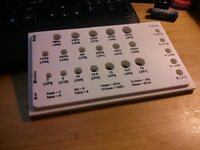
Not quite right, but getting closer.

I have 3 small problems to work out before I'd be comfortable selling them. The holes seem to not be quite round which appears to be a software issue. I'm going to try a different engraving option to see if I can get the text a bit more crisp and lined up correctly and lastly I need to find another option for color filling because painting and having to sand it back down destroys the labor effort savings I'm trying to achieve. Rub and buff sticks may be a better option but need to get to hobby lobby to get some.
 

Attachments

  • IMG_20140925_143014 (Medium).jpg
    IMG_20140925_143014 (Medium).jpg
    149.5 KB · Views: 318
Joined
Sep 18, 2013
Messages
775
Location
Childress, Texas
For the color fill problem, try covering the piece with blue masking tape before the actual engraving. Then after the laser cuts the letters, spray paint to fill and remove the remaining tape. Most of the clean-up problems should be taken care of that way.
 

Dan Masshardt

Member
Joined
Jan 30, 2013
Messages
4,806
Location
Mechanicsburg, PA
Not quite right, but getting closer. I have 3 small problems to work out before I'd be comfortable selling them. The holes seem to not be quite round which appears to be a software issue. I'm going to try a different engraving option to see if I can get the text a bit more crisp and lined up correctly and lastly I need to find another option for color filling because painting and having to sand it back down destroys the labor effort savings I'm trying to achieve. Rub and buff sticks may be a better option but need to get to hobby lobby to get some.

Is there a discount for that sample unit? :)

Do the bits fit okay in the not quite round holes?
 
Signed-In Members Don't See This Ad
Top Bottom