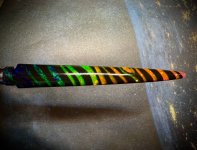
On softer blanks (like Alumilite Clear Slow - Urethane), I usually apply two thin coats of CA such as GluBoost as it provides a harder layer that resists abrasion better than the raw Alumilite. This helps retain the glossy finish longer.
For finishing, I use two different methods:
Method #1: With the lathe at about 1000 RPM, I dry sand with 400, 600, and 800 grit sandpaper then go to wet sanding with standard Micro Surface pads. Then, depending on the finish I follow up with buffing using a sewn cotton wheel and PSI's blue buffing stick followed by a loose flannel wheel with no abrasive.
Micro Surface Pads:
#1500 (25 microns = about 400 ANSI grit)
#1800 (15 microns = about 1200 ANSI grit)
#2400 (12 microns = about 1500 ANSI grit)
#3600 (8 microns = about 2500 ANSI grit)
#4000 (5 microns = about 4000 ANSI grit)
#6000 (4 microns = about 5000 ANSI grit)
#8000 (3 microns = about 7000 ANSI grit)
#12000 (1 micron = about 10000 ANSI grit)
Method #2: With the lathe at about 1000 RPM, I dry sand with 400, 600, and 800 grit sandpaper. Then I bump the lathe up to about 3000 RPM and polish through the six grits of Stadium Pen Blank's Magic Juice. So far I have found no reason to buff following Magic Juice.
Magic Juice (AI Estimated Microns)
#1 (4 to 6 microns = about 3000 to 4000 ANSI grit)
#2 (3 microns = about 6000 ANSI grit)
#3 (2 microns = about 8000 ANSI grit)
#4 (1 micron = about 10000 ANSI grit)
#5 (0.5 micron = about 50000 ANSI grit)
#6 (0.25 micron = about 100000 ANSI grit)
Occasionally with Magic Juice I find a tiny white dot caused by residual polish that gets into a microscopic bubble or pinhole on the blank. Sometimes it can be challenging to get it out of there. For this reason, I often opt for the Micro Surface Pad and buffing method even though I do think that Magic Juice yields a superior glossy finish.
Dave