
You are using an out of date browser. It may not display this or other websites correctly.
You should upgrade or use an alternative browser.
You should upgrade or use an alternative browser.
Advice on back painting
- Thread starter qquake
- Start date
Signed-In Members Don't See This Ad
Signed-In Members Don't See This Ad
Kenny Durrant
Member
I try to use a color that will enhance the blank. I wouldn't use black because it might kill the red in the blank.
jttheclockman
Member
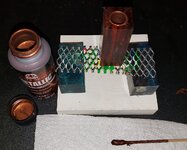
I would experiment. May want to try metallic blue. Here is an example. I had shown this when I made this pen set. I tried white and it washed it out(left) I tried a brown/red mix and it muddied the blank (bottom right side of blank) and settled on metallic blue which brought out the orange and highlighted the black (top right) I should have mentioned I tried black also but made the blank too dark and washed out the whites. Also mention I only back painted the blank and no need to paint tubes. I never do that. I will at time add some color to epoxy but not always. I did not in this case. All the Sierra pens I just shown were back painted with a color close to the blank color but that was because there were no veins running through them.


its_virgil
Member
Drill and turn between centers with or without the tube. If you use the tube do not glue it in place but the ends will need to be milled. Yes, the blank can be turned without the tube or with the tube inserted but not glued in place.
Paint several colors of paint on a dowel rod and insert it into the blank moving the blank to the different colors. Pick the one you like best. Keep the stick, or sticks, for use next time.
Do a good turn daily! Don
Paint several colors of paint on a dowel rod and insert it into the blank moving the blank to the different colors. Pick the one you like best. Keep the stick, or sticks, for use next time.
Do a good turn daily! Don
ramaroodle
Member
Ooooo! I like that look.I would experiment. May want to try metallic blue. Here is an example. I had shown this when I made this pen set. I tried white and it washed it out(left) I tried a brown/red mix and it muddied the blank (bottom right side of blank) and settled on metallic blue which brought out the orange and highlighted the black (top right) I should have mentioned I tried black also but made the blank too dark and washed out the whites. Also mention I only back painted the blank and no need to paint tubes. I never do that. I will at time add some color to epoxy but not always. I did not in this case. All the Sierra pens I just shown were back painted with a color close to the blank color but that was because there were no veins running through them. View attachment 235663View attachment 235664
jttheclockman
Member
You can turn with tube if you use bushings but not if you TBC. The blank will spin on the tube. Drill and turn blank round down close to finish size and do as Don suggested. Find color, paint and glue in tube and finish turning to proper size. I remember years ago someone made the color stick and shown that idea. I bet is has to be over 10 years ago. Maybe it was Don.Drill and turn between centers with or without the tube. If you use the tube do not glue it in place but the ends will need to be milled. Yes, the blank can be turned without the tube or with the tube inserted but not glued in place.
Paint several colors of paint on a dowel rod and insert it into the blank moving the blank to the different colors. Pick the one you like best. Keep the stick, or sticks, for use next time.
Do a good turn daily! Don
FrankH
Member
Wow! I would never have thought to paint metallic blue. the pen and letter opener are fantastic.
jttheclockman
Member
That is the thing you never know what colors will do for a blank I wish I had taken a photo of the black sample I did and shown that compared to blue. Huge difference. But I threw it out.Wow! I would never have thought to paint metallic blue. the pen and letter opener are fantastic.
I would love to see how it looks when you are done. I have reverse painted and painted tubes, but for something that see-thru, I can always see the drill marks (I even sanded them how and didn't like the way it came out) . Good luck and let us see it please. Thank you.
qquake
Member
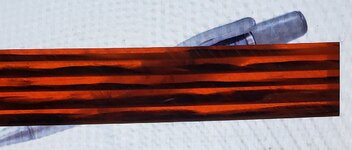
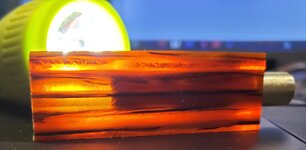
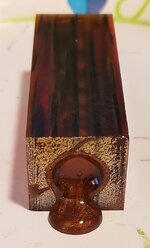
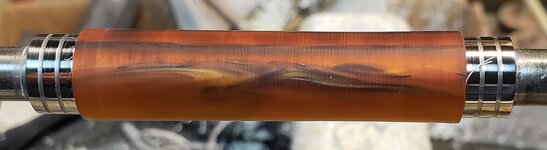
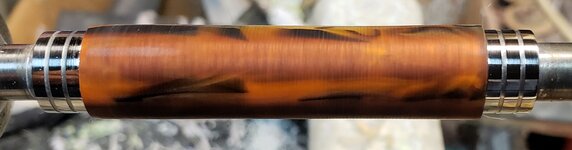
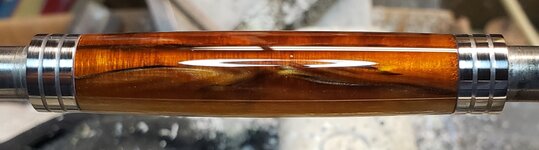
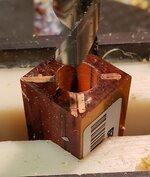
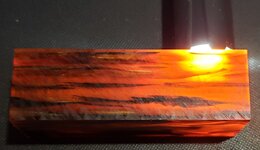
I haven't decided what to do yet. This blank isn't just translucent, it's almost clear in places. Whatever color I use will definitely show through. I think black would be too dark. I'm leaning towards something metallic, but I just don't know.
MPVic
Member
Test stick is an excellent idea!Drill and turn between centers with or without the tube. If you use the tube do not glue it in place but the ends will need to be milled. Yes, the blank can be turned without the tube or with the tube inserted but not glued in place.
Paint several colors of paint on a dowel rod and insert it into the blank moving the blank to the different colors. Pick the one you like best. Keep the stick, or sticks, for use next time.
Do a good turn daily! Don
Larryreitz
Member
Jim, thanks for posting this. I didn't look at it last night and boy am I glad I clicked on it this AM. Thanks to the advice offered by John T and Don Ward this thread is one of the most useful I have ever read.
Larry
Larry
qquake
Member
Rust-colored /red primer?
That's not a bad idea.
Curly
Member
I've mentioned it before but it bears repeating. Polish the end of the blank and then cut a thin slice off. Now you can put it on any colour you want to see the effect. Coloured paper, spray bomb lids, fabrics, nail polish bottles, anything. Once you find the colour you like you can get some of it in your favourite paint and use it. Also good for seeing what colours can do to enhance a blank or kill it.
mick
Member
Like Magpens suggested a nice coppery red would pop! I want add something tho. Since the blank is so transparent. If after drilling the hole isrough or looks too dull or cloudy run some rolled up sandpaper through it and then polish a bit. You'll be surprised the difference it will make.
Sent from my SM-G955U using Tapatalk
Sent from my SM-G955U using Tapatalk
qquake
Member
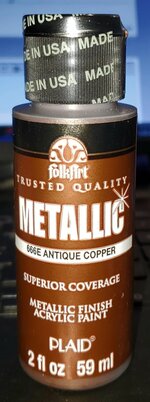
mick
Member
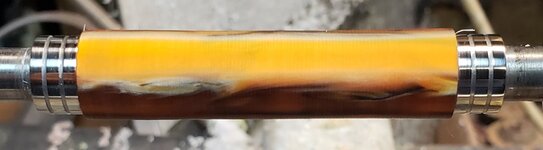
That is perfect!
Sent from my SM-G955U using Tapatalk
Sent from my SM-G955U using Tapatalk
qquake
Member
qquake
Member
mick
Member
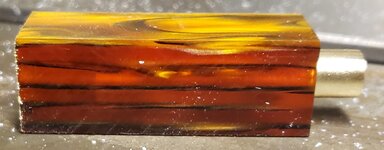
That color is going to be fantastic! Be sure you post the finished pen.
Sent from my SM-G955U using Tapatalk
Sent from my SM-G955U using Tapatalk
qquake
Member
qquake
Member
qquake
Member
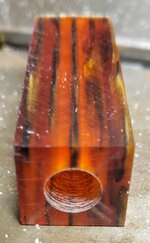
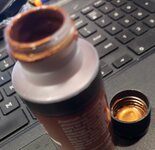
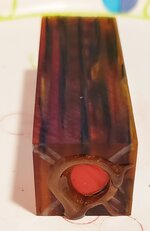
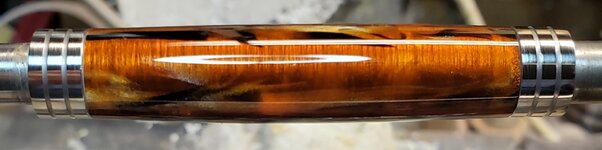
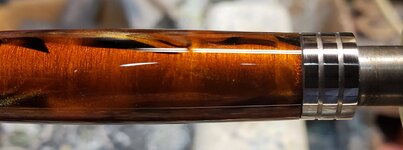
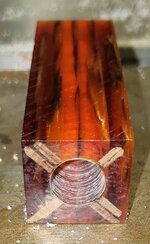
I don't like it. I'm guessing the radial scratches are drill marks. I thought the paint would hide them. I should have used the sandpaper-on-a-stick like Mick suggested. I do have enough of the blank left to try again.
Attachments
jttheclockman
Member
A blank that transparent definitely needs to have the inside sanded and polished. As I always say take a blank and break it down to layers. When all said and done. Top coat, blank material, inside blank material, adhesive, and then tube. Looks like the color will work for you though.
qquake
Member
I've been thinking about it, and even if I polished the inside, it still wouldn't look good. If I back paint it, the paint would show. If I paint the brass tube and/or color the epoxy, it would show. I can't imagine the blank looking good no matter what I do.
jttheclockman
Member
How do you figure that. Those type blanks are used alot. The key to a good paint job is to spray it and not brush it. Spray in from both ends and let drip free. Do it all the time. Just need to make sure the hole is large enough that you do not scrape it when putting tube in. You can do it. Do not give up.I've been thinking about it, and even if I polished the inside, it still wouldn't look good. If I back paint it, the paint would show. If I paint the brass tube and/or color the epoxy, it would show. I can't imagine the blank looking good no matter what I do.
qquake
Member
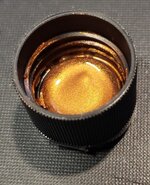
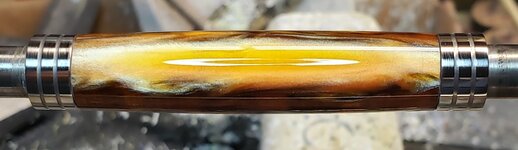
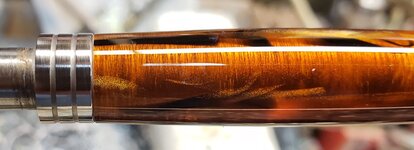
I suppose to the uninitiated they might look like part of the design. But I still think they're ugly.
Nice finish though. As I wrote, I bought special mandrel to sand the inside...it was smoother, but still not to my liking.I suppose to the uninitiated they might look like part of the design. But I still think they're ugly.
qquake
Member
I think the problem is, parts of this blank aren't just translucent, they're downright clear. Normally, with translucent blanks, I back paint, paint the tube, and color the epoxy to prevent seeing the "glow" (for lack of a better term) from the brass tube showing through. Especially at the ends, where the material is the thinnest. But with this blank, everything you do is going to show through.
qquake
Member
Xel
Member
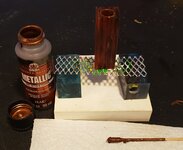
Have you tried chemical polishing with DCM? My drill bit left spiral gouges in a dear - but rather transparent - blank. I used an extra induction hotplate instead of the hairdryer and a small bottle of Goof-Off for the chemical itself, but everything else was basically the same set-up (including the adequate ventilation!). Downsides were 1) still having to manually sand the worst of it, and 2) the inside being so smooth resulted in decreased paint adhesion to the inside of the tube. Still think it was worth it.Does any one have an issue with seeing the drill marks when painting the inside of the barrel?
Maybe it'll help.
")
qquake
Member
Do you have any photos of your blank, especially before and after?
Thank you. I will read. I did try acetone, but not the above, Thx.Have you tried chemical polishing with DCM? My drill bit left spiral gouges in a dear - but rather transparent - blank. I used an extra induction hotplate instead of the hairdryer and a small bottle of Goof-Off for the chemical itself, but everything else was basically the same set-up (including the adequate ventilation!). Downsides were 1) still having to manually sand the worst of it, and 2) the inside being so smooth resulted in decreased paint adhesion to the inside of the tube. Still think it was worth it.
Maybe it'll help.
the link has before and after shots by Brad.Do you have any photos of your blank, especially before and after?
qquake
Member
I meant photos of Xel's blank.
Signed-In Members Don't See This Ad
sorry about that.I meant photos of Xel's blank.