Nice work - on the salvage and the turn!!
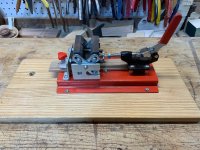
Collet chucks are descended from the metal working community. They provide you with minimal to no runout errors and a good solid, repeatable ability to hold your workpieces. They come in a number of different styles and sizes, with an ER32 collet style and associated chuck being the most popular size used for pens. Here is a link
Collet Chuck for the Stainless Steel Bottle Stopper one I currently use as a possibility. The chuck itself stays while you change out different collets inside of it for different diameter material that it will hold. You purchase the different collets based on the size needed, 'click' it into the chuck, then mount the chuck with collet into your headstock - using either direct threading it to the headstock, or the headstock morse taper, depending on what type of chuck you buy. If you combine the collet chuck with a good Jacobs chuck for the tailstock drill side, like this one
Drill Chuck and insure your lathe is aligned, you will solve a lot of your drilling issues. The biggest difference in collet chucks is the size (ER32 is typical), their maximum diameter (fractional or metric), and if they have a through hole in the chuck or not. Longer blanks are helped by a through hole, the one I referenced is not a through hole chuck - it is a closed hole, so blank size is limited by the depth of the chuck. Depending on your blanks, this will be an issue or not matter at all.
Hope this helps!
Kevin