Turning between centers - another way

Signed-In Members Don't See This Ad

Texatdurango

Member
Joined
Apr 23, 2007
Messages
4,649
Location
Show Low, Arizona
…. I am a bit jealous of the fridge, but hey I have a washer/dryer, 3 bikes, a water heater and everything else that doesn't fit in the house in my garage...er, I mean my shop.
I guess a washer/dryer trumps a fridge any day of the week… that's too funny! :biggrin:

….Is your dead center a special one? ....
Nope, just your plane-jane mt2 dead center, 3.1" long

Could you post some information about your sander and busing adapters? That looks like a great idea ….
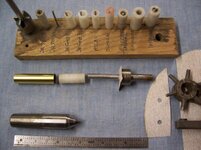
Someone made these things last year but I forgot who, if someone remembers please post their name since they are a good idea. I made mine out of a solid piece of steel and simply take an adhesive backed sanding disk, cut a strip then punch some holes with an old leather punch. I don't even bother rounding the pads, just stick one on. The white inserts are made from delrin rods and turned down to fit the ID of the tubes I use. The center hole provides a SNUG fit on the sander shaft. See the photo below.

….I don't use the skew to clean up the CA I just start with a rougher sandpaper. I was thinking of getting a scraper or modifying the flat skew I don't use anymore to do the same thing.
Good idea! Rough sandpaper is a HUGE culprit and takes a LOT of sanding to remove the deep scratches which try their darndest to stay 'till the bitter end and ruin an otherwise nice shiny finish!

Smoothing the CA "ridges" on a blank with a skew after applying CA has made my finishes look so much better and I think it has a lot to do with the fact that I start sanding with 600 grit rather than 320 or 400 like I used to. I have even heard of some folks starting with 150, 180 or 240…… I shudder when I think of the deep scratches those grits are introducing to a blank.
 

Attachments

  • sander.jpg
    sander.jpg
    75.7 KB · Views: 306

Texatdurango

Member
Joined
Apr 23, 2007
Messages
4,649
Location
Show Low, Arizona
I don't know where to get one today but after the next time I go to George's shop, we might be able to have an auction for one!

Nice tutorial George!

Oh that's nice........ steal from an old guy trying to make ends meet on a fixed income pension! :frown:

Heck, why wait for an auction....... Do I hear a bid? :biggrin:
 

CSue

Local Chapter Leader
Joined
Jan 16, 2007
Messages
2,368
Location
Laveen, AZ, USA.
George, thank you! There isn't much more I can say that hasn't already been said. It is the best tutorial I've seen & read in awhile! Thanks for posting!
 

Freethinker

Member
Joined
Jun 26, 2007
Messages
275
Location
MO.
Fantastic tutorial. I am going to try it just the way you've outlined.....EXCEPT, I don't know if I have the nerve :)eek:) to present a skew to the blank after adding all my coats of CA.

I am very comfortable with the skew, and do a great deal of my turning with one, but it seems you'd have to be mighty careful to only take off maybe 1 or 2 thousands so as to not cut all the way through the CA in some place.............has this ever been a major concern of yours?

Have you ever measured --roughly-- how many thousands you are adding when applying , for instance, 8 or 10 coats of thin CA to the blank?

A hard question to answer, I know, since so many factors are involved; application pressure, viscosity of the CA used, number of coats, etc...........but I'm just trying to get a rough idea of how much leeway, so to speak, you have when you put that skew up against that blank to flatten the CA.

Thanks for the tutorial though. Good job.
 

Texatdurango

Member
Joined
Apr 23, 2007
Messages
4,649
Location
Show Low, Arizona
I've got a few thoughts in blue below......

Fantastic tutorial. I am going to try it just the way you've outlined.....EXCEPT, I don't know if I have the nerve :)eek:) to present a skew to the blank after adding all my coats of CA.

I am very comfortable with the skew, and do a great deal of my turning with one, but it seems you'd have to be mighty careful to only take off maybe 1 or 2 thousands so as to not cut all the way through the CA in some place.............has this ever been a major concern of yours?

No, because I sneak up on the blank so carefully that taking thick fuzz off is too much at a time! If you think about shaving thin fuzz off rather than cutting the CA off, you will do a lot better at it than you think. YES, I have cut through the CA into the wood and it's easy to tell because white fuzz is CA, colored fuzz isn't. :) If I cut through to wood I simply stop and apply more CA!

Have you ever measured --roughly-- how many thousands you are adding when applying , for instance, 8 or 10 coats of thin CA to the blank?

A hard question to answer, I know, since so many factors are involved; application pressure, viscosity of the CA used, number of coats, etc...........but I'm just trying to get a rough idea of how much leeway, so to speak, you have when you put that skew up against that blank to flatten the CA.

It's easier to determine than you think. Have a look at the caliper readout in step 14 then in step 18. Those are real readings, the first is the blank turned down, the second is after the CA is applied.

Thanks for the tutorial though. Good job.
 

Paul in OKC

Member
Joined
Jul 26, 2004
Messages
3,089
Location
Oklahoma City, OK, USA.
For those of you turning between centers, I wonder if you find it an issue when doing slims or similar pens with two halves. Since I'm new, when I'm turning the slims, I like to see the top and bottom halves together so I can make sure their contours match each other. Is this not and issue for most of you?

Mike

Not really a problem, Mike, if you use the bushing sizes for your guide. If you run larger slim lines and make your own center bands or don't use center bands. you may need to come up with something different, or use calipers.
 

tgraytn

Member
Joined
Nov 19, 2009
Messages
82
Location
Tennessee
I received my dead center from Penturners Products the other day (Super fast shipping and GREAT quality) and used it tonight for the first time. What do I think? BYE BYE Mandrel!!! This is definitely the way to go! I love it!
 

larryc

Member
Joined
Oct 2, 2009
Messages
1,135
Location
Mableton, GA (Near Atlanta)
Great tutorial. I have started TBC with some acrylic blanks that I had with the brass tubes already installed. I liked your idea of the sanding tool so much that I made one using a mandrel nut (since I don't need the mandrel nut anymore) and a 1/4-32 bolt with the head cut off.

I guess I am missing something. In Step 10 you show the upper and lower blanks with bushings installed but in Step 11 it looks as if you are only turning one blank. Is this correct - you turn each blank individually? Is there a way to turn and finish both blanks at the same time as is done using a mandrel, or is this one of the downsides of TBC?
 

Texatdurango

Member
Joined
Apr 23, 2007
Messages
4,649
Location
Show Low, Arizona
Great tutorial. I have started TBC with some acrylic blanks that I had with the brass tubes already installed. I liked your idea of the sanding tool so much that I made one using a mandrel nut (since I don't need the mandrel nut anymore) and a 1/4-32 bolt with the head cut off.

I guess I am missing something. In Step 10 you show the upper and lower blanks with bushings installed but in Step 11 it looks as if you are only turning one blank. Is this correct - you turn each blank individually? Is there a way to turn and finish both blanks at the same time as is done using a mandrel, or is this one of the downsides of TBC?

No, you are not missing anything, I just put both blanks together for the photo. When turning between centers I turn one blank at a time. I've never given any thought to mounting two blanks at once since I guess I have done it this way so long, I see no benefit to trying two at once.

To be honest, I don't make that many kit pens any more so when I do, I'm never in a hurry and to keep from getting bored I will change my routine around now and then. One time I will turn and sand both blanks before finishing, other times I will turn, sand, and apply the finish to one blank before doing the second one since it doesn't matter.

After turning center to center for a while you will get into a routine and soon will start finding your own little favorite tricks and short cuts. With all the positives of turning between centers, turning two blanks at once isn't a downside in my mind, it's a hassle. :)
 
Last edited:

tgraytn

Member
Joined
Nov 19, 2009
Messages
82
Location
Tennessee
Will this method work using an acrylic blank? In other words, will the steb center hold the acrylic blanks?
 

jleiwig

Member
Joined
Jan 10, 2007
Messages
1,860
Location
Monroe, Ohio, USA.
Will this method work using an acrylic blank? In other words, will the steb center hold the acrylic blanks?

If it's a fragile blank, you may want to make sure to drill a small hole first over your center mark so that pressure from the points doesn't split the blank.
 

rjwolfe3

Member
Joined
Feb 12, 2008
Messages
8,352
Location
Mansfield, Ohio, USA.
Funny you should mention that Justin because I just did that, lol. I have five different "Steeler" colors type blanks that I am trying to find just the right one for the wife. I managed to split the only one that looked right!
 

Texatdurango

Member
Joined
Apr 23, 2007
Messages
4,649
Location
Show Low, Arizona
While talking about steb centers I thnk we need to remember that the center point of a steb center is spring loaded and the center point itself will not be the part of the steb center that is applying the pressure on the blank when you tighten it up. The outer teeth will be applying most if not all of the pressure while the center only aligns the blank initially. But as Justin points out, the end of the blank that faces the tailstock is most commonly held by just the 60 degree live center which is applying all of the force to the center of the blank.

Are ya'll using 60 degree center drills to drill your holes (shown below)?

The only time I use a center drill is on very fragile blanks where the spring loaded center punch itself might cause a piece to chip out when I mark the initial center. Then, I will use either a #1 or #2 center drill shown below, that way I will have a 60 degree chamfer for the steb center point to fit into rather than just the edge of a hole from a spiral drill bit, but I don't believe much pressure is being applied at the center of these drives, I can push mine in half way with my finger.


stebcenter_l.jpg


480.2990.jpg
 
Last edited:

handplane

Member
Joined
Aug 8, 2008
Messages
69
Location
Guantanamo Bay, Cuba
Another GREAT tutorial George. I started doing this recently and it has made a huge difference in my work. I would like to know about the tool you use to turn your blanks. What is it? Maybe I missed something but it looks like a flat scraper.
 

Texatdurango

Member
Joined
Apr 23, 2007
Messages
4,649
Location
Show Low, Arizona
..... I would like to know about the tool you use to turn your blanks. What is it? Maybe I missed something but it looks like a flat scraper.
It is one of those carbide insert turning tools that was all the rage around here earlier this year. I made this one and ordered a slew of carbide tips for it this summer. Due to the angle of the very sharp carbide cutter it cuts rather than scrapes. At first I thought... what a piece of crap, what's everyone so excited about?" I soon found the proper angle of attack and where the "edge sweet spots" were and found that it was perfect for truestone blanks as it cut through them like a warm knife through margarine and I didn't have to stop and re-sharpen every few minutes like I did with my skew! Now it is the tool I grab when I start turning a pen blank, bowl or just about anything.
 
Joined
Sep 24, 2006
Messages
8,206
Location
Tellico Plains, Tennessee, USA.
With George's Permission, I have converted this thread to a PDF for people to save to their computer.

http://www.penturners.org/forum/attachment.php?attachmentid=20836&stc=1&d=1260887257

Hope it helps! :biggrin:

Thanks Justin... that saves me from having to create my own....

George, this is definitely a tut for the shop.... I'll print and put in my notebook out there... I don't keep a computer in the shop ... too dirty.. don't have a wireless connection and would have to run a cable the 50+ feet to the shop... great job on the tutorial.
 

Texatdurango

Member
Joined
Apr 23, 2007
Messages
4,649
Location
Show Low, Arizona
After posting the above tutorial, Justin (Jleiwig) came up with what I thought was a good idea so I acted on it and here are the changes.

To begin with this is NOT necessary to turn between centers, it is for those efficient (or lazy :)) people who don't like changing out the mt-2 steb center, mounting the Beall collet chuck then removing the Beall chuck and mounting the mt-2 dead center. All that on and off, on and off, on and off, mounting the steb drive then knocking it out, mounting then tightening and using the Beall collet chuck then loosening and removing it to mount the mt-2 dead center wears a guy out! PLUS... this puts the pen blank farther away from the headstock giving you some elbow room to work the blank! :eek:

Now with the "New and Improved" method it's a simple matter of mounting the Beall collet chuck then a twist of the collet tightening nut to change out between steb drive, round blank then finally the dead center for final finishing.

Here are a few photos to illustrate what I am talking about, hope it makes sense.

First I bought a 1/2" steb drive, P/N 161-0161 from Craft Supply. I chose their center because it appeared to have a larger diameter shank in which to modify. The steb drive looked similar to this (mine is a 1/2", this looks to be the 1" size) before I turned it down to fit into a 3/4" collet:
stebdrive.jpg


I turned down the rear section to .748" to fit snugly into my 3/4" collet. Here is the modified center:

colletmod1.jpg


Now the steb drive can easily be inserted into my 3/4" collet so I can turn down a square blank:

colletmod2.jpg


Here is the steb drive mounted in the collet:

colletmod3.jpg


Now I'm ready to grab onto a square blank and turn it round:

colletmod4.jpg


Now here is where the ease of all this becomes apparent. With a simple twist of the collet nut, the steb drive is removed and the blank is inserted in the same collet for further working:

colletmod5.jpg


Once the blank has been worked by shaping, drilling and/or tapping, it is removed by a simple twist of the collet nut then the modified mt-2 dead center is installed for final turning, sanding and finishing. The dead center mod was easy, I simply mounted the dead center in the headstock of my metal lathe, brought up the tailstock with a 60 degree dimple to make sure the center was indeed centered then cut away about 1/2" of the taper. Then I mounted my collet chuck and inserted the dead center in backwards grasping the 1/2" true area and turned off the rear to match the front diameter. I made mine 5/8" diameter since I use that collet size a lot when holding my custom pens for final tapping and sizing.

colletmod6.jpg


From here on out, everything is the same as in the above tutorial:

colletmod7.jpg


So there you have it, the Beall chuck stayed in place from start to finish and in my opinion is worth the purchase of the steb drive and modified mt-2 dead center.
 
Last edited:

Texatdurango

Member
Joined
Apr 23, 2007
Messages
4,649
Location
Show Low, Arizona
Brian and Rob,

If you want to buy the steb drive, I'll turn it down for you, just pay the postage! Also, a few folks have asked about the dead centers so I'm thinking of buying a few mt-3 dead centers and turning them to 3/4" like I did mine below. I found a carbide tipped mt-3 dead center that came with my letal lathe that I never used so turned it to 3/4" this afternoon, so now I have both 3/4" and 5/8" centers and they run as true as if they were in the headstock spindle.

I'm guessing a carbide tipped mt-3 center will run around $10-$12 so with postage and $10 for my work, they might come to around $25-$30. If interested, let me know, if I get a few folks interested, they can split the shipping so might even be less.

Here are the ones I made today to get an idea of what I'm talking about, top is 3/4" dia, bottom is 5/8" dia. The larger center is pretty long so I'm thinking of shortening it a bit:

dead-centers.jpg
 

rstought

Passed Away Nov 11, 2016
In Memoriam
Joined
Feb 9, 2007
Messages
216
Location
Charlotte, North Carolina, USA.
George...

I'm interested in both offers - I have a 1/2" Stebcenter that I'd love to have modified, and I still have a few $$$ left over from Christmas, so I could go for the dead center right away, too.

Let me know when/if you are ready, and I'll be your first customer...
 

lorbay

Member
Joined
Jul 2, 2009
Messages
3,378
Location
BC. Canada
Excellent tutorial. Thx for sharing!! Also I am interested in the dead centre and if you can get me a steb centre I wouls take that too rather than me ship you one and then back at me.

Lin.
 

Texatdurango

Member
Joined
Apr 23, 2007
Messages
4,649
Location
Show Low, Arizona
I was just informed that there is another thread where folks are having dead centers made and I don't want to step on any toes so I will refer anyone interested in having centers made to: http://www.penturners.org/forum/showthread.php?t=55016&highlight=dead+center

I was really just doing this as a favor for those with no means to make their own rather than start a little dead center making operation. :)

Thanks for understanding.
 
Signed-In Members Don't See This Ad

Sberger

Member
Joined
Oct 12, 2009
Messages
113
Location
Rockport, TX.
Great job, and thanks for sharing. You are fortunate to have both the tools, knowledge, and ability. We are fortunate that you share. Good man!
 
Top Bottom