Threading Attempt #5

Signed-In Members Don't See This Ad

cnirenberg

Member
Joined
Jan 26, 2004
Messages
2,700
Location
Fort Myers, Fl
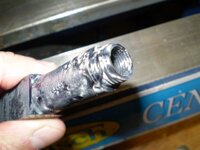
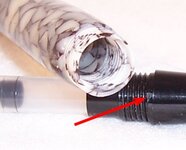
After a few tries, I have come up with a method which work for me. But, I am missing something. Look at the pic with the nib threaded into the "babbel" section. There is a gap which wasn't there on previous attempts. It looks like that portion isn't threaded. Should I drill out thefirst few threads or use a end mill to clean it up a bit. What's the best course to go?
My thanks to George and all that have posted to this type of thread before, I have learned a great deal, and have had a blast imploding, breaking, cracking.......
 

Attachments

  • P8150013.JPG
    P8150013.JPG
    44.4 KB · Views: 306
  • P8150016.JPG
    P8150016.JPG
    58 KB · Views: 305
Signed-In Members Don't See This Ad

BRobbins629

Passed Away Dec 28, 2021
In Memoriam
Joined
Mar 8, 2006
Messages
4,037
Location
Richmond, VA, USA.
There is a little shoulder on the Berea nibs that you can deal with in one or two ways. If you're doing this on a wood lathe, you can take a parting tool and carefully open up section with the inside threads for the length of the the shoulder. On a metal lathe this can be done with a boring bar. Other solution is to chuck the nib holder and turn off the shoulder. I have done both, but prefer the first method.

Yet another solution is to get a reamer the size of the shoulder and ream the hole out until it fits.

Welcome to the club!
 

cnirenberg

Member
Joined
Jan 26, 2004
Messages
2,700
Location
Fort Myers, Fl
Bruce,
Thats kind of what happened on one of my first tries. I had never used a tap before and chucked that baby in tight. I ended up using the tap as a reamer. Patience helps too.
I picked up a tapping guide and no problems. The Pam trick works great.
 

Texatdurango

Member
Joined
Apr 23, 2007
Messages
4,649
Location
Show Low, Arizona
Like Bruce, I used to take a small skew and turn the inside back enough to make room for the shoulder. But I found that I had a ball rotary file in the shop that was just the right diameter so now I just use the rotary file to radius the inside after threading.

There is another tiny culprit you need to deal with. These threads are molded plastic and have small mold marks around the shoulder, usually three. I don't know what their purpose is and have found that the section threads on easier if they are not there so I take a razor knife and slice them off.

I attached a photo showing where I am talking about.
 

Attachments

  • closeup of nib.jpg
    closeup of nib.jpg
    17.1 KB · Views: 246

cnirenberg

Member
Joined
Jan 26, 2004
Messages
2,700
Location
Fort Myers, Fl
George,
I will try the file this weekend. I was looking at the nib section and how it attaches to the coupler last night and I haven't the foggiest idea what those things are. Good thing I still have all my carving knives. Thanks for your help, I did get the HF set for about $20like you said, and probably will upgrade some sizes at a later date.
 

pipecrafter

Member
Joined
Oct 31, 2008
Messages
320
Location
Clayville, Rhode Island
You can also ream the ream the first few threads out with a slightly larger drill bit. I think that I use a 3/8" when I do mine, and it works out perfectly - even though I think that 25/64" works out mathematically more appropriate.
 

BRobbins629

Passed Away Dec 28, 2021
In Memoriam
Joined
Mar 8, 2006
Messages
4,037
Location
Richmond, VA, USA.
One other thing I do is to chase the threads on the nib holder with a M10 x 1 die. I think this is my way of getting rid of those mold marks George talks about.
 

cnirenberg

Member
Joined
Jan 26, 2004
Messages
2,700
Location
Fort Myers, Fl
Kurt and Bruce,
I will let you know what seemed to work best. Hopefully, I can get a little garage time tonight or tomorrow morning. Thanks for the advice. The kitless style is too tempting not to try, I get tired of sanding through all those bushings.
 
Top Bottom