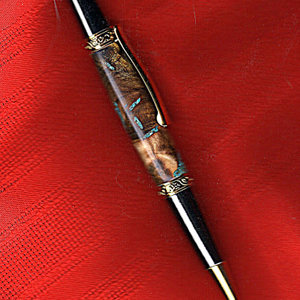
The Opal Dealer

Signed-In Members Don't See This Ad

EricRN

Member
Joined
May 16, 2019
Messages
760
Ive gotten good results with their stuff too. I was actually surprised how easily it sanded and polished up.
 

FGarbrecht

Member
Joined
Aug 22, 2019
Messages
618
Location
NY
Yeah, I've done a few small inlays and some pen oops bands and it works easily and looks great. For anyone who is curious but hasn't worked with it, it's simple: place opal powder or pieces in the inlay cutout and drop in thin CA to fix in place. For a pen band, just work in small amount and work your way around putting in a small amount of powder on top and fix with CA. Fill to slightly above the surface level and then work down when the CA is cured with turning tools or standard sanding and polishing materials.
 
  • Like
Reactions: DrD

greenacres2

Member
Joined
May 2, 2017
Messages
1,686
Location
Northwest IN
Tony--i've not seen how fine this product is ground, but i've been using dust of turquoise, lappis, copper and aluminum in voids in burl that show up when i'm close to finished diameter. As mentioned above, i work the dust into the void then add a few drops of super-thin CA. The CA carries the dust where it needs to go as the void changes sizes in that last 1/16" or so of turning. I tried doing that with epoxy, but i was getting clumpiness and also the epoxy was too thick to find the void below the surface. That use has saved several blanks and i think adds a touch of artistic impression. Craft Supplies carries a nice assortment of dust--not cheap, but it only takes a little cuticle spoon from a manicure kit to fill an ugly void.
earl
 

FGarbrecht

Member
Joined
Aug 22, 2019
Messages
618
Location
NY
Thank you. How do you make the cut-out to hold the opal please?
On a pen if you want to create a simple inlay band, take the blank down to finished size and then just use a parting tool to cut down into the blank 1/16" or so. I've used simple drilling to create circular inlay on knife scales. Or you could use a carving knife or dremel tool if you are feeling more artistic....
 

BruceA

Member
Joined
Jan 27, 2008
Messages
245
Location
Fayetteville, TN, USA.
Question: the opal grains come in Medium and Fine. Which would be better for a 1/16" band line on a pen?

Question: using as a simple accent line on a pen, what amount of opal would you suggest purchasing? It comes in 1 gram increments.

This looks "enticing"...!
Thanks for the heads up on the site sale!
 

FGarbrecht

Member
Joined
Aug 22, 2019
Messages
618
Location
NY
Question: the opal grains come in Medium and Fine. Which would be better for a 1/16" band line on a pen?

Question: using as a simple accent line on a pen, what amount of opal would you suggest purchasing? It comes in 1 gram increments.

This looks "enticing"...!
Thanks for the heads up on the site sale!
For a tiny inlay like a 1/16" band I would use the fine grains. Medium gives a different (and nice) appearance but you'll have spaces between grains that may be undesirable in the finished pen.

Although the 1 gm bags look tiny, a little goes a long way if you are just inlaying bands or shallow lines. You can probably do 10 or more pens with one bag if you are careful.

As with everything, there is a bit of a learning curve and some pitfalls with the technique. Here's what a do for a band on a pen:
1. With the pen mounted and turned down to near finished size, use a parting tool to create a circumferential cut. It doesn't have to be deep; just deep enough to get at least a couple of layers of opal dust into the groove, but make sure there is enough depth so you can do the finishing steps without completely losing the stone.
2. Keep the pen mounted on a spindle or something to hold it horizontally so that you can turn it.
3. Place a clean piece of paper underneath to catch opal grains that fall through for re-use.
4. With a tiny spatula, make a small mound of opal in the groove at the very top of the arc. Put in enough opal to rise above the surface of the pen. Drop as small an amount of CA as possible onto the opal to saturate it and hold it in place. Don't use thin CA (unless you have a very fine needle tip applicator and can control the flow precisely) because it will run and drip and your opal will fall off the pen in a big glop. Medium CA is better, it gives you a little more working time. Also, thin CA will tend to run into the groove around the pen so you'll have less (or no) space to place more opal as you work your way around. You can use a small spatula or toothpick to move the opal around to make sure it is packed into the groove before the CA sets. Once your mound looks good hit it with a tiny blast of CA.
5. Rotate the pen 5 or 10 degrees and repeat step 4 as many times as necessary to get a complete ring of opal. Once the entire ring is done, apply thin CA to the whole thing to make sure everything is glued into place securely. Use more accelerator now. It should look pretty bad at this point.
6. Let the opal / CA set up. I usually go overnight.
7. I finish at high speed with a carbide scraper taking very light cuts to level the CA / opal down to the level of the pen surface. Finish as usual now with abranet, micromesh, CA or whatever you like.

There are a couple of people on youtube making opal inlay rings who show the whole process in detail, worth taking a look to see how a master does it.
 

BruceA

Member
Joined
Jan 27, 2008
Messages
245
Location
Fayetteville, TN, USA.
FGarbrecht, excellent info on the inlay process! I'm going to get a couple different one gram Fine packs @$8.75 each to give this a try. There are some great colors to choose from. Thanks for the good info.
 

TonyL

Member
Joined
Mar 9, 2014
Messages
8,904
Location
Georgia
On a pen if you want to create a simple inlay band, take the blank down to finished size and then just use a parting tool to cut down into the blank 1/16" or so. I've used simple drilling to create circular inlay on knife scales. Or you could use a carving knife or dremel tool if you are feeling more artistic....
Thank you. I also have trouble control the turquoise stone powder. Maybe this stuff will be easier to control. Thank you.
 

BruceA

Member
Joined
Jan 27, 2008
Messages
245
Location
Fayetteville, TN, USA.
Tony, yes, the synthetic opal is sold by the GRAM.
I asked The Opal Dealer about using it to create a 1/16" deep x 1/8" wide accent on pens, and whether to buy the Fine or Medium grit, and their reply was:

For pen making we usually suggest our fine size. The fine size would fill the space a bit better. For that small of an inlay space, I would guess 1 Gram would go as far as 30 pens but that's just a guesstimate.

Found this photo on their Facebook page from a Sale back in July, and it shows the 1 gram packets:
Not clear on the actual measurements of the packets.
opal.jpg
 

FGarbrecht

Member
Joined
Aug 22, 2019
Messages
618
Location
NY
I have a bunch of the 1 gram packets; I'm not sure what the volume is but I'd guess about 1 teaspoon, maybe a little more.
 

FGarbrecht

Member
Joined
Aug 22, 2019
Messages
618
Location
NY
Thank you. I also have trouble control the turquoise stone powder. Maybe this stuff will be easier to control. Thank you.
Tony - The opal tends to go all over the place too unless you have a very steady hand, that's why I put a sheet of paper underneath to collect and re-use the spillage. I have some turquoise and malachite powder as well but haven't used it yet. I've also got some Inlace turquoise, which is a premixed turquoise-resin mixture that you can just slap into your inlay. It works well and finishes nicely but the turquoise is a little coarse so may not be the best choice for pen work.
 

sbwertz

Member
Joined
May 11, 2010
Messages
3,649
Location
Phoenix, AZ
Thank you. How do you make the cut-out to hold the opal please?

Tony, you can use a dremel tool to make voids to infill, or use the fill to fill natural voids and cracks in otherwise unusable blanks. We do it a lot at the blind center. I use crushed turquoise, lapis lazuli, red jasper, and malachite. I crush it using a 2" piece of threaded pipe with a cap on one end and a 1 inch piece of threaded pipe with a cap on one end and put the stone in the big one and beat on it with the little one!

You can also use a parting tool to make a band around the pen all the way to the brass tube and mix the crushed stone into epoxy and use the resulting paste to fill the ring. It is also great for repairing burls when a piece comes out and flies off into never never land leaving a hole in your pen blank.

When using the dremel tool, I use old dental bits my dentist saves for me. When they are too dull to drill teeth, they are still plenty sharp to cut wood. I use it to clean out natural cracks and voids and If I want to add an accent color to a blank with no voids, I use the dremel and dental bit to route out a groove, following a prominant grain pattern so It looks like a natural void.

 
Joined
Dec 22, 2017
Messages
3,032
Location
Wolf Creek Montana
Lots of good info here and I'm glad I came across it. I've got some very old (60's) Elk antler my father in law gave me. Has anyone here used the crushed opal in a cut in design on the marrow? I'm thinking of using a Dremel tool to cut the pattern and then filling and gluing the crushed opal into the pattern. Thoughts?
 
Top Bottom