The Finish Quest

Signed-In Members Don't See This Ad

shastastan

Member
Joined
Jan 15, 2014
Messages
323
Location
N CA
I'm finally admitting that I've been on the finish safari and it's been for many years, too. For those of you that have found what they believe to be the very best finish (for pens, that is), Congratulations. For those of you who are using a finish that they like but continue to search. "Ah feel your pain." Currently I sand to 600 grit and use the micro polishes that I bought from Craft Supplies. After that, I apply a couple of coats of wipe on poly. Actually, I'm pretty happy with the shine from the micro polishes, but I apply the wipe on poly for durability. I used to use a 50-50 mix of Deft lacquer (gloss) and lacquer thinner. I liked this finish but it was sort of tedious. I sanded to 1200 grit. I applied 6 coats of finish, drying and buffing between each coat. Finally, I have to admit that I'm one of those woodworkers who admittedly have not spent enough time and attention to learn more about finishing. Maybe the simplicity and ease of application of wipe on poly has me under it's power? Please join in with your comments and experiences.

P.S. I just read jrista's post on another thread (re a finish study) and I learned some helpful ideas from it.
 
Last edited:
Signed-In Members Don't See This Ad

jttheclockman

Member
Joined
Feb 22, 2005
Messages
19,132
Location
NJ, USA.
Stanley that is and always will be the $1000 question here. I have settled on 2 basic types of finish. CA and lacquer. What I would comment on in your attempts is when you talk finish and then mention you use micro polishes and then top coat you are not doing anything. You do not put a polish under a top coat. Waxes or polishes do not go well under poly or other top coats. To me a waste of time there. Sand to 600 is fine and then top coat with poly. Now many types of poly so that comes into play but poly is the top coat. Any enhancement of the shine with waxes or polishes is basically temporary. Yes it may bring the shine up a notch but will fade with use. But when doing this you need to let the poly cure totally and not just dry. It needs to get rock hard. Then an automotive wax will bring up the shine somewhat.
 

montmill

Member
Joined
Jan 26, 2008
Messages
644
Location
13528 Old Hwy. G Montfort, Wisconsin
I've found four coats of Minwax poly (not thinned) isn't enough on an ice cream scoop. My kids each have an ice cream scoop finished in poly, four coats, and they have lost the finish. I'm now using six to eight.
 

shastastan

Member
Joined
Jan 15, 2014
Messages
323
Location
N CA
Stanley that is and always will be the $1000 question here. I have settled on 2 basic types of finish. CA and lacquer. What I would comment on in your attempts is when you talk finish and then mention you use micro polishes and then top coat you are not doing anything. You do not put a polish under a top coat. Waxes or polishes do not go well under poly or other top coats. To me a waste of time there. Sand to 600 is fine and then top coat with poly. Now many types of poly so that comes into play but poly is the top coat. Any enhancement of the shine with waxes or polishes is basically temporary. Yes it may bring the shine up a notch but will fade with use. But when doing this you need to let the poly cure totally and not just dry. It needs to get rock hard. Then an automotive wax will bring up the shine somewhat.
Thanks for the response. Putting poly over the micro waxes is not my original idea. I got the idea from a Craft Supplies demo. Prior to that, I had not heard of this process. I may go back to the 50-50 Deft/Lacquer thinner. It works good for durability, but takes a little more effort. I'm not a commercial pen maker and my pens get used a lot by those I give them to. I have not had good luck with liquid wax finishes lasting over time. Deft has lasted quite well on furniture and WOP has done well on salt & pepper shakers. WOP can take some time to fully cure though.
 

shastastan

Member
Joined
Jan 15, 2014
Messages
323
Location
N CA
I've found four coats of Minwax poly (not thinned) isn't enough on an ice cream scoop. My kids each have an ice cream scoop finished in poly, four coats, and they have lost the finish. I'm now using six to eight.
You might try Deft (gloss or satin). It has held up well for us.
 

jttheclockman

Member
Joined
Feb 22, 2005
Messages
19,132
Location
NJ, USA.
Stan whoever is giving that advice at Crafts Supply is not doing a good job. Ask any furniture finisher and wax is the one problem they have to avoid in applying a top coat finish. They have to even be careful when cutting woods because many times they use lubricants for tablesaw tops as well as gears. But they stay away from silicones and petroleum type sprays. They use dewaxed shellac to seal woods and so on. So using a polish or wax under a top coat is not a good thing. Anything on top of a top coat can enhance a shine but can also cause dulling. Poly will stand up better to a pen than lacquer but both work well and get overlooked many times because we focus on CA finishes and the like. Not sure why you are thinning lacquer because it melts into each coat as you apply and you control the number of coats. When thinning you have to increase coat number. Deft is a good product. I like it. Good luck.
 

shastastan

Member
Joined
Jan 15, 2014
Messages
323
Location
N CA
Stan whoever is giving that advice at Crafts Supply is not doing a good job. Ask any furniture finisher and wax is the one problem they have to avoid in applying a top coat finish. They have to even be careful when cutting woods because many times they use lubricants for tablesaw tops as well as gears. But they stay away from silicones and petroleum type sprays. They use dewaxed shellac to seal woods and so on. So using a polish or wax under a top coat is not a good thing. Anything on top of a top coat can enhance a shine but can also cause dulling. Poly will stand up better to a pen than lacquer but both work well and get overlooked many times because we focus on CA finishes and the like. Not sure why you are thinning lacquer because it melts into each coat as you apply and you control the number of coats. When thinning you have to increase coat number. Deft is a good product. I like it. Good luck.
Thanks again for the advice. This very valuable info for pen making. Disassembly and re-sanding is not practical all with pens. I made a little drying rack a couple of years ago with a pic posted on here. My garage is too cold to get stuff to dry in the winter so I put the finish on and bring the rack inside to dry. I thin the Deft with lacquer thinner and apply very light coats so it dries on the lathe in about 2 minutes @ 3400 rpms. Yes, it takes about 11 coats for the shine that I like.
 

PatrickR

Member
Joined
Apr 8, 2017
Messages
1,427
Location
Rural America
To johns point, an old saying in woodworking is "once you wax, you can never go back". Wax over shellac used to be a common finish but it is not durable and VERY difficult to refinish. (If not impossible)
Second to CA for me is dip finishing with lacquer. You get a durable thick film with one application and if you don't end up with any dust nibs, no post application processes needed.
 

shastastan

Member
Joined
Jan 15, 2014
Messages
323
Location
N CA
@Patrick. I assume that the ends would have to be plugged to keep the finish out of the tubes? I guess that I could turn some plugs using my collet chuck. I could connect the plugs inside the tubes using some very thin wire. I had not heard of the dip method before. Would you use unthined lacquer?
 

PatrickR

Member
Joined
Apr 8, 2017
Messages
1,427
Location
Rural America
@Patrick. I assume that the ends would have to be plugged to keep the finish out of the tubes? I guess that I could turn some plugs using my collet chuck. I could connect the plugs inside the tubes using some very thin wire. I had not heard of the dip method before. Would you use unthined lacquer?
There are a few members here who do it in one form or another, some searching will lead you to info/options.
here is an old thread of mine that shows how I do it. My process hasn't changed too much.
I now make the plugs from HDPE or delrin. No need for them to be connected in any way. The fit to the tubes has to be snug enough to keep liquid out.
i now use brushing lacquer. Normally thinned by about 1/3. It is necessary to allow it to flow out evenly before setting. If it doesn't end up with a thick enough film as you want it can be repeated after a couple hours without any pretreatment. Depending on the weather a retarder may be necessary to keep it from setting too fast or blushing (whitening caused by high humidity). I always add at least a few drops to slow drying. More if the humidity is above 70 And don't do it at all when its raining. also best to do it in as dust free an area as possible.
 

shastastan

Member
Joined
Jan 15, 2014
Messages
323
Location
N CA
Thanks for taking time to pass on your tips, Patrick. PSI url said item not available, but another poster showed an 18 rpm motor on Amazon for $12 +. The rotisserie is something that I had not thought of, but it sure makes sense. Duh!
 

PatrickR

Member
Joined
Apr 8, 2017
Messages
1,427
Location
Rural America
Thanks for taking time to pass on your tips, Patrick. PSI url said item not available, but another poster showed an 18 rpm motor on Amazon for $12 +. The rotisserie is something that I had not thought of, but it sure makes sense. Duh!
I had forgotten but the motor on that psi unit died. I got a set of three off Amazon that were a direct replacemen. Easy enough to make a stand.
this pen was finished in this manner with lacquer.
904305D5-F6CA-4AA6-8C3E-878F945D7CA7.jpeg
 

shastastan

Member
Joined
Jan 15, 2014
Messages
323
Location
N CA
I had forgotten but the motor on that psi unit died. I got a set of three off Amazon that were a direct replacemen. Easy enough to make a stand.
this pen was finished in this manner with lacquer.
View attachment 332086
Wow, that's beautiful!! I just ordered a small motor ($11), a cord pigtail, and some shaft fittings. I hope to get a setup done next week.
 

shastastan

Member
Joined
Jan 15, 2014
Messages
323
Location
N CA
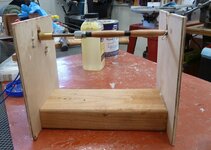
Here's a pic of the pen drying "rotissierie" I'm trying today. The lacquer is brushing Deft. It said not to thin so we'll see what happens. I bought the motor, arbor sleeve, and the pigtail cord from Amazon. The arbor is just a 9.5" piece of threaded 1/4" rod. I used it because the 7mm spacers can be tightened to keep the lacquer out of the tubes. I'll let it run for 4 hours today. The blank is applewood sanded to 1200 grit. If it doesn't work, I'll probably just do some more experimenting. The odor from Deft is really intense so I can't bring it in the house to dry. The weather here has gone from 90 degrees down to 29 F. last night
 

Attachments

  • P1060264.JPG
    P1060264.JPG
    332.8 KB · Views: 94

shastastan

Member
Joined
Jan 15, 2014
Messages
323
Location
N CA
Like all finishing methods dipping is different for everyone. With practice you will find the way that works best for you.
Thanks for the words of encouragement, Patrick. I've attached a pic of 3 pens that I used the dipping finish method on. The wood is king wood, apple wood, and wenge (?). I used 80% Deft and 20% lacquer thinner. Thinning the lacquer did get rid of the blobs created in the drying process. Even then I did have to sand the 1st coat back except with the king wood.
Dipped Pens 4.JPG
 

farmer

Member
Joined
Jun 16, 2012
Messages
807
Location
NV
Thanks for taking time to pass on your tips, Patrick. PSI url said item not available, but another poster showed an 18 rpm motor on Amazon for $12 +. The rotisserie is something that I had not thought of, but it sure makes sense. Duh!
For epoxy or a UV finish . thin coats My lathes spin at about 50 rpm.
18 rpm epoxy or a uv finish would create air bubbles in the finish.
 

shastastan

Member
Joined
Jan 15, 2014
Messages
323
Location
N CA
I've decided that I've gotten a practical finish using the 50-50 Deft and lacquer thinner finish. My steps are:
1. Sand to a 1200 grit finish.
2. Apply the 1st coat with the lathe off.
3. Turn on lathe and run at 3000 rpms for 2 min's.
4. Buff with a lint free cloth (I use an old handkerchief) for 2 mins
5. Leave the lathe on and apply the finish, very lightly, and wait for 1.5 mins.
6. Buff for 1.5 mins
7. Do steps 5. & 6. for 5 more times at least--Do more repetitions if needed.

If you are not satisfied with the results, let the pen dry overnight, and start the sanding process again at 600 grit and repeat the above steps. I learned of this process while reading a product review on the PSI site. It provides me with a feeling of control over the process and seems to meet my needs. To me it's time-consuming though. The wax polishes do yield a nice shiny finish, but their durability does not last. YMMV
 

PatrickR

Member
Joined
Apr 8, 2017
Messages
1,427
Location
Rural America
I've decided that I've gotten a practical finish using the 50-50 Deft and lacquer thinner finish. My steps are:
1. Sand to a 1200 grit finish.
2. Apply the 1st coat with the lathe off.
3. Turn on lathe and run at 3000 rpms for 2 min's.
4. Buff with a lint free cloth (I use an old handkerchief) for 2 mins
5. Leave the lathe on and apply the finish, very lightly, and wait for 1.5 mins.
6. Buff for 1.5 mins
7. Do steps 5. & 6. for 5 more times at least--Do more repetitions if needed.

If you are not satisfied with the results, let the pen dry overnight, and start the sanding process again at 600 grit and repeat the above steps. I learned of this process while reading a product review on the PSI site. It provides me with a feeling of control over the process and seems to meet my needs. To me it's time-consuming though. The wax polishes do yield a nice shiny finish, but their durability does not last. YMMV
Have you given up on the dip finish?
 

PatrickR

Member
Joined
Apr 8, 2017
Messages
1,427
Location
Rural America
Not completely, no.
Good. The process you describe sounds As labor intensive as CA.
it appears that you are dipping two barrels at once? I have only done one at a time. Runs can develop from not getting the blank spinning before the lacquer starts to set. This happens very fast.
also sanding to 1200 is too polished. I wouldn't go past 600.
 

shastastan

Member
Joined
Jan 15, 2014
Messages
323
Location
N CA
Yes, that process is very labor intensive. The advantage is the finishing process is completely done all at once.
I do dip both barrels at once. I can tighten them on the threaded rod so the finish doesn't get inside the tubes. I learned that I do have to get the blanks rotating as fast as I can. I do allow for excess to drain off right after dipping into a 12 0z finish mix. I didn't get any runs the last time. I do have to tighten the set screw (in the sleeve) to the threaded rod also.
 

dogcatcher

Member
Joined
Jul 4, 2007
Messages
2,361
Location
TX, NM or on the road
There is no simple and fast finish for all of your pens. There is no fast and simple finish. There are good finishes, mediocre finishes and awful finishes, but no simple and fast finishes.

I use mainly wood for my pens, ecause I like the look and feel of a fine wood pen. I also want the wood on the pen to look like the wood on a high dollar custom rifle that has a beautiful wood stock with a handrubbed oil finish.

My method is similar to Frank Whiton's classic oil finish for gunstocks. It is my go to finish for my pens and game calls. A Google search will find you an article about his method.
 

PatrickR

Member
Joined
Apr 8, 2017
Messages
1,427
Location
Rural America
Yes, that process is very labor intensive. The advantage is the finishing process is completely done all at once.
I do dip both barrels at once. I can tighten them on the threaded rod so the finish doesn't get inside the tubes. I learned that I do have to get the blanks rotating as fast as I can. I do allow for excess to drain off right after dipping into a 12 0z finish mix. I didn't get any runs the last time. I do have to tighten the set screw (in the sleeve) to the threaded rod also.
Keep in mind that you can repeat the process if it is thinner than you want. No additional prep required as long as it has not cured fully.
 

shastastan

Member
Joined
Jan 15, 2014
Messages
323
Location
N CA
I decided to try dipping with a bottle stopper. I had to make a new mandrel. I rotated it for around 4 hours in a cool garage. I do trust the durability of Deft. We have also used in on furniture. It's pretty tough stuff. Here's a pic:
dipped stopper.jpg
 

jttheclockman

Member
Joined
Feb 22, 2005
Messages
19,132
Location
NJ, USA.
I am sorry but I do not get the extra work you are doing by dipping Deft lacquer at all. Deft is so thin and why not just spray it on? Very little dry time if you do light coats and will polish as you see fit. I use it all the time on my birdhouse ornaments and never even have to polish after.
IMGP0486.JPG
 

shastastan

Member
Joined
Jan 15, 2014
Messages
323
Location
N CA
Sorry for the confusion. Dipping (with the rotation) is the least amount of work. The most work is finishing while on the lathe with 6 coat applications. That is really a beautiful bird house[--especially compared to mine. That bottom finial really adds some class, too.
 

PatrickR

Member
Joined
Apr 8, 2017
Messages
1,427
Location
Rural America
I decided to try dipping with a bottle stopper. I had to make a new mandrel. I rotated it for around 4 hours in a cool garage. I do trust the durability of Deft. We have also used in on furniture. It's pretty tough stuff. Here's a pic:View attachment 334699
This set up is a lot like what I use for pens. I normally drape a tack cloth over it immediately to keep dust off until it dries. 4 hours is far longer than is necessary unless you have added a lot of retarder. lacquer sets very fast, 30 min or less, dry to the touch in an hour or so and complete cure in a week. Not sure but is there open grain showing? If so you may be over thinned. I would expect to see a completely smooth finish with one dip but as said you can repeat the process until it is, just so it is dry to the touch and not fully cured.
 

shastastan

Member
Joined
Jan 15, 2014
Messages
323
Location
N CA
Thanks, Patrick. putting a tack cloth over the setup is an idea that I had never thought of. Great idea!
 
Top Bottom