You are using an out of date browser. It may not display this or other websites correctly.
You should upgrade or use an alternative browser.
You should upgrade or use an alternative browser.
Tenon
- Thread starter Rotor13
- Start date
Signed-In Members Don't See This Ad
Signed-In Members Don't See This Ad
MRDucks2
Member
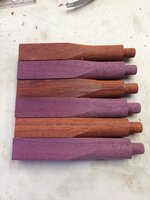
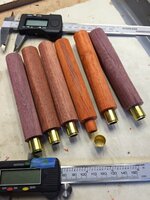
I have had great success just using a parting tool. After turning the piece to size for the main portion of the blank body with the tenon I then make sure I know the length of the tenon and start my cut right there. Early on I would mark the line in pencil.
Go easy on your depth at first and measure often with your calipers.
Sent from my iPhone using Penturners.org mobile app
Go easy on your depth at first and measure often with your calipers.
Sent from my iPhone using Penturners.org mobile app
Two Hair
Member
I also use a parting tool.
JimB
Member
Parting tool or depending on the size tenon you can sharpen the correct size open end wrench and use that.
jttheclockman
Member
Have done it with parting tool and also skew.
mmayo
Member
dogcatcher
Member
Is this a tenon for a bowl blank or a tenon like on chair legs?
DrD
Member
Used to use a parting tool, now use a square edge carbide EZ Woods.
donstephan
Member
For furniture joints, I use a parting tool to a diameter perhaps 1/16" larger in diameter, waste away with a spindle roughing gouge, push cuts with shallow gouge, or peeling cuts with a skew, then close in on the final diameter with slicing cuts with a skew.
penicillin
Member
- Joined
- Feb 27, 2019
- Messages
- 1,036
Parting tool.
Push it straight across as a scraper to start the cut; just a quick start to get it going. That initial scrape will prevent the parting tool from feathering the inside edge. Pull the parting tool back, tip it up, and bevel cut the remainder of the tenon. (Don't scrape the entire tenon, or you will put a lot of wear and heat on your parting tool.) Gently push the bevel forward and down as the tenon is cut. You will see and feel the action as you make the cut. Any non-woodturner who watches you will think you're a pro.
Confession Time:
There is a certain raw pleasure in making tenons on a lathe with a parting tool. It is fun to watch the wood go down as you cut the tenon. Fun, as in two-year-old knocking down a tower of blocks fun. Try not to jump up and down and squeal with delight in front of others as you make tenons.
This is my parting tool; it came as part of a six-piece turning tool set:
https://www.robert-sorby.co.uk/b830031-standard-parting-tool
(Mine is the 1/8 inch version with a handle, third down on the list.)
Parting tools come in many shapes and sizes. One of my experienced woodturning friends needed a parting tool for the shop a few days ago, and he was very pleased with this one:
https://www.robert-sorby.co.uk/b830s08-slim-parting-tool
You didn't say why you want to make tenons. If it is for pen turning, then you're done. Measure carefully. It is easy to cut off, much harder to cut on.
Some people make dovetail tenons for mounting bowl blanks in a chuck for hollowing. Dovetail tenons have a slight angle to them to match the angles in the chuck jaw, making a better grip. Nova makes a special dovetail turning tool with just the correct angle to match their chucks (and probably most other brands of chuck). I do not have one. Instead, I use a diamond carbide tool to shape the angle after cutting the initial tenon. It doesn't have to be the exact perfect angle as long as the chuck has firm grip on the bowl. I like the diamond tool because it is more versatile. It has many uses, such as making decorative "grip" lines on pens.
Nova dovetail turning tool that I do not own, at least not yet:
https://www.teknatool.com/product/nova-dovetail-chisel-chuck-accessory/
Diamond carbide tool that I use, it works well enough for me and has many other uses in woodturning:
https://www.rockler.com/full-size-diamond-ergonomic-carbide-turning-tool
monophoto
Member
Parting tool or bedan - depending on the desired length of the tenon.
Take small steps, measure frequently with calipers. If the end objective is a tenon that must fit into a mortise, test frequently, and gradually reduce the diameter to the target. I often make pieces with 1/2 or 5/8" tenons that fit into drilled mortises, so I drill a test hole in a scrap using the same bit that will be used to create the actual mortise to use as a gauge.
Sometimes, if the tenon is to be longer (say greater than 1/2"), give it a gentle taper, and do a test fit with the mortise that it must fit into. As the tenon approaches the desired final diameter, it will slip partway into the mortise, leaving a burnished line at the point on the taper that has the exact diameter - that makes it easier to turn the rest of the tenon to the desired diameter. The tip of the tenon will be slightly undersized - that's not a problem, and in fact putting a small chamfer on the end of the tenon helps with final assembly.
Related subject - glueing a tenon into a mortise. Ideally, the tenon will be just a smidge undersized to allow room for glue. Use a scrap of wood (I sometimes use plastic coffee stirs) to smear glue inside the mortise rather than on the tenon - that way, surplus glue is forced into the mortise. Glue applied to the tenon tends to be forced out of the joint. But a problem is that if the mortise is blind (ie, just a hole drilled into timber), air can be trapped in the mortise when you try to insert the tenon, and forcing the tenon into the mortise also squeezes glue out of the joint, potentially leaving the joint weak. One solution to this is to drill a weep hole in the side or bottom of the mortise using a very small bit (less than 1/16") to provide a path for air to escape when you push the tenon in. That hole will fill itself with surplus glue, so it doesn't require any repair later. But another approach is to use a dremel to cut a groove along the length of the tenon to provide an escape path for air. Again, the groove will fill with glue and won't actually weaken the joint.


