Stair Balusters

Signed-In Members Don't See This Ad
See more from mark james

mark james

IAP Collection, Curator
Joined
Sep 6, 2012
Messages
12,720
Location
Medina, Ohio
Another Coronavirus project.

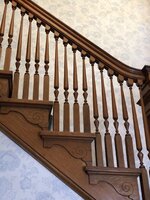
My In-Laws live in a house with some stair Balusters that have been broken and missing for decades. They have lived here for 70+ years. It is a curved staircase and 5 are missing. The age of the house is approximately 130 years ago, and I was assigned the "privilege" to take on this repair.

I suggested seeking a local Amish woodturner who could actually do a nice job, but "NOOOOOOOO! It's basically a long fat pen, you can do it." :eek: :D:mad:.

My skills as a general woodturner has included little spindle work, so this is very much a learning experience. But with the outside temps above 90 degrees, my basement shop has a newfound comfort level.

The house itself is in poor repair (my in-laws are both 94), but it was a beauty back in its prime. The woodwork is an interesting mishmash of cheap pine, I suspect some sycamore and beech, as well as incredibly intricate oak fireplace moldings.

But the staircase is 130 years old, so matching the wood as well as an aged varnish/shellac/??? will be a chore.

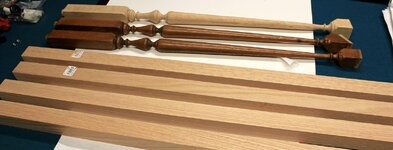
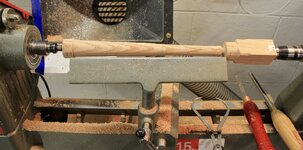
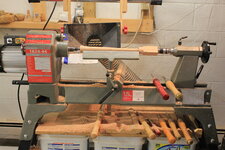
I'm using oak 2" x 2" x 3' sections from Home Depot. Hopefully the match is close. I took out several of the remaining Balusters to match the patterns, and the end grain looked like an open grain Oak.

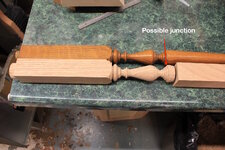
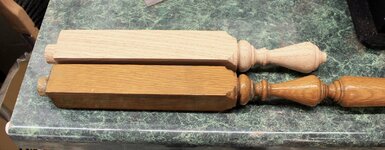
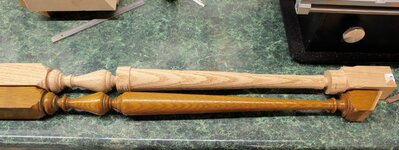
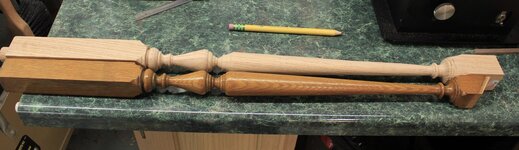
Any suggestions or comments are welcomed. I have 2 done, so 3 to go. These are turned in two sections and joined in the middle via a mortise/tenon; not ideal, but my lathe will not accommodate the full spindle. Each step has different lengths, so there are 4 different lengths of the 5 needed.

I'll post pictures after they are done.
 

Attachments

  • IMG_E0521.JPG
    IMG_E0521.JPG
    265.9 KB · Views: 286
  • IMG_1828.jpg
    IMG_1828.jpg
    166.5 KB · Views: 308
  • IMG_1829.jpg
    IMG_1829.jpg
    268.5 KB · Views: 265
  • IMG_1830.jpg
    IMG_1830.jpg
    269.8 KB · Views: 261
  • IMG_1831.jpg
    IMG_1831.jpg
    273.3 KB · Views: 283
  • IMG_1832.JPG
    IMG_1832.JPG
    404.9 KB · Views: 274
  • IMG_1833.jpg
    IMG_1833.jpg
    181.1 KB · Views: 272
Signed-In Members Don't See This Ad

carlmorrell

Member
Joined
May 14, 2013
Messages
689
Location
Cary, NC
Those stairs are beautiful.

Hahah, It's just a big pen. Sort of like telling a lawnmower repair guy, he needs to build a F1 car. As you are demonstrating, getting the shape duplicated is the easy part. The hard part is matching the color. The times I have been given similar tasks, I failed miserably. I would mix up a custom gel stain, and get a good color match, realize I need a second coat and everything comes out too dark. At least you can experiment on scrap pieces. Sorry that is not much encouragement. Are you sure that is the original finish? Not refinished? if it is original, it would probably have been shellac. Good luck!
 

MPVic

Member
Joined
Dec 23, 2011
Messages
612
Location
Hamilton, ON, Canada
Outstanding craftsmanship on that staircase - what a treasure!! I applaud your efforts in this 'labor of love', Mark. I'm sure you will be very pleased with the outcome. Can't wait to see the finished work.
 

Dalecamino

Local Chapter Leader
Joined
Jan 2, 2008
Messages
14,568
Location
Indianapolis, In.
There you go again with your modesty! What exactly were you looking for in the way of suggestions? And your skills are far above general! Maybe you just didn't know it. ๐Ÿ™„ Nice project you stumbled into buddy. Opens the door for more. ๐Ÿ˜ I think you've done quite well with these so far. That stairway is awesome!
 

mark james

IAP Collection, Curator
Joined
Sep 6, 2012
Messages
12,720
Location
Medina, Ohio
Those stairs are beautiful.

Hahah, It's just a big pen. Sort of like telling a lawnmower repair guy, he needs to build a F1 car. As you are demonstrating, getting the shape duplicated is the easy part. The hard part is matching the color. The times I have been given similar tasks, I failed miserably. I would mix up a custom gel stain, and get a good color match, realize I need a second coat and everything comes out too dark. At least you can experiment on scrap pieces. Sorry that is not much encouragement. Are you sure that is the original finish? Not refinished? if it is original, it would probably have been shellac. Good luck!

Yes, we have enough scraps to experiment. And no, we have no idea if this is the original finish. There have been only two families in the house for 130 years. I was suspecting shellac, but I am punting the finish to my retired, bored chemist wife!!! She claims to be a Urethane specialist, so to me that says she knows everything about old baluster finishes. ๐Ÿ˜๐Ÿ˜๐Ÿ˜. Good luck to her!
 

mark james

IAP Collection, Curator
Joined
Sep 6, 2012
Messages
12,720
Location
Medina, Ohio
There you go again with your modesty! What exactly were you looking for in the way of suggestions? And your skills are far above general! Maybe you just didn't know it. ๐Ÿ™„ Nice project you stumbled into buddy. Opens the door for more. ๐Ÿ˜ I think you've done quite well with these so far. That stairway is awesome!

I was hoping someone, anyone would say "Hey, there is an easier way to do these - try ..........." I will admit, if I get more comfortable with my spindle gouges I may look at a few different woodturning projects.

I will need to custom fit the 5 I am doing. I hope they will fit OK and not have to return them all. If I need to I suspect my social calendar is pretty open and I have the time the next few months.

My FIL suggested I refinish all the balusters. I asked him how long he intended to live - that led to a good laugh and he said I can just finish the 5.
 

philipff

Member
Joined
Jun 21, 2009
Messages
596
Location
Williamsburg, VA
Mark, I have turned dozens of these things and offer 3 points; 1. mark the low points first with a parting tool and caliper then work towards the next high point in both directions; 2. place the sample on a rack just in front of the blank so you can see exactly how each step should look. 3. use a skew as much as you can because you do not need to sand when done turning! Good luck, and good matching. OBTW, a good parting tool can make quick work of the little steps in each piece. P.
 

monophoto

Member
Joined
Mar 13, 2010
Messages
2,542
Location
Saratoga Springs, NY
Another Coronavirus project.

* * *
These are turned in two sections and joined in the middle via a mortise/tenon; not ideal, but my lathe will not accommodate the full spindle. Each step has different lengths, so there are 4 different lengths of the 5 needed.

Sounds like a fun project, and a great challenge. I like the idea of the mortise and tenon joins- when I was making canes a couple of years ago, I opted for that approach since my 18" lathe bed would not allow me to turn the full length in a single piece, and that proved to be a very practical solution. The fact that the balusters are shaped provides ample opportunities to disguise the joins.

I suspect the greatest challenge will be in matching the aged finish. The shape doesn't have to be a perfect match (there likely could be some variation in the original balusters). Will the replacements be clustered together or distributed randomly? Unless the replacements can be clustered together in a quasi-hidden location (such as the top of the staircase), a random distribution might be less obvious.
 

mark james

IAP Collection, Curator
Joined
Sep 6, 2012
Messages
12,720
Location
Medina, Ohio
Mark, I have turned dozens of these things and offer 3 points; 1. mark the low points first with a parting tool and caliper then work towards the next high point in both directions; 2. place the sample on a rack just in front of the blank so you can see exactly how each step should look. 3. use a skew as much as you can because you do not need to sand when done turning! Good luck, and good matching. OBTW, a good parting tool can make quick work of the little steps in each piece. P.

Thanks for the suggestions Phil. It sounds like I'm using all your thoughts with the exception of the skew. I've been making good use of the parting tools I have (3) as well as my spindle and roughing gouges, bench grinder and hones. And my mechanical calipers age happy to be appreciated after sitting for a few years.

I appreciate the suggestions.

Sounds like a fun project, and a great challenge. I like the idea of the mortise and tenon joins- when I was making canes a couple of years ago, I opted for that approach since my 18" lathe bed would not allow me to turn the full length in a single piece, and that proved to be a very practical solution. The fact that the balusters are shaped provides ample opportunities to disguise the joins.

I suspect the greatest challenge will be in matching the aged finish. The shape doesn't have to be a perfect match (there likely could be some variation in the original balusters). Will the replacements be clustered together or distributed randomly? Unless the replacements can be clustered together in a quasi-hidden location (such as the top of the staircase), a random distribution might be less obvious.

The 5 I am doing will be randomly places where needed. It actually is a fun project and my spindle turning skills are getting better. The mortise/tenon is good as the match is better centered as I can do it all on the lathe. And yes, the finish match will be the challenge. I bought a 3' length of the same Oak to do test finish applications and see what is close.

Thanks for the response.

If you had asked me that question, I tell everyone I'm going to live to be 109... long enough to be a nuisance to my kids.

I guess I'm ahead of you. I'm already a nuisance. ๐Ÿคฃ
 

Curly

Member
Joined
Nov 20, 2010
Messages
4,828
Location
Saskatoon SK., Canada.
Good on you for taking on a challenge. Even if it is kind of forced upon you.

I think the spot you chose to join the two parts is not good because it is in the thinnest part of the spindle. I would have made it at the point where the top of the taper rounds over to the first detail. A seam there won't show and because of the extra meat there you could have a tenon 50% or more bigger than the one in the cove. The cove would be as strong as the wood allows. Remember you asked for suggestions.

As other have said matching the finish will be the hardest. You might want to look into filling the grain or some of it so the finished piece won't stand out from the smoother old ones.
 

bsshog40

Member
Joined
Oct 2, 2018
Messages
2,354
Location
Omaha, Tx
Those are looking great Mark! One of the reasons I bought my 48" bed, in case I wanted to do some nice spindle work like that. I've been wanting to get a nice board to practice one day, haven't done it yet. Nice inspiration!
 

mark james

IAP Collection, Curator
Joined
Sep 6, 2012
Messages
12,720
Location
Medina, Ohio
Those are looking great Mark! One of the reasons I bought my 48" bed, in case I wanted to do some nice spindle work like that. I've been wanting to get a nice board to practice one day, haven't done it yet. Nice inspiration!

This is very much a nice learning curve for me. Even at 20" with the tailstock tight and 3/4" Steb Centers the spindle wobbles just a bit. Using kiln dryed Oak from Home Depot is a good "wild a.." guess for the wood match, but it's a tough wood to turn; lots of dust and small particles. I have decent ventilation, filters and dust collectors, but still a mess. Not like turning a nice wet wood bowl blank!

Very light cuts, I am sharpening and honing more on this project than any other.

I am 1/2 way done with the 3'rd Baluster. I am following a suggestion from Curly to shift the spot of the tenon/mortise to a larger OD location for a stronger joint. This section is not done, but the junction will be just right of the rounded edge.
 

Attachments

  • IMG_1846.jpg
    IMG_1846.jpg
    400.8 KB · Views: 150
Last edited:

mark james

IAP Collection, Curator
Joined
Sep 6, 2012
Messages
12,720
Location
Medina, Ohio
Might I suggest doing a segmented chevron version for the remaining spindles. Maybe some of your royal poinciana with some pizaz like this green one you did: https://www.penturners.org/threads/3-sided-chevron-finial-and-upper-blank.162395/

Yep, that would be the ticket. Might take a while, you better stock up on glue. At least you wont have to worry about drilling on center.

You can suggest, but that will not happen. Bad idea, evil IAP member, not nice to bait the bear... I have done several 7" long Chevron blanks and they were not easy to keep the alignment. At 20-30" my starting "brick" would be close to 36"-42" thick. ๐Ÿ˜ข๐Ÿ˜ข๐Ÿ˜ข๐Ÿ˜ข๐Ÿ˜ข.

But hey, it's Bespoke Pizza Night, so all is good! ๐Ÿ˜‚๐Ÿ˜‚๐Ÿ˜‚!
 

robutacion

Member
Joined
Aug 6, 2009
Messages
6,514
Location
Australia - SA Adelaide Hills
Well, these things are so easy to make (With all the correct tools/equipment) a copy lathe attachment really makes a big difference but unless one wants to make a living out of it, the investment would not be justified just to make a few so, considering what you have to work with, you are doing a better job than you may think. I may suggest you take a piece of the old finished wood to the store and find a wood tint/dye that matches the original colour after that a coat or two of oil and you should be done.

Don't sell yourself short, my good friend...! ;)

Cheers
George
 
Top Bottom