Some of My Others

Signed-In Members Don't See This Ad
See more from wdcav1952

wdcav1952

Activities Manager Emeritus
Joined
Mar 18, 2004
Messages
8,955
Location
Montgomery, Pennsylvania, USA.
Believe me, it takes nerve to post here after seeing William Young's and Marc Phillips's work!

Here goes:

The red spalted box elder I got as a great deal from Gary Max. The maple came from the woods behind my house, and the norfolk pine I got on Ebay. Comments welcome, any flavor:

Edit: Damn, I can't believe that I forgot my Thuya Burl from Nolan!
 

Attachments

  • Box Elder1.jpg
    Box Elder1.jpg
    34.4 KB · Views: 219
  • Box Elder2.jpg
    Box Elder2.jpg
    29.3 KB · Views: 180
  • Maple2.jpg
    Maple2.jpg
    36 KB · Views: 195
  • Norfolk Tall.jpg
    Norfolk Tall.jpg
    25.7 KB · Views: 219
  • 100_2971.jpg
    100_2971.jpg
    20.8 KB · Views: 197
  • Thuya Burl Vessel.jpg
    Thuya Burl Vessel.jpg
    28.9 KB · Views: 195
Last edited:
Signed-In Members Don't See This Ad

stolicky

Member
Joined
Mar 14, 2008
Messages
820
Location
Loudonville, NY, USA.
God job.

Curious: Did you apply any kind of UV treatment to the box elder to try to slow down the browning process?

Also, how hard is the norfolk pine?
 

alphageek

Former Moderator
Joined
Jul 19, 2007
Messages
5,120
Location
Green Bay, WI, USA.
Wow Cav, those are beautiful!

Man, I really need some of that beautiful wood..... and a bigger lathe.... and some new talent.....

You need to adopt a son? No... An apprentice? Hmmm.. Don't think SWMBO would like those ideas.
 

penhead

Local Chapter Leader
Joined
Aug 21, 2004
Messages
2,097
Location
Chesapeake, Virginia, USA.
Really nice work Mr.Cav...

I remember reading somewhere about NIP having to be soaked in oil or something before turning...am I remembering that correctly and did you have to do anything special in the finishing on the NIP..??
 

broitblat

Member
Joined
Feb 9, 2006
Messages
3,226
Location
Bellevue, WA, USA.
Those are all beautiful woods and you've done a nice job on coaxing them into something "useful". I particularly like the color of the Box Elder and the shape of the Maple.

-Barry
 

RDH79

Member
Joined
Mar 25, 2008
Messages
1,549
Location
Rimersburg, Pa, USA.
Lathe Question

Hi Cav Great looking work. Was wondering what size of lathe do you turn those on. I have a mini and looking to turn bigger things. Thanks Rich H
 

wdcav1952

Activities Manager Emeritus
Joined
Mar 18, 2004
Messages
8,955
Location
Montgomery, Pennsylvania, USA.
Nice spittoons:biggrin: I'm sure your captive patients will enjoy rinsing from now on:biggrin:

Skippy, that's so cold you could chill your drinks!! :biggrin:

Thanks to all for the nice words.

The Norfolk Island Pine had some spalt and had been in the shop for almost a year so it wasn't very hard.

As to the translucency, I stole this from another forum:

soaking oil is BLO, tung oil, mineral spirits, just about any oil based finish. Maybe 35-40% mineral spirits. First soak is usually for 3-4 days, than take out wipe off and let dry for a couple of days. 5-10 more soaks with drying in between each soaking. Final wipe down with 100% BLO or tung oil followed by about a week drying, than buff and wax.

When I started the finish on these, I thought (wrongly!) that the soak was polyurethane. I'm basically pleased with the result, but will get some more NIP and follow the above method.

As far as the Box Elder, it just has a lacquer finish with no thought to color stabilization from UV rays. RollerBob offered to lend me one of his aluminum foil helmets that he uses to prevent aliens from stealing his finishing secrets to use while finishing it, but I regretfully declined.

Again, thanks for the kind words.
 

wdcav1952

Activities Manager Emeritus
Joined
Mar 18, 2004
Messages
8,955
Location
Montgomery, Pennsylvania, USA.
Hi Cav Great looking work. Was wondering what size of lathe do you turn those on. I have a mini and looking to turn bigger things. Thanks Rich H

Rich,

I have a Jet 1236. It is simple compared to some of the amazing lathes out there, but it can do more than I can!!

BTW, it is possible that I may have a lead on a used one. If it does develop, do you want me to let you know?
 

Dario

Member
Joined
Apr 14, 2005
Messages
8,222
Location
Austin, TX, USA.
As to the translucency, I stole this from another forum:

soaking oil is BLO, tung oil, mineral spirits, just about any oil based finish. Maybe 35-40% mineral spirits. First soak is usually for 3-4 days, than take out wipe off and let dry for a couple of days. 5-10 more soaks with drying in between each soaking. Final wipe down with 100% BLO or tung oil followed by about a week drying, than buff and wax.

When I started the finish on these, I thought (wrongly!) that the soak was polyurethane. I'm basically pleased with the result, but will get some more NIP and follow the above method.

Cav,

Want another finishing tip for NIP (or other wood turnings)?

If the item is small enough, soak it in the solution (25% BLO, 25% Tung, 50% Mineral spirits - usual mix is equal parts but you need a faster drying solution for this one) and put it in a pressure pot. You will get a lot more penetration quickly that way. Only way you can attain the same depth of penetration is by soaking for more than a month. Try it :wink:

I you want to minimize your soaking solution, try using a slightly bigger vessel of similar shape as your turning. Small platters can be put in a zip lock sometimes before pressure treatment.

Good luck!!!
 

wdcav1952

Activities Manager Emeritus
Joined
Mar 18, 2004
Messages
8,955
Location
Montgomery, Pennsylvania, USA.
Interesting range of timbers and well finished turnings.:):):)

The first two look a little out of proportion to me. A smaller base on both with a tighter curve at the base would lift them in the elegance department.


Arthur,

Thank you for for the input. The first two, although not noted as such, are two views of the same piece. The smaller base I understand, but please explain the tighter curve remark. I am very much the novice when it comes to bowls, and all advice is welcomed.

Thanks for taking the time to comment.
 

Dario

Member
Joined
Apr 14, 2005
Messages
8,222
Location
Austin, TX, USA.
William,

If you want to learn more about proportions/shape/form, looks at glass bowls, vases and platters for "inspiration". I like to start with the classical designs (they are classics for a reason) then modify if need be. Sometimes a slight change in the curve can change the over all impact of a turning. I am not a good turner by a stretch but can be a critic :D.

Common mistake that I see is trying to maximize the wood...or removing less than should be. Bigger is not always better especially when you sacrifice shape and form by doing so.

There are a lot of online woodturning galleries...browse through them and save some that appeal to you (or something you want to try later) for future reference. I have a collection of such in my computer and tried to use the artist name and wood ID for file name as much as possible.
 

VisExp

Member
Joined
Oct 1, 2007
Messages
2,738
Location
Palm Coast, FL, USA.
William, in addition to what Dario said, I'd highly recommend "The Art of Turned Bowls" by Richard Raffan. It deals with the form of a piece and you'll find yourself referring back to it often.

Your work is looking very nice. My favorite would be the Pennsylvania Maple Bowl.
 

artme

Member
Joined
Jun 1, 2009
Messages
1,149
Location
Dundowran Beach, Queensland, Australia
Arthur,

Thank you for for the input. The first two, although not noted as such, are two views of the same piece. The smaller base I understand, but please explain the tighter curve remark. I am very much the novice when it comes to bowls, and all advice is welcomed.

Thanks for taking the time to comment.

Pity I can't make better use of the computer so I will try with words to explain what I mean.
If the base is made smaller then you could begin a suitable distance up the wall with a curve that would blend into the base. The last photo on the top row is the sort of thing I have in mind.
 

wdcav1952

Activities Manager Emeritus
Joined
Mar 18, 2004
Messages
8,955
Location
Montgomery, Pennsylvania, USA.
Eric,

I understand now what you mean. Combined with Dario's comment, I get the idea. I was trying to let the wood do all the talking, rather than having the shape of the vessel and the wood speak as one. (Forgive the sentence, but it seems to express what I am thinking.

Keith,

Somewhere I have a couple of VHS on bowl making I got from Jeff that I can't find (yet!) I know Raffan appears on one of them.

Ken,

Thanks for the kind words.
 

Fred

Member
Joined
Feb 18, 2007
Messages
3,557
Location
N.E. Atlanta, Georgia U.S.A.
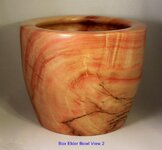
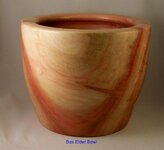
Great work Mr. Cav. Really nice to see you doing the bowl thing. I like the designs of them all and especially the oil finish. I too am working on a Maple bowl right now. I have been applying Lindseed oil several times this month and letting the wood take up what it wants.

For you and anyone else that works with wax/oil finishes try this and see if you like the ease and cleanliness in applications. Take an old cotton sock put it inside it's mate (no holes.) Then pull both over a 3" PVC pipe and fill the inside sock with fine sawdust. Pack the sawdust as tight as possible and try to keep it packed as you remove the PVC. Then tie off the sock with nylon construction cord. The entire wad of sawdust is about as big as my fist when finished.

Then soak the 'assembly' in a generous amount of BLO, whatever, and use this as a blotter to apply the oil to the wood. No open cans to turn over, no brushes to clean, no dripping, no re-dipping, no muss, no fuss, nothing.

When the oil gets a bit used up I just pour some more into my METAL can and let the sock sit for a bit. NOTE I use a metal can as I don't want the oil laden sock to heat up over time when it's not being used and burn me out of house and home. No lid is involved either.

So far I have tried this with Tung Oil, BLO, several waxes and the mess associated from use of a brush is gone. BTW, I do not buff with the sock, just use it as a simple applicator device.

Do not leave this oil filled sock outside the metal holder sitting on top of anything ... you would be surprised as to how much oil can seep out overnight and get all over everything other than what you want it to get on! DAMHIKT!!!

Have fun ... :biggrin:
 

Fred

Member
Joined
Feb 18, 2007
Messages
3,557
Location
N.E. Atlanta, Georgia U.S.A.
Since I am often the only 62 year old kid running around in my yard with no socks and no shoes on I seem to always have several pairs of socks just waiting to become one of the oil/wax gizmo's. :cool:

If you do a good bit of brush on oil finishes I believe you will really find the sock and sawdust pad to work very well for you or anyone.

Have fun and give it a try! :biggrin:
 

wdcav1952

Activities Manager Emeritus
Joined
Mar 18, 2004
Messages
8,955
Location
Montgomery, Pennsylvania, USA.
Hi Cav, great job on the bowls, I like the NIP, if you need more ways to soak the pine let me know, I learned from the Master Kelly Dunn, keep up the good work, aloha.

Chris

Thanks, Chris, I appreciate the good words and the offer of knowledge. I am stripping the finish off the taller NIP piece and want to do the finish right as to soaking the pine.

Any tips/recipes you can share would be much appreciated.
 

Kalai

Member
Joined
Jul 10, 2007
Messages
701
Location
Kurtistown, Big Island of Hawaii, USA.
Hi Cav, when you are dealing with Norfolk Pine you can do different things with different finishes, if you want to bring out the colors more you can just use polyurathane, if you want to make it translucent then you need to do a process of soaking in boiled linseed oil,I will post a detailed process for it if you and others think it would be neede or I can just email it to you and anyone else who wants to know, let me know if you have any questions about the process, aloha.

Chris
 
Top Bottom