Segmenting Struggles

Signed-In Members Don't See This Ad

ChewTerr

Member
Joined
Aug 24, 2015
Messages
54
Location
Dallas, TX
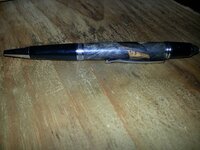
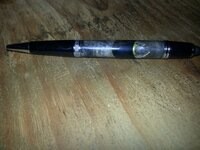
So. I started trying to make an overly complicated (for me) pen, and struggled as a result. I wanted to do a Sierra with two woods in it, cut at a 45 degree angle, so that there is a chevron in wood B inserted into a blank of wood A. After I was mostly done with the pen, I read in the library that this seems to be a segmented pen design? So, the pen kind of worked, but had some major flaws.

1) The blank fit weirdly on the tube, so sanding to the tube ended up being somewhat uneven. This caused it to not match well with the kit.

2) The gray (main) wood of the blank had holes, bubbles, and knots. I tried to fill with sawdust as I could as instructed here: http://www.penturners.org/forum/f14/hole-y-moley-135054/.

3) Perhaps most crucially, the two woods seemed to have drastically different hardnesses. There were places where the gray wood cut or sanded much more quickly than the adjacent black/tan wood. So there are two places where the softer wood has shallow depressions from sanding faster.

4) The soft gray wood seemed to chip off when I epoxied the whole blank together, so there is an area at the border of the two where you can see the tube through epoxy. I hadn't noticed that until it was sanded down and was too late to fill with sawdust.

Overall I am pretty happy with the lessons I have learned in the overly ambitious attempt, but definitely sad that the pen suffered for it. Among things to do differently next time, I will make a temporary fence for my chop saw by clamping two boards nearby. This was demonstrated on the segmented spider pen in the library and will make the cuts much easier/safer, in addition to providing smoother cuts to glue together.

I told you all of this so that I can ask you the next bit - the two woods definitely seemed to be different hardnesses, which caused the pen to be uneven and amateurish. How do you handle making pens out of multiple woods of varying softness? Any pointers for this or my other mistakes?

Additionally, I apologize if I am creating forum topics too prolifically. My past two pens both involved techniques that were very new to me, so each seemed to merit questions to the forum.

Thanks!
-Will
 

Attachments

  • 20150915_234026.jpg
    20150915_234026.jpg
    237.8 KB · Views: 463
  • 20150915_234034.jpg
    20150915_234034.jpg
    243.3 KB · Views: 417
Signed-In Members Don't See This Ad

CREID

Member
Joined
Jul 23, 2008
Messages
3,009
Location
Vancouver, wa
I am definitely not a segment expert, but I have done two different woods of different hardness or softness, however you want to put it. What I ended up doing was before sanding (this is also what I do with two different colors of wood like cocobolo and holly) is to use thin CA and let it soak in a bit to make them both kind of the same hardness. You have to be careful though, because the CA doesn't soak in all that far in most cases and you can sand through it and be back in the same position you were in. Just sand a little and then see if you need to add more CA before you continue. Hope this helps and I'm sure the more segment experienced turners will have some ideas too. This is just what I did.
Curt
 

jttheclockman

Member
Joined
Feb 22, 2005
Messages
19,082
Location
NJ, USA.
Hello William. Welcome to the site. Welcome to the world of pen turning and welcome to the world of segmenting.:)

There is a whole forum dedicated to segmenting which you may find interesting. Lots of great info in there and interesting projects. There is also a thread that has strictly photos of segmented pens that also may interest you.

It is great that you are experimenting and trying new things right away. Do not get discouraged but learn from your mistakes and ask questions.

I maybe able to help with a couple things. You do need to make yourself a jig of some sort if you plan on doing segmenting work. Or if you have an incra sled or maybe a Dubby sled that can give you infinite angles of sort. I have these but i chose to make a sled that is designed to cut at certain angles and is always locked into that angle and makes repeatable cuts easily. I will post a photo of one such sled. It is designed for 45 degree only cuts. It is used on my tablesaw which to me is the ideal tool for segmenting. But a bandsaw can work as well and a sled can be made for that as well.

The other problem you seem to have is one many segmenters run into. It is the use of two different materials such as different woods or different mediums such as acrylics and metals. When using 2 different woods you have a couple factors that you need to overcome and one is softness of each wood. The other factor would be cross contamination from 2 different colored woods such as light and dark woods used together. What I always tell everyone is learn to use the skew. It is a great tool when dealing with segmenting pens. You eliminate both problems and can go right to a finish. A skew will put a ready for finish feel better than any sandpaper.

With that said, if you feel you need to sand the trick is to sand with a block of wood for support. Make sure the sandpaper is tight around the block of wood (ideally self adhesive sandpaper is a great idea) Do not use velcro backed sandpaper. You now sand making sure you make contact with both woods at all times.

As mentioned here is a photo of the sled I mentioned and also a photo of a pen that would have been all kinds of trouble if i did not use my skew. I would have encountered both problems. But from skew to finish and no problem. Hope some of this helps. There is other articles and pictures of sleds in the library. Good luck.


ChewTerr

Member
Joined
Aug 24, 2015
Messages
54
Location
Dallas, TX
Wow, thank y'all a ton! I had totally missed the forum for segmenting (or skipped over it, since I only recently learned what it was). I'm definitely going to give a ton of thought to your advice before I plan out my next segmented project. First though, I may try a few easier projects, like straightforward pens and my first non-Sierra.

Curt - I considered trying to do my first CA finish in hopes that it would fill in some of the gaps and support the wood, but I was intimidated by the thought, and am not well set up for it. Thankfully, earlier I ordered some CA-proof bushings, so I can experiment. I'll definitely keep that in mind next time, though! You're right, that should definitely make things a bit safer to work.

John - Great tips! I presently only have a miter saw and a scroll saw to cut with, but the library article with the spider pen showed an improvised fence set up for the angle, so I will definitely give that a try. Also, I will look up your made-up words, like incra and Dubby (they sound like styles of dance music)! Both the skew and the wood block for sanding sound like elegant fixes to the problems I was having, so I will practice working with the skew.

Thanks again!
 

Sabaharr

Member
Joined
Mar 7, 2009
Messages
598
Location
Slidell, LA
I told you all of this so that I can ask you the next bit - the two woods definitely seemed to be different hardnesses, which caused the pen to be uneven and amateurish. How do you handle making pens out of multiple woods of varying softness? Any pointers for this or my other mistakes?

Stabilize them. Yeah I know that is my answer for everything but it solves a LOT of pesky little problems. In this case of woods of varying hardness make them the same hardness, problem solved.
 

Joey-Nieves

Member
Joined
Sep 5, 2012
Messages
362
Location
Vega Baja, Puerto Rico
My father would say that if you needed an easy way to do something find a lazy person, so he would defer to me. I segment a lot, although I most admit that I do don't do a lot of specific patterns like John (I will steel that sled idea). I have many gauges and over time only use less than 5, a carbide cutter with a square 6" radius, a round 1/2" carbide cutter, I made both of them but you can but similar at our sponsor EWT, a 1-1/4" Scarper, 1/4" scarper and a small paring tool. All as sharp as a razor.
So whats the trick? well as you saw above there is no one answer, I do lite cuts and use my big scraper a lot because it will cover more area of the blank and that way I don't cut just one material, but 2 or more at the same time, so I keep it even. The 1/4" scarper comes in handy when you need a detail, they can cut more than most gauges, specially on hard woods.
 

Skie_M

Member
Joined
Aug 7, 2015
Messages
2,737
Location
Lawton, Ok
As for that mess you had up by the cap ....


That's most likely caused by your drill bit wandering and creating an oversized hole.

You can still address that issue by adding in some wood dust and CA to fill the gap, and then taking it to a sander to take the top of the patch off ...

You'll have to sand by hand after that to avoid damage to the barrel or the end cap, and then hit it with a buffing wheel to bring the shine up.


Other ideas for fixes .... disassemble the pen! Put the upper tube back on the lathe and fix it normally (but use a nylon or delrin bushing, as CA won't stick to it).

Also, while the pen is disassembled, you can apply CA to the entire exterior to bring the thickness back up even with the harder wood and then re-apply your finish sanding and polish it to a shine.

The difference in thickness will never be apparent, because the CA will magnify the wood beneath, and the entire pen will have the same texture and feel. Unless you spill the beans, whoever ends up with it will never know there was an "oops!".
 

ChewTerr

Member
Joined
Aug 24, 2015
Messages
54
Location
Dallas, TX
As for that mess you had up by the cap ....


That's most likely caused by your drill bit wandering and creating an oversized hole.

You can still address that issue by adding in some wood dust and CA to fill the gap, and then taking it to a sander to take the top of the patch off ...

You'll have to sand by hand after that to avoid damage to the barrel or the end cap, and then hit it with a buffing wheel to bring the shine up.


Other ideas for fixes .... disassemble the pen! Put the upper tube back on the lathe and fix it normally (but use a nylon or delrin bushing, as CA won't stick to it).

Also, while the pen is disassembled, you can apply CA to the entire exterior to bring the thickness back up even with the harder wood and then re-apply your finish sanding and polish it to a shine.

The difference in thickness will never be apparent, because the CA will magnify the wood beneath, and the entire pen will have the same texture and feel. Unless you spill the beans, whoever ends up with it will never know there was an "oops!".

Thanks, this makes a lot of sense, too. Regarding the Mystery of the Roaming Drill, is there anything I should be doing to avoid this going forward? I'm new enough that I'm more focused on learning to avoid issue in future pens than fixing the ones I've made.

That said, regarding the attempt to fix this pen, I have already finished it with friction polish. Would adding CA over that look/react weird? I love the idea of filling in the little craters, but am intimidated by trying to finish using CA, especially when mistakes have already been made to complicate the process.
 

Skie_M

Member
Joined
Aug 7, 2015
Messages
2,737
Location
Lawton, Ok
There are some things that superglue doesn't stick to, strangely enough. :)


You could try filling the void first, then sanding it back and applying your friction polish over it again. (pen disassembled and put back on the lathe, of course)
 

jttheclockman

Member
Joined
Feb 22, 2005
Messages
19,082
Location
NJ, USA.
May I suggest if you are taking this pen apart, why not just chuck the blank and start over??? Chalk it up to a learning experience. It is not a very complicated blank. Just my thoughts. All this sanding and adding glue is just a waste of time. Yes you can learn to fix a blank this way but you also can learn to do it right too. Happy Turning.:)
 

BSea

Member
Joined
Dec 28, 2009
Messages
4,628
Location
Little Rock, Arkansas
Regarding the Mystery of the Roaming Drill, is there anything I should be doing to avoid this going forward? I'm new enough that I'm more focused on learning to avoid issue in future pens than fixing the ones I've made.

That said, regarding the attempt to fix this pen, I have already finished it with friction polish. Would adding CA over that look/react weird? I love the idea of filling in the little craters, but am intimidated by trying to finish using CA, especially when mistakes have already been made to complicate the process.
I'm guessing you used a drill press for drilling the hole. I'd suggest getting a jacobs chuck (drill chuck) for your lathe. The accuracy of drilling your holes should improve.

Here's one: https://littlemachineshop.com/products/product_view.php?ProductID=2870&category=7

Another thing that should help, is to drill a smaller hole 1st, and work up to the final hole dimension. When drilling wood, the grain will have a tendency to make the bit drift a little to follow the grain. To help prevent this, make sure your bits are sharp.
 

MTViper

Member
Joined
Jul 22, 2009
Messages
728
Location
Clyde, Texas
RE: Wandering Drill Bit
I've made several pens in with this type segmenting, of wood and acrylic. I've exploded some of my glue-ups because of the wandering bit. I drill most of my blanks on the lathe, but these I drill with a drill press and I use a pen vice clamped tightly to hold the blank together so it doesn't twist. Most of the time when I've had tear out or exploding blanks, it's been at the joints, so make sure they are securely in the vice. If the two pieces are not the same size to begin with, sand them so they are even on all sides and will clamp securely. Make sure your blanks are glued with good quality 2 part epoxy. CA does not have enough sheer strength to hold them together if the bit binds.

Drill slowly, have an idea how deep your blank will be when it encounters each glue joint and slow down in this area entering and leaving the inserted piece. Clear the waste off your drill bit frequently to avoid heating and pressure. I usually use brad point bits for this and have had less wandering with them (as long as I did what I typed above) than with conventional bits.

One other option is to drill your blanks then make your cuts, insert the tube in the holes and glue everything at once. You have to make sure your drillings are straight and your cuts are the same angle.
 

Skie_M

Member
Joined
Aug 7, 2015
Messages
2,737
Location
Lawton, Ok
One of my future plans is to get me a Drill Doctor that can sharpen and split the points... Split point bits tend to wander less than standard bits, but are much easier to sharpen than brad point bits.
 
Top Bottom