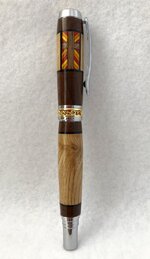
Segmented PITH to SteveJ

Signed-In Members Don't See This Ad
See more from mark james

mark james

IAP Collection, Curator
Joined
Sep 6, 2012
Messages
12,746
Location
Medina, Ohio
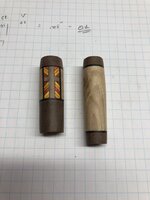
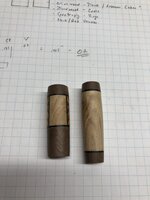
This was the second version of this design. In the first (I'll post in a separate thread), I used Olivewood and a thinner cross. I wanted less figure in the wood, so not to detract with the cross, and I wanted a cross that looked "nearer," so used wider segments. And I used Lebanon Cedarwood in this pen.

Steve has received the pen, and I have received his, so there will be another thread with his.

The suggested PITH Theme was "Pentarsia."

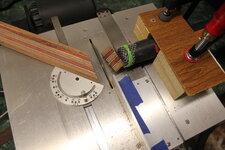
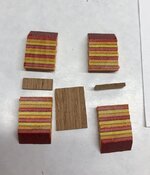
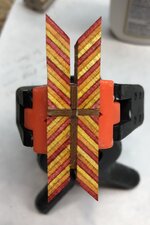
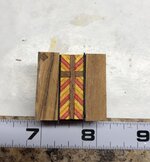
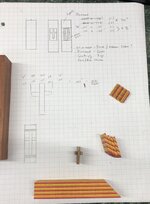
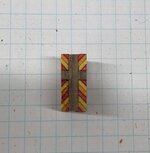
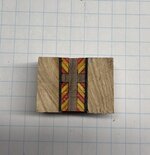
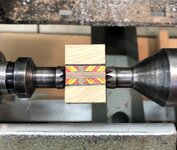
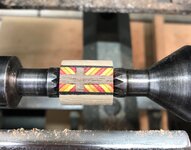
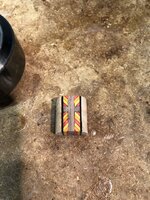
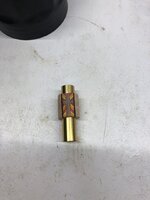
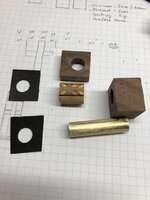
I'll show the steps in the second post.

IMG_0568.jpg
IMG_0568.jpg
IMG_0567.jpg
 

Attachments

  • IMG_0567.jpg
    IMG_0567.jpg
    87.3 KB · Views: 169
Last edited:
Signed-In Members Don't See This Ad

WarEagle90

Member
Joined
Apr 28, 2019
Messages
387
Location
Waverly Alabama
Mark, that is a great looking pen. Fine craftsmanship. Thanks for posting the process pictures. Makes it look easy, but in reality I know it takes talent and patience. Unfortunately, I have little of the first and none of the second ;)
 

mark james

IAP Collection, Curator
Joined
Sep 6, 2012
Messages
12,746
Location
Medina, Ohio
Wonderful, I don't have the patients or talent yet for some thing like this. I just want to get a Celtic knot to look right. But, I did just start turning pens a month ago and turning in general 4 months ago (lots of 2x4 cut into blanks to practice).

Hi Rick, thank you for your kind comments. Actually, this is an easier blank to construct than it appears. I highlighted - yet, as that is important. Get comfortable with some simple segmenting (Celtic Knots are tricky buggers and I don't view it as a beginners skill, but it will indicate many areas for practice), then play with new designs.

Be willing to screw up, be patient and build your skill-set.
 

mark james

IAP Collection, Curator
Joined
Sep 6, 2012
Messages
12,746
Location
Medina, Ohio
Mark, that is a great looking pen. Fine craftsmanship. Thanks for posting the process pictures. Makes it look easy, but in reality I know it takes talent and patience. Unfortunately, I have little of the first and none of the second ;)

Hi Dan, I'll repeat what I said to Rick:

Thank you for your kind comments. Actually, this is an easier blank to construct than it appears.

Be willing to screw up, be patient and build your skill-set.

Additionally, I like to show the process as this shows how things can be done. This is not to say this is the best way, just the way I'm comfortable with. I'm sure others have different and probably easier methods.

And to be truthful, seeing the process is only showing you the path up the hill - you will have to explore the hill yourself. Trial and error is a wonderful teacher.
 

WarEagle90

Member
Joined
Apr 28, 2019
Messages
387
Location
Waverly Alabama
Hi Dan, I'll repeat what I said to Rick:

Thank you for your kind comments. Actually, this is an easier blank to construct than it appears.

Be willing to screw up, be patient and build your skill-set.

Additionally, I like to show the process as this shows how things can be done. This is not to say this is the best way, just the way I'm comfortable with. I'm sure others have different and probably easier methods.

And to be truthful, seeing the process is only showing you the path up the hill - you will have to explore the hill yourself. Trial and error is a wonderful teacher.

Mark, thanks for your words of wisdom. I certainly intend to give this a try one day, but I must first learn to crawl so I'm trying to focus on the turning and finishing process and not let myself get ahead of my abilities. In the meantime, I will enjoy seeing yours and other's creations and try to learn along the way.
 

mark james

IAP Collection, Curator
Joined
Sep 6, 2012
Messages
12,746
Location
Medina, Ohio

G'Day Alan.

I have a library article on Chevrons which has some of the same techniques for this blank construction. I'll add some pictures below that I have posted before, but am not positive they are still accessible; if not they may be in the future. Truly, ask me any questions - as I have stated, seeing how this is done is only the start, you will need to tweak your process and may come up with a better one. And the best result of getting a head start on some designs... You'll come up with your own that are different.

After the new IAP Site settles down and the Library is open for new articles I intend to write several articles.

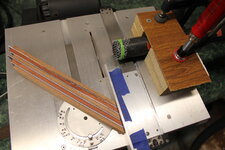
However, to answer your question, I cut 45 degree slices from the initial "brick" - pen blank size for these actually. Then I simply used a disk sander to get the ends that were in the middle joints of the cross to be even in their color pattern. This was easy. The amount of the spectraply sticking out is easily trimed/sanded. I have one picture where there seems considerable waste, but as
it was only about 1/4" I was not concerned.

I used a table-top model-makers table saw (Byrnes), but have also previously used by large Craftsman Table saw with a 45 degree angle sled.

Time... These blanks took me in cumulative time less than 2 hrs. I would cut the slices, sand then even, cut the walnut cross pieces, glue the pattern together and let dry for 1-2 hrs (Tightbond Translucent, but I suspect other wood glues are fine). Then I added the black veneers and side pieces. Marked the ends CAREFULLY between the pattern, turned round, placed in a collet chuck to drill the tube hole. The glue onto the tube with more veneers and end caps (2 part epoxy for wood to tube).

Honestly, this pen looks a bit daunting if you have not done much segmenting, but is is a very reasonable blank to start with. Very worth the time. It is a nice project to do while doing other projects as you need to wait for the glue to dry fully.

I made the first pen with Olivewood and a thin cross. While it looks OK, I tweaked it to make the cross look "closer" e.g., wider segments, and used Cedar from Lebanon instead of the Olivewood. I felt the Olivewood distracted from the segmenting, and the Cedar of Lebanon was equally appropriate for the theme.

Hope this is helpful, and ask any questions if any arise. And do make this yourself, lots of fun when they work!

Cheers, Mark

IMG_1283.JPGIMG_1284.JPGIMG_0574.jpgIMG_0575.jpgIMG_0580.jpg
 

Sataro

Member
Joined
Mar 15, 2009
Messages
3,102
Location
Mexia, TX
Amazing work there. Your pens requires talent and patience to accomplish your work. You mentioned that it takes trial & error. Looking at your work, it shows that you have put in the trial & error & moved past that point. Great work there!!!
 

Alan Morrison

Member
Joined
Jan 15, 2019
Messages
3,077
Location
N Ireland
Hope this is helpful, and ask any questions if any arise.
Cheers, Mark
Mark, many thanks for your prompt and comprehensive reply. You're a good man.
I'm sure that I read your article on chevrons in the library ( pre-site change ) but I just cannot find it now. Is it still there or I am looking in the wrong place?
I had originally asked about how you cut the small segments but didn't realise that they were from a spectraply blank ( something I had not come across before looking it up ) I feel stupid, but realise that this segmenting is more do-able now. The local minister is leaving to go abroad and I would really like to give him a pen similar to yours.
What is the black product that is used around the cross and spectraply?
Thanks for your time Mark
Very best regards
Alan
 

OZturner

Member
Joined
Aug 5, 2013
Messages
6,663
Location
Sydney. NSW. Australia
A Beautiful Concept and Execution Mark.
An Incredible Segmented Blank, Explained Proficiently, With Photo's and Detailed Instructions.
Your Tutorial Presentation, and Craftsmanship, is Superb.
Thank you Mark, for this Thread, and your Extended Explanations.
Congratulations,
Brian.
 

mark james

IAP Collection, Curator
Joined
Sep 6, 2012
Messages
12,746
Location
Medina, Ohio
Mark, many thanks for your prompt and comprehensive reply. You're a good man.
I'm sure that I read your article on chevrons in the library ( pre-site change ) but I just cannot find it now. Is it still there or I am looking in the wrong place?
I had originally asked about how you cut the small segments but didn't realise that they were from a spectraply blank ( something I had not come across before looking it up ) I feel stupid, but realise that this segmenting is more do-able now. The local minister is leaving to go abroad and I would really like to give him a pen similar to yours.
What is the black product that is used around the cross and spectraply?
Thanks for your time Mark
Very best regards
Alan


The Library is not quite up to speed yet, but I suspect will be with some patience.

I have usually made my own "bricks" (layered stacks 1" x 2" x 6"), but for this specific design with a cross and the sun shining through the stained glass, the vibrant colors of the spectraply was perfect. Here, I used Tequila Sunrise.

Honestly, the blank looks more daunting than it really is - like a "cowardly bull." Be prepared to make 2-3 attempts, and then don't be surprised if the first one is just fine. The actual construction of the upper blank segmenting (only 7 plus veneers for the cross; then the end caps and veneers) is straigntforward. The lower blank is even easier. A ket for alignment is to accurately mark the center of the designs on the ends to avoid a taper in the side panels.

The black sections are just stock black veneer - about .019 - .022" thick. Sometimes I use a thicker stock which I need to get from guitar repair websites. Not sure what you have over the pond.
 

Alan Morrison

Member
Joined
Jan 15, 2019
Messages
3,077
Location
N Ireland
I have usually made my own "bricks" (layered stacks 1" x 2" x 6"), but for this specific design with a cross and the sun shining through the stained glass, the vibrant colors of the spectraply was perfect. Here, I used Tequila Sunrise.

Thanks again Mark, and because of the above I don't feel so stupid. So, if making your own " bricks " how do you safely cut them so thinly and, as Darley asked, do you do the dyeing yourself.-----------you said to ask questions, so I'm asking.
I have used guitar pickboard, black, white, black on occasions but find that the white stands out too much, also have used vulcanised fibre, that you call " fish paper " I think, which is somewhat more subdued in colour.
Mark, thanks again. You're a gentleman.
Alan
 

mark james

IAP Collection, Curator
Joined
Sep 6, 2012
Messages
12,746
Location
Medina, Ohio
Darley and Alan:

No, I do no dying myself. For essentially all my previous segmenting with the Chevron designs, I used stacked layers of Maple, Padauk, Walnut and possibly Cherry. And at times no veneers between, thin (standard) veneers and more recently thicker veneers.

I do have a Byrnes thickness sander which allows me to mill my slices down to any thin stock I need. For some of my designs, I do customize the size of the layers to fit into slots (another different bucket of fish). I can take slices that are .0625" (1/16"), and mill each piece down to .06", .055", .053", etc. Or .09375" (3/32"), down to .09", .085", etc.

However, I frequently used precut stock timber from this site: D and D Hardwoods. They sell timber in thin stock that is excellent as-is, ready to be used.

For the veneers, You can use the typically available packets (e.g. 5-6 sheets, about 8" x 12"), both with dyed colors and natural timber. I have used the dyed varieties. But, for the thicker veneers, I obtain them in larger sheets; more expensive, but less waste. These come from: B and B Rare Woods. They have thick stock veneers with about 6-8 colors. These make for very vibrant visual effects (In my opinion).

I am not sure what is available in both of your countries, and cringe to think of the shipping, customs duty, etc. Possibly you have resources/vendors who have similar materials.

So if it very feasible to make most of my designs with standard materials if you do not have fancy toys.


If you PM me your address and preferred computer format (windows or Mac), I will send you a thumb drive of a slideshow I recently did in Chicago (MPG). I had requests, so I have done this for 4 other IAP members. There are about 117 slides, with 5-6 different designs.

Cheers Mates.
 
Top Bottom