Segmented Holly & Maple Pen!

Signed-In Members Don't See This Ad
See more from axolotl_laserbeam

Joined
Apr 23, 2021
Messages
28
Location
Minnesota
Hey guys, I hope you're doing well,

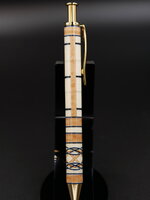
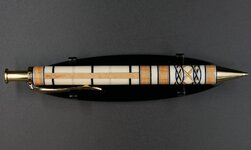
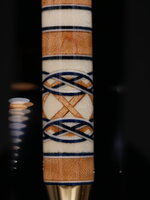
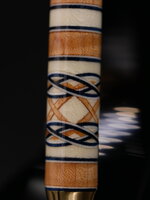
I'm super excited to share the latest that I've created with Holly, Maple, and some dyed veneer!

I really obsess about symmetry in my pens and I'm happy to say that my attempt at making 12 cuts for this knot ended with stunning accuracy as a result of my first use of a Miller Falls miter box that I restored.

I want to give thanks to Dale Lynch who suggested I consider using a Miller Falls miter box as I currently do not have room for a table saw. He also sent me useful information on handsaw sharpening and provided his tips and tricks. I really appreciate it!

I also made an attempt to take decent photos for this pen. I messed a bit with the contrast because Holly is so bright. Do you guys have any tips or critiques of these photos and maybe ideas on how I can improve?

- Collin
 

Attachments

  • P1040482.JPG
    P1040482.JPG
    90.4 KB · Views: 228
  • P1040495.JPG
    P1040495.JPG
    105.9 KB · Views: 227
  • P1040486.JPG
    P1040486.JPG
    159.5 KB · Views: 218
  • P1040491.JPG
    P1040491.JPG
    144.7 KB · Views: 234
Signed-In Members Don't See This Ad

mark james

IAP Collection, Curator
Joined
Sep 6, 2012
Messages
12,752
Location
Medina, Ohio
WOW! Collin, there are so many excellent elements in this. 👍 👍 👍 . To do all that with a hand saw shows real skill. You got a wonderful IAP member in Dale for suggestions, and it is no surprise that he instructed you well.

The knots are very well done. As I am sure you noted, photo 3 displays well placed small triangles in white, very close to same size (I always look to the top of each knot for alignment, then the inner triangles). Photo 4 shows a bit of wavering, but you attempted one of the hardest segmenting designs, so no worries.

But what I really like is the contrast between the upper and lower halves. The Long Boy is excellent for a nice tapestry to play with, and you nailed a well thought out design; very unique. And a nice choice of timbers and veneers.

I look forward to your future efforts! Thanks for sharing. 👏👏👏
 

Dale Lynch

Member
Joined
Dec 12, 2011
Messages
1,819
Location
Hastings,NE
I knew from seeing your work with the coping saw that this would be right up your alley. I was there once. The knots look great on different angles. Looking at the closeups, a tip i can give is to not cut all the way through ( extra layout needed)and fit your inlay material to hold square with light pressure. Helps prevent over gluing. Care must be taken to ensure that there will be no hidden gaps on the inside.
I like the subtle accents in the top, enhances but doesn't overwhelm.

Keep it up, this is the the first one out of the gate.
 

jttheclockman

Member
Joined
Feb 22, 2005
Messages
19,148
Location
NJ, USA.
Very well done and to do with a hand saw that says alot. Nice craftsmanship. You will do well in the segmenting field of blank making. Good luck as you continue down this path. Enjoyed looking at this pen.
 
Joined
Apr 23, 2021
Messages
28
Location
Minnesota
WOW! Collin, there are so many excellent elements in this. 👍 👍 👍 . To do all that with a hand saw shows real skill. You got a wonderful IAP member in Dale for suggestions, and it is no surprise that he instructed you well.

The knots are very well done. As I am sure you noted, photo 3 displays well placed small triangles in white, very close to same size (I always look to the top of each knot for alignment, then the inner triangles). Photo 4 shows a bit of wavering, but you attempted one of the hardest segmenting designs, so no worries.

But what I really like is the contrast between the upper and lower halves. The Long Boy is excellent for a nice tapestry to play with, and you nailed a well thought out design; very unique. And a nice choice of timbers and veneers.

I look forward to your future efforts! Thanks for sharing. 👏👏👏
Mark, thank you so much for your compliments!

I noticed the wavering as well and I'm determined to do even better next time. I think the mistake that I'm going to learn from is putting too much pressure on the blank with clamps during the glue up as it may cause warping.

Also, I agree, that the body of this kit is awesome you have a lot to work with and the thickness gives it a good feel.
 
Joined
Apr 23, 2021
Messages
28
Location
Minnesota
Excellent workmanship and excellent design ! ! !

That is a fantastic pen, Collin ! !

Can you (or anyone) please tell me when pen kit you used . . . . I love the very long barrel.

It looks like the Dayacom Long Clicker ( which is available here : https://www.exoticblanks.com/long-clicker-pen-kit-chrome.html )

but I would like to be absolutely sure.
Thank you!

This is actually a Rockler Longwood Mechanical Pencil: https://www.rockler.com/longwood-click-pencil-hardware-kit

They also have a pen version of this with a slightly smaller barrel but it is 3 dollars cheaper and a really nice mechanism/ ink: https://www.rockler.com/long-wood-click-pen-hardware-kit-gold

If you give this kit a shot, I highly recommend you make sure the mechanism works correctly as. I've had two, with mechanisms that don't push the lead out enough, I am hoping the people at Rockler will let me replace the mechanism I have for this mech pencil.
 
Joined
Apr 23, 2021
Messages
28
Location
Minnesota
I knew from seeing your work with the coping saw that this would be right up your alley. I was there once. The knots look great on different angles. Looking at the closeups, a tip i can give is to not cut all the way through ( extra layout needed)and fit your inlay material to hold square with light pressure. Helps prevent over gluing. Care must be taken to ensure that there will be no hidden gaps on the inside.
I like the subtle accents in the top, enhances but doesn't overwhelm.

Keep it up, this is the the first one out of the gate.
Thanks a ton, Dale,

As I was telling Mark I think I might have applied a little bit too much pressure while using clamps. I know what you mean when you say don't cut all the way through and I think I may cut even less next time so that the uncut blank is stronger. Instead of leaving a 16th of an inch uncut maybe I'll leave an eighth of an inch uncut depending on the leeway I have.
 
Joined
Apr 23, 2021
Messages
28
Location
Minnesota
Very well done and to do with a hand saw that says alot. Nice craftsmanship. You will do well in the segmenting field of blank making. Good luck as you continue down this path. Enjoyed looking at this pen.
Thanks, John! I have really been enjoying segmenting and this is a fantastic place to learn more about it!
 
Joined
Apr 23, 2021
Messages
28
Location
Minnesota
Hi Colin,
To me , as a beginner, this is just stunning.
I am glad you like it! It is awesome you found this website because it is full of great support and members for beginners. I highly recommend just to try experimenting, with no expectations, going with the flow. See what you come up with and learn from what you did well!! I look forward to seeing your post!
 
Joined
Apr 23, 2021
Messages
28
Location
Minnesota
That is very impressive! I agree that symmetry is important.

I am curious as to why this specific brand of miter saw was recommended. Is it just known to be more precise or reliable?
That is a great question. From my understanding it's just extremely well made, stable, and precise. They don't make a miter box like this one anymore... but also there is a brand called Langdon which has a similar quality box and im sure there are other vintage brands that work. The miter box weights about 40 pounds or maybe more. I heard someone speculating on YouTube that if a company were to sell a product like this nowadays it would cost a thousand dollars retail.

Also Dale may know more about this specific brand, but there seem to be a few viable options.
 

TDahl

Member
Joined
Dec 11, 2019
Messages
1,894
Location
Brentwood
I am going to repeat what everyone else has said.....WOW! I am extremely impressed with you craftsmanship, design innovation, and attention to detail. I also like the fact you used hand tools to create this masterpiece. Well done. I cannot wait to see what other segmenting works of art you will create. Again, well done. Thank you for sharing.
 

jrista

Member
Joined
Aug 12, 2021
Messages
2,241
Location
Colorado
What a wonderful pen! This truly is a masterpiece. I love the design.

I have to say I particularly like your "knotwork"! I have often wondered about Celtic Knot designs I've seen in the past. A lot of the time, they don't really look like knots, where there is a particular pattern of overlayed rope as the line interleaves with itself to actually create a knot. Your design here, shows a lot of that proper, realistic overlay as if there were actually some string tied around the pen. I really appreciate that attention to detail, and the accuracy and realism there! I've wondered a lot about how you would even achieve that, and the only conclusion I've come to is you would have to saw only part way through for some of the segments of the knot, and saw very precisely so as to avoid cutting into parts of the line that should "overlay on top of" the part you are currently working on. Seems like extremely precise, meticulous work! Especially done with by hand.

You, sir, are a true craftsman! I really appreciate your work, and the effort that had to go into it! Inspiring!
 
Joined
Apr 23, 2021
Messages
28
Location
Minnesota
What a wonderful pen! This truly is a masterpiece. I love the design.

I have to say I particularly like your "knotwork"! I have often wondered about Celtic Knot designs I've seen in the past. A lot of the time, they don't really look like knots, where there is a particular pattern of overlayed rope as the line interleaves with itself to actually create a knot. Your design here, shows a lot of that proper, realistic overlay as if there were actually some string tied around the pen. I really appreciate that attention to detail, and the accuracy and realism there! I've wondered a lot about how you would even achieve that, and the only conclusion I've come to is you would have to saw only part way through for some of the segments of the knot, and saw very precisely so as to avoid cutting into parts of the line that should "overlay on top of" the part you are currently working on. Seems like extremely precise, meticulous work! Especially done with by hand.

You, sir, are a true craftsman! I really appreciate your work, and the effort that had to go into it! Inspiring!
Thank you! I want to demistify it a little. Basically I started with my first knot out of maple which was made from 4 cuts at 45 degree angles and then I added two knots on top of the first (both being 4 cuts each) at a different angle (I think 20-25 degrees). Each cut was replaced with two slices of veneer.
 

jrista

Member
Joined
Aug 12, 2021
Messages
2,241
Location
Colorado
Thank you! I want to demistify it a little. Basically I started with my first knot out of maple which was made from 4 cuts at 45 degree angles and then I added two knots on top of the first (both being 4 cuts each) at a different angle (I think 20-25 degrees). Each cut was replaced with two slices of veneer.

It was this that caught me:


The way the layers of veneer of the top two knots (above the underlying maple one) overlay here... So there is the bottom diagonal, lower left to upper right. Then there is the upper diagonal, from upper left to lower right...but...its "underneath" the top arch, and on top of the lower arch. THAT is what made me really think it was a "knot tied around the pen"... ;)

Maybe it was just the order you made each cut? Bottom angle first, then the bottom arch, then the middle angle, then the top arch? I am not really seeing the whole picture, I guess, of the entire knot, so I may be missing something. I feel that, to get a truly accurate knot, you might have to do partial cuts, and fit in layers of veneer part way, to make sure that certain lines don't cross others, to actually get an accurate celtic knot in the long run. I'm honestly not sure if its even really possible. Anyway, its just something that has fascinated me about the celtic knot designs in pens for a while. ;)
 
Joined
Apr 23, 2021
Messages
28
Location
Minnesota
It was this that caught me:


The way the layers of veneer of the top two knots (above the underlying maple one) overlay here... So there is the bottom diagonal, lower left to upper right. Then there is the upper diagonal, from upper left to lower right...but...its "underneath" the top arch, and on top of the lower arch. THAT is what made me really think it was a "knot tied around the pen"... ;)

Maybe it was just the order you made each cut? Bottom angle first, then the bottom arch, then the middle angle, then the top arch? I am not really seeing the whole picture, I guess, of the entire knot, so I may be missing something. I feel that, to get a truly accurate knot, you might have to do partial cuts, and fit in layers of veneer part way, to make sure that certain lines don't cross others, to actually get an accurate celtic knot in the long run. I'm honestly not sure if its even really possible. Anyway, its just something that has fascinated me about the celtic knot designs in pens for a while. ;)
You are right about some of it! And some you may be overthinking or in other words just appreciating :) but you are correct I only use partial cuts so that I can keep things extremely accurate. I will actually try to make a video on some of the step I took to make this, and I will PM you if I finish if you want to see.
 

jrista

Member
Joined
Aug 12, 2021
Messages
2,241
Location
Colorado
You are right about some of it! And some you may be overthinking or in other words just appreciating :) but you are correct I only use partial cuts so that I can keep things extremely accurate. I will actually try to make a video on some of the step I took to make this, and I will PM you if I finish if you want to see.
Looking forward to the video!
 
Top Bottom