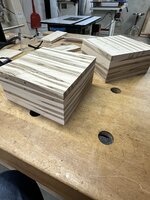
The start of a couple ambriosia maple boxes. Nature of the wood is worm holes. I could fill them with black CA or leave them natural. As a woodworker, I like the natural wormholes, not sure what the buying public like. I'm sure some would see them as flaws. What do you all think? To fill or not to fill, that is the question. Not that it matters but these will be ribbon boxes.

You are using an out of date browser. It may not display this or other websites correctly.
You should upgrade or use an alternative browser.
You should upgrade or use an alternative browser.
Seeking Opinions
- Thread starter KenB259
- Start date
Signed-In Members Don't See This Ad
Signed-In Members Don't See This Ad
howsitwork
Member
Fill with black epoxy / dust then the public see the drama but don't worry about live worms being in there
jcm71
Member
Fill them with ground turquoise.
jttheclockman
Member
Fill them is my opinion. Black or a dark brown. Going to look good. Did you put a finish on the others. Hope you return back to that thread. seeing these has started my brain shutting down on pens for awhile after I get this patch of blanks done and turning my attention to boxes of different types. Have a couple ideas that will take some thought but should be good gifts or sellers.
John, I had a serious design flaws in the previous ones. I had to go back to the drawing board and figure out a better, more repeatable method. These will be the first with the new method. At least I didn't ruin the "ribbons". I'll post them when done. Good thing the person that wanted them didn't need them by Christmas.Fill them is my opinion. Black or a dark brown. Going to look good. Did you put a finish on the others. Hope you return back to that thread. seeing these has started my brain shutting down on pens for awhile after I get this patch of blanks done and turning my attention to boxes of different types. Have a couple ideas that will take some thought but should be good gifts or sellers.
jttheclockman
Member
No say it wasn't so!! Could you ellaborate so maybe I do not make the same mistake. I am going to do a variety of styles. I want to inlay the ribbons and also overlay them if I can thin them enough and then also combine with the use of rabbited slots. Going to be a good way to use up some lumber. Then I have a surprise that I hope can pull off. I have been wanting to do these type boxes for so many years and just never got to it. Now would be a perfect time. I may even do a scrollsawn box or 2 or do some overlay with fret work. Once my brain gets rolling who knows what rolls out of it.John, I had a serious design flaws in the previous ones. I had to go back to the drawing board and figure out a better, more repeatable method. These will be the first with the new method. At least I didn't ruin the "ribbons". I'll post them when done. Good thing the person that wanted them didn't need them by Christmas.
")
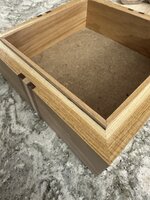
I'll try. Before I glue the boxes together, I was routing a quarter in slot about 3/4 of an inch down from the top halfway through the thickness, this was on the inside. Once glued together, obviously you can't see it. Then when the glue is dry, and after the ribbon was inlaid, I rout a 1/4 inch slot on the outside, just slightly above the bottom of the hidden slot. If you get it right, the top will just drop down onto the bottom. The problem is, you're routing pretty much blind and most of the time, the top ends up sloppy. The new method will have inserts glued in after the top is cut off. Also the ribbons on the sides didn't match up if the top was turned. I built a dado sled that I think will eliminate that issue. Here's one, not finished yet, but shows the insert. My opinion, it actually looks better.
Attachments
jttheclockman
Member
So basically no routing and you are letting the inner liner do the lining up of the top and bottom portions. That should work if your ribbons are all the same if you turn the top. It is the easiest way to do that. I did something similar when I made this IAP box. But what I did was route the lower section so that the top fits over the center portion. It started out all the same height because I needed the height to route out for the pen area. Then I just routed out as much as I need to get the proportions I needed. The way you are building the box now is the way many boxes are made. They can be done in reverse also. Doing what I did to the bottom of my box but just doing it to the lid. Or sometimes people will add a block to the bottom side of the lid the size of the opening in the bottom half. In my line of work that is the method I use because within that block I can scrollsaw a scene or some inlay work so as when you open the box you see the underside of the lid and are surprised at the extra work done to the box.I'll try. Before I glue the boxes together, I was routing a quarter in slot about 3/4 of an inch down from the top halfway through the thickness, this was on the inside. Once glued together, obviously you can't see it. Then when the glue is dry, and after the ribbon was inlaid, I rout a 1/4 inch slot on the outside, just slightly above the bottom of the hidden slot. If you get it right, the top will just drop down onto the bottom. The problem is, you're routing pretty much blind and most of the time, the top ends up sloppy. The new method will have inserts glued in after the top is cut off. Also the ribbons on the sides didn't match up if the top was turned. I built a dado sled that I think will eliminate that issue. Here's one, not finished yet, but shows the insert. My opinion, it actually looks better.
egnald
Member
For pens I fill my Ambrosia Maple beetle holes with Timbermate Wood Filler - Ebony color. I always disclose that I filled the holes and that they were caused by the Ambrosia Beetles boring into the wood and the Ambrosia Fungus they carry along with them is what makes the colored streaks. - Sweet Boxes by the way. - Dave
I have had luck filling voids with charcoal sticks and CA. I think the black charcoal would look good with your wood.
rherrell
Member
If I want a brown filler I use old coffee grounds and CA.
KMCloonan
Member
Filling the holes with a colored filler (black or brown) says "It's a feature, not a bug" (so to speak).
I like Dave's suggestion. "I always disclose that I filled the holes and that they were caused by the Ambrosia Beetles boring into the wood and the Ambrosia Fungus they carry along with them is what makes the colored streaks."
I like Dave's suggestion. "I always disclose that I filled the holes and that they were caused by the Ambrosia Beetles boring into the wood and the Ambrosia Fungus they carry along with them is what makes the colored streaks."
jttheclockman
Member
Ken I am following this thread and wonder is there any update as to your progress with making these boxes. Now that I am out of my shop for a few days I need to satisfy my artsy intake.
I haven't had a chance. I ordered some black CA crack filler from Amazon, supposed to be here tomorrow. I'm hoping to have one of them ready to finish this weekend.Ken I am following this thread and wonder is there any update as to your progress with making these boxes. Now that I am out of my shop for a few days I need to satisfy my artsy intake.