Second closed end pen

Signed-In Members Don't See This Ad
See more from Hippie3180

Hippie3180

Member
Joined
May 30, 2023
Messages
982
Location
Texas
I made another closed end, it's fun, something new leading me closer to the kit less goals I have. As you can see it's another black walnut, we have a lot so it gets used often for experimental type things. I had to use two pieces again to have the length I needed so I could part off the body. This closed end is flat on the end where as the previous one was a bit rounded.

IMG_1747.jpeg
 
Last edited:
Signed-In Members Don't See This Ad

mark james

IAP Collection, Curator
Joined
Sep 6, 2012
Messages
12,792
Location
Medina, Ohio
That is a very attractive pen Michele. 👍
I am a fan of closed ends, and your profile is very nice - well done..
 
Last edited:

Hippie3180

Member
Joined
May 30, 2023
Messages
982
Location
Texas
Looks like you got the hang of these pretty quickly. What are you using for a mandrel? By the way, I think every experiment I've done has been with walnut also.
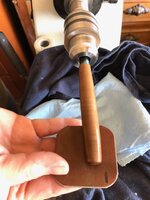
So, because this was a kit, we drilled one end out and inserted a tube. Then we put the Jacobs chuck on the headstock and put the tbc in the Jacobs chuck, then the bushing. We used the 60 degree on the tailstock and turned the body. For the cap we put it on an actual mandrel and brought the mandrel saver up to the cap bushings. To sand the body we put a punch (we have a set) just smaller than the tube into the Jacobs chuck, put painters tape on the punch to make a crude jamb chuck…this kept the body blank from slipping so we could sand and finish. Basically, it's a convoluted set up, but it works. Most folks have a Jacobs chuck and a tbc, so if that's all you have you can turn closed end.

First pic is set up for cap. Second is set up using punch in Jacobs chuck to sand and finish body.

IMG_1592.jpeg
 

Attachments

  • IMG_0115.jpeg
    IMG_0115.jpeg
    103.6 KB · Views: 58

sorcerertd

Member
Joined
Sep 30, 2019
Messages
2,737
Location
North Carolina, USA
It sounds like you are working on my budget, LOL. The tape makes sense, though. A pin chuck might give you more accuracy going forward, but this seems to work well for you at the moment. I've been meaning to play around with this a bit, too. Lately, I haven't even had time to make anything in the shop.
 

egnald

Member
Joined
Jun 9, 2017
Messages
3,173
Location
Columbus, Nebraska, USA
Very cool and attractive pen.

The the couple of closed end pens that I have made have sent me down the rabbit hole - I bought the PSI Big Grabber mandrel just a week ago. I have a couple of closed end blanks drilled, painted and drying. I painted the inside of the blanks (plastic blanks) and it seems like it is is taking forever for the paint to dry deep in the hole.

I'm anxious to see what is next.

Dave
 

derekdd

Member
Joined
Jan 29, 2023
Messages
1,116
Location
Wisconsin
So, because this was a kit, we drilled one end out and inserted a tube. Then we put the Jacobs chuck on the headstock and put the tbc in the Jacobs chuck, then the bushing. We used the 60 degree on the tailstock and turned the body. For the cap we put it on an actual mandrel and brought the mandrel saver up to the cap bushings. To sand the body we put a punch (we have a set) just smaller than the tube into the Jacobs chuck, put painters tape on the punch to make a crude jamb chuck…this kept the body blank from slipping so we could sand and finish. Basically, it's a convoluted set up, but it works. Most folks have a Jacobs chuck and a tbc, so if that's all you have you can turn closed end.

First pic is set up for cap. Second is set up using punch in Jacobs chuck to sand and finish body.

View attachment 357413
Clever use of the tools and equipment at hand.
 
Top Bottom