Seam Ripper Info, Please

Signed-In Members Don't See This Ad

shastastan

Member
Joined
Jan 15, 2014
Messages
333
Location
N CA
So far, I've only made 1 seam ripper. I got the kit from PSI and my wife loves it. I did have to remove and remount the retaining spring. I may have put it in backwards. I guess sometimes the spring has to be glued in to anchor it.

I've looked at kits at CSUSA, Woodcraft, PSI, and Packard .Other than PSI,none use a retaining spring. Instead they have tiny "o" rings mounted in grooves on the part that holds the ripper knife. I've read some customer reviews. Some say the bushings do not match the mandrel size. Some say that the o rings are easily damaged and do not last very long.

I'm uncertain which kits to buy. I'm just making them as gifts for family and friends. Also I do not sell anything that I make. I'm not interested in making these other than from a kit. The reason is for convenience and time. I would appreciate hearing from someone who is very satisfied with kits they may have purchased. Thanks.
 
Signed-In Members Don't See This Ad
I use the o-ring style & I'm satisfied with them. I wipe the inserts with a very light coat of wax to help slide the o-rings on. The ones that go over the rounded part go on fairly easily, but the other end is a little harder, so I use about a 1 to 2 inch piece of a chopstick as an assist.

I first slide the o-ring over the narrow end of the chopstick then slide it down the stick & onto the ripper insert.

A light wax wiping also makes it easy to slide the insert in & out of the tube.

My wife uses her ripper a lot and has never lost or damaged an o-ring. A friend of ours who does a LOT of sewing has lost a few, but I suspect that she wiped a little too much wax on the insert.
 
I've made one from PSI and one from Woodcraft. Personally I like the Woodcraft (O Ring) style better. I use a tube insertion tool and roll the o rings onto it and up the taper a little ways then put a 7mm pen tube over the end as though I was going to glue it in a pen blank. Put the open end of the 7mm pen tube up to the end of the Seam Ripper (the end where the o rings fit and then roll the o rings off the tool onto the pen tube and from thence onto the end of the seam ripper piece. Once on it's a simple matter to set the o rings into the grooves on the part.
 
I make seam rippers for quilters. They are basically just a handle to hold a standard dritz ripper. They prefer to have standard dritz rippers because they get dull (and sometimes the points break off.) If I make the rippers with the standard dritz rippers, they can just go to the fabric store and buy a new ripper to go into the handle. A 7mm bit will make a hole that the plastic handle of the dritz ripper fits into. Then for storage they simply pull out the ripper and reverse it in the hole to form a holster.
 
Thanks for all of your responses and tips--especially how to put the o rings on. I decided to try a few kits from Bear Tooth. Their kit looks like good quality in the pic, but using the ripper will be the true test. I really appreciate all of your suggestions.

Stan
 
Thanks for all of your responses and tips--especially how to put the o rings on. I decided to try a few kits from Bear Tooth. Their kit looks like good quality in the pic, but using the ripper will be the true test. I really appreciate all of your suggestions.

Stan

Show your work when you're done. Thanks.
 
I've made one from PSI and one from Woodcraft. Personally I like the Woodcraft (O Ring) style better. I use a tube insertion tool and roll the o rings onto it and up the taper a little ways then put a 7mm pen tube over the end as though I was going to glue it in a pen blank. Put the open end of the 7mm pen tube up to the end of the Seam Ripper (the end where the o rings fit and then roll the o rings off the tool onto the pen tube and from thence onto the end of the seam ripper piece. Once on it's a simple matter to set the o rings into the grooves on the part.

Thanks for those instructions. They made putting on the O rings the easiest part of the assembly.
 
I bought the kits from Bear Tooth. I checked the tubes after gluing to make sure the bushings fit ok. When I tried to get the knife holder into the finished piece, the fit was way too tight for the holder with O rings to go into the tube. I had to use round files, wire brushes and sandpaper to get it to fit.

I may have gotten some glue inside the tube even though I tried to be careful. Next time, I'll make sure the holder with O rings fits into the tube before gluing. Guess I'll have to change my glue up process and plug up the tube ends first. I've heard a lot of people do it that way.
 
Yes, plug the holes before gluing. Also, chamfer the open end of the seam ripper so the O rings don't get damaged on a rough or sharp edge. On the inside of the tube, I take some 400G sandpaper on a dowel and clean up the brass. This will help you see if there is any glue and get rid of a sharp edge caused by chamfering the tube end. I too wax the inside of the tube before sending any out.
Use a twisting motion while pulling out the seam ripper will make it easier.
Hope this helps. I really prefer the Berea style over the PSI version. And the replacable rippers are worth getting.

Thanks Charlie. It seems that the fitting of the plastic part, that goes inside the blade holder, is loose. I know it would be stupid to glue the blade inside, but should I put a very small dab of epoxy or thick ca glue on the plastic to hold it in the holder. I have had no problems with the PSI kit and my wife sez that it's still sharp and she's used it a lot, too.

I just watched Ed from Exotic Blanks do a gluing demo on youtube. His way is about as simple as you can get and I will be wearing nitril gloves. I just ordered some base wax sheets to plug the tubes before gluing, too.
 
Last edited:
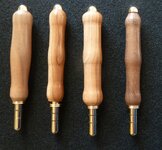
Here's the results of the kits with "o" rings. I'm not real happy with the results and 1 o-ring broke. It was difficult for me to slide them from the brass tube onto the blade holder. I'm going back to the other type if I do anymore.
 

Attachments

  • P1050533.jpg
    P1050533.jpg
    289.7 KB · Views: 190
Those rippers all sold at our annual church boutique. I tried a double ended one that uses the spring clip, from PSI. I like that style better than the o rings. PSI does sell replacement knife assemblies.
 
Back
Top Bottom