Rookie Question

Signed-In Members Don't See This Ad

RGVPens

Member
Joined
Oct 4, 2021
Messages
408
Location
Mission TX
OK...I've NEVER turned anything on a lathe! I cut and drilled (on the lathe) my blank. I epoxied the tube (after scuffing) it in and waited overnight.
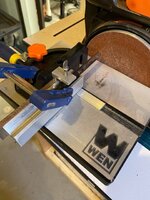
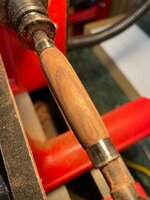
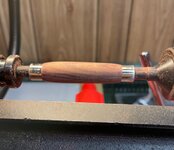
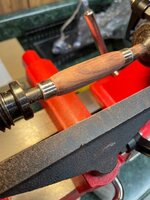
The picture shows how I set it up. I have carbide tools. I'm turning Rosewood.
I started to turn it...but the blank would stop on the mandrel even barely touching it with the tool. I thought I had better get some advise before I go too far.
No need to reinvent the wheel...just ask first!

1. Is my setup right?
2. How tight can I put it on the mandrel?
3. What speed should I set it on? Turncrafter VS10
4. Is the round head on the tool easier to start with...or the square?
5. Hold tool level with the numbers on the carbide bit facing up?
6. When starting, work from the center to the ends to round the blank?

Any other first time advise you can think of? I'm sure after I've turned the first one or two I'll have a much better idea of what to do and what not to do!
We're headed to Mexico for the day, I'll read the replies this evening. After Margaritas in Mexico, I'll probably wait till morning to try turning...LOL

Thanks!
IMG_0757.jpg
 
Signed-In Members Don't See This Ad

KenB259

Member
Joined
Dec 24, 2017
Messages
3,579
Location
Michigan
You just need to tighten the tailstock more. I always start with the round carbide, speed as fast as it will go. Carbide up, you should start with it level. I start in the middle and work towards the ends, at least until its round. Also be aware, some people have reactions to rosewood, wear a respirator.
 

magpens

Member
Joined
Feb 2, 2011
Messages
15,911
Location
Canada
You've got the idea already, Gary !!!

Tighten up that tailstock . . . you'll find the point that works . . . and you ( probably ) won't over-tighten . . . just take it in stages .
Re-tighten as necessary.

The round-nosed tool is probably best for rounding the blank that you have already mounted. . . Hold tool parallel to the floor.

Rotational speed of about 1500 - 2000 RPM should be adequate for this part of the process . . . and WEAR YOUR FACE SHIELD.

Start from the center and work towards the ends . . . I would say . . . TAKE LIGHT CUTS REMOVING A LITTLE MATERIAL ON EACH PASS.

You'll soon get the feel for it and you can then modify your approach to suit the material.

Enjoy your Margaritas . . . report back soon !!! . . 😀 😀 😀
 

jttheclockman

Member
Joined
Feb 22, 2005
Messages
19,151
Location
NJ, USA.
Tighten the tailstock and make sure it is not slipping on you. Speed, fast is better when doing things like that. I am in the camp always turn from ends toward the center. The reason is there is more support toward the center than on the ends. You see more chip outs on ends when people turn from center out. You could make things easier if you knock the corners off either by sanding them or by cutting on the bandsaw. There are threads on this particular procedure with photos of people's jigs to hold the blank here.
 

RGVPens

Member
Joined
Oct 4, 2021
Messages
408
Location
Mission TX
OK...no tequila this trip, just a couple of beers with lunch...lol.

So, I watched this time when I tightened it up...the tailstock was sliding. I corrected that and tightened it up good.
I also took the corners down some on the belt sander, this helped also.
I took my time and turned it down to the pictures, then a little closer to the bushings with 150 grit.
Should the ends of the wood be completely flush with the bushings? This is a Sierra kit
I have 1" roll sandpaper in 150-600 grits. I also have Micromesh pads in 1500 - 12000
I have some Stick Fast CA Thin and activator, and a small bottle of Aussie Oil at this time.
What now?
 

Attachments

  • IMG_0761.jpg
    IMG_0761.jpg
    55.5 KB · Views: 78
  • IMG_0762.jpg
    IMG_0762.jpg
    125.9 KB · Views: 79
  • IMG_0760.jpg
    IMG_0760.jpg
    64.3 KB · Views: 73
Last edited:

KenB259

Member
Joined
Dec 24, 2017
Messages
3,579
Location
Michigan
Ideally, you should should get right down to the bushings with your lathe tool and not sandpaper. Sanding will deposit metal dust onto your blank, you can already see sanding marks on your bushings. Most everyone, when they start, are afraid to get close to the bushings, but that's what you need to do. Sanding also changes your bushing sizes rather quickly. I know you're just getting started so it's seems intimidating.
 

WriteON

Member
Joined
Aug 21, 2013
Messages
3,319
Location
Florida & Pa
I have some Stick Fast CA Thin and activator, and a small bottle of Aussie Oil at this time.
What now?
Decide which finish you want to have. CA or Oil. Just my 02.... hold off on the CA for now, Focus on turning, sanding, assembling. Oil makes a nice finish, DO NOT USE rags to apply anything...use the proper applicators....small cut paper towels. There are a few uTubes about finishing.

Turning and finishing.....Once again...you will learn from this. Execute and observe.... from there you can make adjustments.
 

RGVPens

Member
Joined
Oct 4, 2021
Messages
408
Location
Mission TX
Decide which finish you want to have. CA or Oil. Just my 02.... hold off on the CA for now, Focus on turning, sanding, assembling. Oil makes a nice finish, DO NOT USE rags to apply anything...use the proper applicators....small cut paper towels. There are a few uTubes about finishing.

Turning and finishing.....Once again...you will learn from this. Execute and observe.... from there you can make adjustments.
Sounds like good advise...I'm thinking the oil might be a little more forgiving at first also. I'll dig out the YouTube videos in a little bit.

Thanks!
 

WriteON

Member
Joined
Aug 21, 2013
Messages
3,319
Location
Florida & Pa
Sounds like good advise...I'm thinking the oil might be a little more forgiving at first also. I'll dig out the YouTube videos in a little bit.

Thanks!
Ozark Sawdust.... Nice stuff. (My buddy is a scroller). I looked into it but it's not for me at this time. No room.

As for oils. I used Danish oil (brings out the natural grain but pretty boring). Birchwood Casey Tru-oil works well. Have fun experimenting.
 

jrista

Member
Joined
Aug 12, 2021
Messages
2,241
Location
Colorado
Regarding finish. There are pros and cons to them all, even CA. CA is usually the go-to finish for people, but I've recently found that Pens Plus, when applied right, is AMAZING. There are a few reasons why I don't want to use CA, not the least of which is I'm extremely allergic to it, and it causes some very severe (maybe close to deadly) reactions in me when I'm exposed to its fumes and dust. But beyond that, I've never quite liked the idea of turning my beautiful wood into plastic...CA, when the volatiles evaporate, is basically a type of acrylic.

Pens Plus is a friction polish, and there are so many out there...but in addition to the oil base (walnut in this case), a volatile thinner (i.e. denatured alcohol) and shellac, Pens Plus also includes microcrystalline wax. This last ingredient seems to be part of the magic of the mixture, as the durability of Pens Plus seems way beyond any other friction polish I've ever used. I have some things a few months old now, used daily, finished with Pens Plus that are still shiny and scratch free. Now, one of these is a keyring, and it did get some dents, which I would be blown away if it did not. However, it still doesn't seem to exhibit any scratches, which is not something I can say about CA finished items that ride along in a pocket with keys and other sharpish things.

The nice thing about pens plus is its totally non-toxic, and rather easy to apply. First coat or few you let soak in before friction polishing, then continued applications until you are satisfied with the finish. There are a few well documented finishing techniques with Pens Plus, or you can feel your way about it. I started with...I think it was a guy named Mike's procedure, but I had some problems with it and have just been experimenting lately. I think I've found my approach, which in the end gives me a nice glass-like, durable fingerprint-free finish.

A bottle is $24, but its much, much larger than the $13-18 bottles of CA you might find, and so far I've only used up the top...oh, maybe inch and a half worth of the bottle, and its a tall bottle! Its a good finish for someone just starting, IMO...and could also be the finish you use 10 years from now!
 

RGVPens

Member
Joined
Oct 4, 2021
Messages
408
Location
Mission TX
Have you ever used Aussie Oil? I have some of that and it did a good job on my first pen. How does Pens Plus compare?
 

jrista

Member
Joined
Aug 12, 2021
Messages
2,241
Location
Colorado
Have you ever used Aussie Oil? I have some of that and it did a good job on my first pen. How does Pens Plus compare?

Aussie Oil is your standard friction polish. Oil, volatile thinner, shellac. I have used Mylands Friction Polish, which is the same thing, and I've also made my own O.B. Shine Juice, which is BLO, DNA and Zinsers Shellac.

Pens Plus was specifically formulated as a friction polish for pens, with durability and longevity in mind, hence the microcrystalline wax. The guy who had it formulated hired a chemist to formulate it optimally for the use case, as I understand it. I've tried several different friction polishes (in general on turned items, and on pens). Most don't hold up well in the long run...they dull for sure, and a lot of people say the pens get sticky if you use them with sweaty hands, etc.

I've not had any of those problems with Pens Plus. Its like a hardwax floor finish for pens...somehow, its formulated to cure to a hard, durable, fingerprint-resistant finish that lasts. I don't know if it lasts as long as CA. Thats a lifetime that is measured in years, so it's tough to really compare over that long of a period.

I have found that, for Pens Plus to work optimally, you need to use moderate pressure so that you get the friction to polymerize and start the curing process, but not so much pressure that things get too hot. Further, I never touch the finish until its fully dried for at least a day. If I do, then I find it either dulls the finish, or leaves unwanted marks and other issues. Once it's fully dried and polymerized properly, it's highly durable.
 
Top Bottom