Pool cue pen

Signed-In Members Don't See This Ad

aggromere

Member
Joined
Mar 27, 2009
Messages
1,385
Location
Tampa, FL
Well i've been working at making a pool cue pen all week and boy did i waste a lot of wood trying to make points in the cue. Still can't do that yet but I did finish one that i think looks okay, not great but okay.

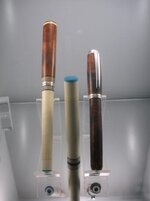
The first picture shows the pool cue pen (jr gent) with the lower barrel for my next one (gent regular size) and a closed end Jr Gent of Amboyna Burl, just for scale. The lower barrel for the gent looks like I just cut the end off of a pool cue shaft, it's the exact size of a real cue shaft end.

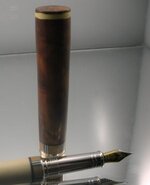
The completed pen was made from a maple pool cue shaft blank from a cue supplier. It has a alt ivory ferrule with a small piece of a blue acrylic blank Dawn sent me free with an order. It looks so real makes you think chalk will come off of it if you rub it on your clothes. To get the shaft taper to scale I drilled it with a 7mm bit to hold refill (pump wont fit) and cut off about 1/2 inch of the tube that came with the kit to hold the nib.

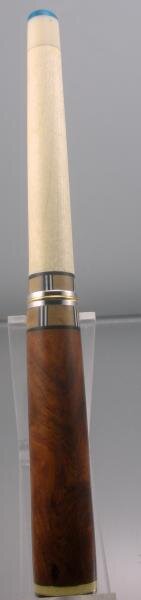
The ring is home made using pickguard and some wood I had lying around. The butt is finished with ca/blow and the shaft is finished with friction shallacwax.

The butt end is solid afrezila(sp) with yellow pick guard sandwiched between brass for the butt end with a small slice of the afrezila as the butt cap.

Still not overly happy with it but I'm getting closer.

Looking for any tips on how to do the points. I've just about reached the conclusion I need a router of some kind to do it.
 

Attachments

  • all three.jpg
    all three.jpg
    13.3 KB · Views: 735
  • new cue upright final.jpg
    new cue upright final.jpg
    6.9 KB · Views: 475
  • new cue apart final.jpg
    new cue apart final.jpg
    17.1 KB · Views: 361
Signed-In Members Don't See This Ad

Paul in OKC

Member
Joined
Jul 26, 2004
Messages
3,094
Location
Oklahoma City, OK, USA.
I did a 4 point pen a while back. But I have access to machine shop stuff, so....But you are right in that a router with a table and a bit that would cut a 90 degree V in the side of the blank will work. Just make a little jig to hold the blanks at an angle, and walaa!, Well, almost that easy.
Nice pen, BTW.
 

workinforwood

Member
Joined
Mar 1, 2007
Messages
8,173
Location
Eaton Rapids, Michigan, USA.
Pen looks good to me. I'm having a hard time visualizing a v bit in a router making a v in the pen. The v shape goes down in, not across. If you did a plunge cut with a v bit, from the surface you will have a circle where the bit stops. I would cut the v shape with a scrollsaw and then cut the corresponding piece and slide it into place. You would do this while the blank is still square.
 

Paul in OKC

Member
Joined
Jul 26, 2004
Messages
3,094
Location
Oklahoma City, OK, USA.
Jeff, they make a bit that will cut from the side that is a 90 degree bit. I will try to find one and post a pic. Using a 90 degree 'pointed' bit will work, and will like you say leave a small flat where the tip runs through the wood. But I have done it a couple of times with good luck. I have a hard time picturing doing the cut with a scroll saw, as the cut angles from being close to the center on the end, and coming out part way toward the other end. But if can be done that way, you da man that can do it!
Here is a pic of the 4 point pen. I did a one point (big point) that I took a pic of the end. If I can find it, I'll post it up here. I did this one with a pointed bit running down the center of the blank.
 

Attachments

  • 4point1.jpg
    4point1.jpg
    43.6 KB · Views: 337

skiprat

Passed Away Mar 22, 2022
In Memoriam
Joined
Oct 19, 2006
Messages
7,812
Location
In a Skip in Wales
A 90 deg bit works ok, but I find that you can get a deeper, narrower and almost full pen 'splice' by using a 60 deg ( included angle )

Perfect point bits are more expensive than the standard pointed bits. The standard bits leave a small flat in the bottom of the groove.

Her's a pic of mine. Keep them in the box as you don't want to damage the tip.:wink:
 

Attachments

  • routerbit.jpg
    routerbit.jpg
    60.7 KB · Views: 400

workinforwood

Member
Joined
Mar 1, 2007
Messages
8,173
Location
Eaton Rapids, Michigan, USA.
Damn Steve...any tool or bit you don't own???

That looks good Paul, but poor planning with the centerband. I would definitely just scroll that with a 3 cent blade. 2 or 4 sides would be easy, adding more is the challenging part on the saw, because your layout has to be spot on and then later it would have to be drilled spot on to work, where as with a router and a pre-spun blank you can use the indexing on the lathe for guaranteed perfection. My problem is that I still don't follow how the router managed that cut. My mind just says scroll it.
 

BRobbins629

Passed Away Dec 28, 2021
In Memoriam
Joined
Mar 8, 2006
Messages
4,037
Location
Richmond, VA, USA.
Nice improvement. Tip looks great. I'm sure when you get the points right you will be well rewarded with the satisfaction.
 

Paul in OKC

Member
Joined
Jul 26, 2004
Messages
3,094
Location
Oklahoma City, OK, USA.
Damn Steve...any tool or bit you don't own???

That looks good Paul, but poor planning with the centerband. I would definitely just scroll that with a 3 cent blade. 2 or 4 sides would be easy, adding more is the challenging part on the saw, because your layout has to be spot on and then later it would have to be drilled spot on to work, where as with a router and a pre-spun blank you can use the indexing on the lathe for guaranteed perfection. My problem is that I still don't follow how the router managed that cut. My mind just says scroll it.

I agree on the center band, this was before I ventured out of the box very far =8^). I am vaguely seeing how one would scroll this, but........I have an old blank started around somewhere, if I can just remeber where..
 
Top Bottom