Pen finals, clips and accent rings

Signed-In Members Don't See This Ad

Amihai

Member
Joined
Oct 8, 2021
Messages
111
Location
Israel
Hello,
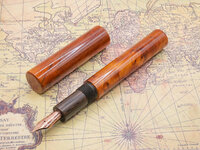
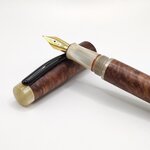
So far, I've been making relatively simple kitless pens, as you can see in the first photo attached. The entire barrel and cap being made from a single material (usually wood in my case), without any hardware such as accent rings or clips. This simple design has its artistic advantages, but as I'm always interested in improving my skills and trying new things, I wanted to try adding a clip and some different color "finals" (I think this is how you call them?) So, for example, the cap is made from wood in the middle and Ebonite or Acrylic beginning and end, with a clip fitted between the Synthetic end and the wood (second photo, NOT MY PEN!).

The problem is that I don't have a clue how to make such a thing and where to begin.
So, kitless pen makers: may I ask you how do you make those complicated pens?
Hopefully you will save me some trial and error. Thank you for any help!
 

Attachments

  • P1001407.jpg
    P1001407.jpg
    609.2 KB · Views: 133
  • il_fullxfull.5581989334_svfl.jpg
    il_fullxfull.5581989334_svfl.jpg
    150.1 KB · Views: 122
Signed-In Members Don't See This Ad
I use several methods to do this now, and I will go through the method that I use with manufactured clips. I am not saying that my method is right, but it works for me. I have had no formal training on doing any of this and figured it out by trial and error and asking lots of questions to people with more metalworking experience on IAP.

Primarily for a blind cap or cap finial, I drill out and thread the same as my section, M10 x1. I prefer to thread all of these pieces and try not to use glue except to secure my metal piece to the finial. I turn down the finial until very close to the right dimension in a section mandrel, and then turn it down to final size and shape while inserted into the pen...very carefully. Make sure to drill out your tenon because if you have tight tolerance, your nib will need the extra room to prevent the tip from hitting your finial. If going with a clip, I start with a premade clip from Beaufort Ink with an outside ring diameter of 12mm and inside of 10mm. I use a 12mm endmill and create a channel into the top of the cap for the clip to sit in. I use a mini file that I have trimmed down to be the width of the clip and file a little channel for the clip to come out. My finial threads are 10mm, and the inner diameter of the clip fits perfectly on my tenon.

To make trim rings, I use a pepetools disc cutter to make washers to fit out of aluminum, brass, copper, nickel silver 18g flat stock. I turn them down with the finial. Others use a jeweler's saw and cut them out of sheet stock. If working with sterling, I now use sterling wire and solder my rings to fit. The disc cutter works well with silver, and I have found that I can use the cutouts for finial coins, but there is still a lot of waste, and silver is quite expensive.

1707838816771.png

Overall cap finial. M10x1 threads. Nickel silver washer cut out and finial coin installed. Make sure you drill out your tenon to allow the nib to fit.


1707838870800.png

End milled out the channel to hide the clip ring. Notice how the nib extends past the opening.

1707839011307.png

Filed out an opening on the right so that when threaded, the ring sits flush.


1707839080227.png

Threading on the finial and fitting the clip to fit in the channel and exiting through the slot.


1707839142033.png

Fully threaded.


1707839293844.png

Blind cap on the barrel partly threaded to show.

1707840369911.png
 
I use several methods to do this now, and I will go through the method that I use with manufactured clips. I am not saying that my method is right, but it works for me. I have had no formal training on doing any of this and figured it out by trial and error and asking lots of questions to people with more metalworking experience on IAP.

Primarily for a blind cap or cap finial, I drill out and thread the same as my section, M10 x1. I prefer to thread all of these pieces and try not to use glue except to secure my metal piece to the finial. I turn down the finial until very close to the right dimension in a section mandrel, and then turn it down to final size and shape while inserted into the pen...very carefully. Make sure to drill out your tenon because if you have tight tolerance, your nib will need the extra room to prevent the tip from hitting your finial. If going with a clip, I start with a premade clip from Beaufort Ink with an outside ring diameter of 12mm and inside of 10mm. I use a 12mm endmill and create a channel into the top of the cap for the clip to sit in. I use a mini file that I have trimmed down to be the width of the clip and file a little channel for the clip to come out. My finial threads are 10mm, and the inner diameter of the clip fits perfectly on my tenon.

To make trim rings, I use a pepetools disc cutter to make washers to fit out of aluminum, brass, copper, nickel silver 18g flat stock. I turn them down with the finial. Others use a jeweler's saw and cut them out of sheet stock. If working with sterling, I now use sterling wire and solder my rings to fit. The disc cutter works well with silver, and I have found that I can use the cutouts for finial coins, but there is still a lot of waste, and silver is quite expensive.

View attachment 368198
Overall cap finial. M10x1 threads. Nickel silver washer cut out and finial coin installed. Make sure you drill out your tenon to allow the nib to fit.


View attachment 368199
End milled out the channel to hide the clip ring. Notice how the nib extends past the opening.

View attachment 368200
Filed out an opening on the right so that when threaded, the ring sits flush.


View attachment 368201
Threading on the finial and fitting the clip to fit in the channel and exiting through the slot.


View attachment 368202
Fully threaded.


View attachment 368203
Blind cap on the barrel partly threaded to show.

View attachment 368205
Thank you very much!
 
I think this is one of the most complicated topics frequently discussed in the pen makers' world. Your question also covers two separate areas of pen making: Finials and metal work (clips and rings). The finials just another extension of pen making with the most complicated part being the cutting of tenons. I trust most pen makers will be able to figure that part out, so I won't go into that subject here. The metal work is where it gets complicated. In my opinion, a quality made pen can look cheap when matched with poorly made clips and rings. The metalwork is an art in itself.

I would suggest researching and learning the arts of Metalsmithing (and/or Silversmithing) and jewelry making. The most basic skills you will need to learn are cutting with a jeweler's saw, using a torch to anneal and solder metal pieces, shaping metal pieces with files, and polishing. There are also a number of pieces of equipment you will need to get started. Rather than list everything here would recommend the following books:

1) Metalsmithing by Jinks McGrath - https://www.amazon.com/Metalsmithing-Jewelry-Makers-Contemporary-Inspirational/dp/0764165844

2) Silversmithing by Elizabeth Bone - https://www.amazon.com/s?k=Silversm...g+elizabeth+bon,stripbooks,335&ref=nb_sb_noss

3) Simple Soldering by Kate Ferrant Richbourg - https://www.amazon.com/s?k=simple+s...ple+Solder,aps,379&ref=nb_sb_ss_ts-doa-p_2_13

Kate Richbourg also has a Youtube channel that covers some of the tutorials in her book.

Once you are confident in these basic skills, I would recommend referring to a couple IAP tutorials:

1) https://www.penturners.org/resources/how-to-build-my-clips.398/

2) https://www.penturners.org/threads/clips.171776/#post-2135746 – (This was a post from Jalbert - scroll to the top of the page.)

Be prepared to spend time and materials during that you will probably throw out during the learning process. This is a learning-by-error venture. I have been studying metalsmithing on my own over the last two years, and only have been making metal clips over the last six months. There are other makers on this platform who are much more experienced and knowledgeable than me who have years of jewelry making training and experience and their work reflects it.

I don't want this to discourage you from advancing your skills, but I believe you should be prepared for what you are getting into so you don't become discouraged along the way. Once you become proficient with working with metal components, the creative possibilities are endless.


Good luck.
 
I use several methods to do this now, and I will go through the method that I use with manufactured clips. I am not saying that my method is right, but it works for me. I have had no formal training on doing any of this and figured it out by trial and error and asking lots of questions to people with more metalworking experience on IAP.

Primarily for a blind cap or cap finial, I drill out and thread the same as my section, M10 x1. I prefer to thread all of these pieces and try not to use glue except to secure my metal piece to the finial. I turn down the finial until very close to the right dimension in a section mandrel, and then turn it down to final size and shape while inserted into the pen...very carefully. Make sure to drill out your tenon because if you have tight tolerance, your nib will need the extra room to prevent the tip from hitting your finial. If going with a clip, I start with a premade clip from Beaufort Ink with an outside ring diameter of 12mm and inside of 10mm. I use a 12mm endmill and create a channel into the top of the cap for the clip to sit in. I use a mini file that I have trimmed down to be the width of the clip and file a little channel for the clip to come out. My finial threads are 10mm, and the inner diameter of the clip fits perfectly on my tenon.

To make trim rings, I use a pepetools disc cutter to make washers to fit out of aluminum, brass, copper, nickel silver 18g flat stock. I turn them down with the finial. Others use a jeweler's saw and cut them out of sheet stock. If working with sterling, I now use sterling wire and solder my rings to fit. The disc cutter works well with silver, and I have found that I can use the cutouts for finial coins, but there is still a lot of waste, and silver is quite expensive.

View attachment 368198
Overall cap finial. M10x1 threads. Nickel silver washer cut out and finial coin installed. Make sure you drill out your tenon to allow the nib to fit.


View attachment 368199
End milled out the channel to hide the clip ring. Notice how the nib extends past the opening.

View attachment 368200
Filed out an opening on the right so that when threaded, the ring sits flush.


View attachment 368201
Threading on the finial and fitting the clip to fit in the channel and exiting through the slot.


View attachment 368202
Fully threaded.


View attachment 368203
Blind cap on the barrel partly threaded to show.

View attachment 368205
I will echo Mark's comments on using the Pepetools disc cutter. It allows you to cut better ring and cabochon blanks.
 
I think this is one of the most complicated topics frequently discussed in the pen makers' world. Your question also covers two separate areas of pen making: Finials and metal work (clips and rings). The finials just another extension of pen making with the most complicated part being the cutting of tenons. I trust most pen makers will be able to figure that part out, so I won't go into that subject here. The metal work is where it gets complicated. In my opinion, a quality made pen can look cheap when matched with poorly made clips and rings. The metalwork is an art in itself.

I would suggest researching and learning the arts of Metalsmithing (and/or Silversmithing) and jewelry making. The most basic skills you will need to learn are cutting with a jeweler's saw, using a torch to anneal and solder metal pieces, shaping metal pieces with files, and polishing. There are also a number of pieces of equipment you will need to get started. Rather than list everything here would recommend the following books:

1) Metalsmithing by Jinks McGrath - https://www.amazon.com/Metalsmithing-Jewelry-Makers-Contemporary-Inspirational/dp/0764165844

2) Silversmithing by Elizabeth Bone - https://www.amazon.com/s?k=Silversmithing+Elizabeth+Bone&i=stripbooks&crid=2SM60BUSTVFJY&sprefix=silversmithing+elizabeth+bon,stripbooks,335&ref=nb_sb_noss

3) Simple Soldering by Kate Ferrant Richbourg - https://www.amazon.com/s?k=simple+soldering+a+beginner's+guide+to+jewelry+making,+book&crid=2SOW6K1NDXOSX&sprefix=SImple+Solder,aps,379&ref=nb_sb_ss_ts-doa-p_2_13

Kate Richbourg also has a Youtube channel that covers some of the tutorials in her book.

Once you are confident in these basic skills, I would recommend referring to a couple IAP tutorials:

1) https://www.penturners.org/resources/how-to-build-my-clips.398/

2) https://www.penturners.org/threads/clips.171776/#post-2135746 – (This was a post from Jalbert - scroll to the top of the page.)

Be prepared to spend time and materials during that you will probably throw out during the learning process. This is a learning-by-error venture. I have been studying metalsmithing on my own over the last two years, and only have been making metal clips over the last six months. There are other makers on this platform who are much more experienced and knowledgeable than me who have years of jewelry making training and experience and their work reflects it.

I don't want this to discourage you from advancing your skills, but I believe you should be prepared for what you are getting into so you don't become discouraged along the way. Once you become proficient with working with metal components, the creative possibilities are endless.


Good luck.
Thank you, but actually I didn't mean to make my own clips, I intended to purchase ready made ones. I was mainly curious on how to attach those clips to the pen itself.
 
As for attaching a clip, Marks method above is pretty well the standard. His finial is rather ornate, but a simple one works and looks dust as good.
 
I use several methods to do this now, and I will go through the method that I use with manufactured clips. I am not saying that my method is right, but it works for me. I have had no formal training on doing any of this and figured it out by trial and error and asking lots of questions to people with more metalworking experience on IAP.

Primarily for a blind cap or cap finial, I drill out and thread the same as my section, M10 x1. I prefer to thread all of these pieces and try not to use glue except to secure my metal piece to the finial. I turn down the finial until very close to the right dimension in a section mandrel, and then turn it down to final size and shape while inserted into the pen...very carefully. Make sure to drill out your tenon because if you have tight tolerance, your nib will need the extra room to prevent the tip from hitting your finial. If going with a clip, I start with a premade clip from Beaufort Ink with an outside ring diameter of 12mm and inside of 10mm. I use a 12mm endmill and create a channel into the top of the cap for the clip to sit in. I use a mini file that I have trimmed down to be the width of the clip and file a little channel for the clip to come out. My finial threads are 10mm, and the inner diameter of the clip fits perfectly on my tenon.

To make trim rings, I use a pepetools disc cutter to make washers to fit out of aluminum, brass, copper, nickel silver 18g flat stock. I turn them down with the finial. Others use a jeweler's saw and cut them out of sheet stock. If working with sterling, I now use sterling wire and solder my rings to fit. The disc cutter works well with silver, and I have found that I can use the cutouts for finial coins, but there is still a lot of waste, and silver is quite expensive.

View attachment 368198
Overall cap finial. M10x1 threads. Nickel silver washer cut out and finial coin installed. Make sure you drill out your tenon to allow the nib to fit.


View attachment 368199
End milled out the channel to hide the clip ring. Notice how the nib extends past the opening.

View attachment 368200
Filed out an opening on the right so that when threaded, the ring sits flush.


View attachment 368201
Threading on the finial and fitting the clip to fit in the channel and exiting through the slot.


View attachment 368202
Fully threaded.


View attachment 368203
Blind cap on the barrel partly threaded to show.

View attachment 368205
Do your file the slot before turning the cap to size or after you reached the desire size of the cap ?
 
I file after the cap is turned to size and do all of the finial work right before sanding.
Thank you. I haven't made a pen yet with a clip . Find it scary .😟. I take your advice and will try and post my first clip pen day after . Regds
 
I use several methods to do this now, and I will go through the method that I use with manufactured clips. I am not saying that my method is right, but it works for me. I have had no formal training on doing any of this and figured it out by trial and error and asking lots of questions to people with more metalworking experience on IAP.

Primarily for a blind cap or cap finial, I drill out and thread the same as my section, M10 x1. I prefer to thread all of these pieces and try not to use glue except to secure my metal piece to the finial. I turn down the finial until very close to the right dimension in a section mandrel, and then turn it down to final size and shape while inserted into the pen...very carefully. Make sure to drill out your tenon because if you have tight tolerance, your nib will need the extra room to prevent the tip from hitting your finial. If going with a clip, I start with a premade clip from Beaufort Ink with an outside ring diameter of 12mm and inside of 10mm. I use a 12mm endmill and create a channel into the top of the cap for the clip to sit in. I use a mini file that I have trimmed down to be the width of the clip and file a little channel for the clip to come out. My finial threads are 10mm, and the inner diameter of the clip fits perfectly on my tenon.

To make trim rings, I use a pepetools disc cutter to make washers to fit out of aluminum, brass, copper, nickel silver 18g flat stock. I turn them down with the finial. Others use a jeweler's saw and cut them out of sheet stock. If working with sterling, I now use sterling wire and solder my rings to fit. The disc cutter works well with silver, and I have found that I can use the cutouts for finial coins, but there is still a lot of waste, and silver is quite expensive.

View attachment 368198
Overall cap finial. M10x1 threads. Nickel silver washer cut out and finial coin installed. Make sure you drill out your tenon to allow the nib to fit.


View attachment 368199
End milled out the channel to hide the clip ring. Notice how the nib extends past the opening.

View attachment 368200
Filed out an opening on the right so that when threaded, the ring sits flush.


View attachment 368201
Threading on the finial and fitting the clip to fit in the channel and exiting through the slot.


View attachment 368202
Fully threaded.


View attachment 368203
Blind cap on the barrel partly threaded to show.

View attachment 368205
What is the depth of the end mill slot for accommodating the clip ? What is the typical cap size with the finial ?
 
What is the depth of the end mill slot for accommodating the clip ? What is the typical cap size with the finial ?
Usually I make the depth of the slot (and the rebate inside the top of the cap for the clip ring) just a little larger than the thickness of the ring-and-tab that have to fit in them. Not so much deeper that the clip is wobbly when the finial is tightened down, but just enough that the clip doesn't force a crack between the finial and cap.
 
Usually I make the depth of the slot (and the rebate inside the top of the cap for the clip ring) just a little larger than the thickness of the ring-and-tab that have to fit in them. Not so much deeper that the clip is wobbly when the finial is tightened down, but just enough that the clip doesn't force a crack between the finial and cap.
Thanks
 
I use several methods to do this now, and I will go through the method that I use with manufactured clips. I am not saying that my method is right, but it works for me. I have had no formal training on doing any of this and figured it out by trial and error and asking lots of questions to people with more metalworking experience on IAP.

Primarily for a blind cap or cap finial, I drill out and thread the same as my section, M10 x1. I prefer to thread all of these pieces and try not to use glue except to secure my metal piece to the finial. I turn down the finial until very close to the right dimension in a section mandrel, and then turn it down to final size and shape while inserted into the pen...very carefully. Make sure to drill out your tenon because if you have tight tolerance, your nib will need the extra room to prevent the tip from hitting your finial. If going with a clip, I start with a premade clip from Beaufort Ink with an outside ring diameter of 12mm and inside of 10mm. I use a 12mm endmill and create a channel into the top of the cap for the clip to sit in. I use a mini file that I have trimmed down to be the width of the clip and file a little channel for the clip to come out. My finial threads are 10mm, and the inner diameter of the clip fits perfectly on my tenon.

To make trim rings, I use a pepetools disc cutter to make washers to fit out of aluminum, brass, copper, nickel silver 18g flat stock. I turn them down with the finial. Others use a jeweler's saw and cut them out of sheet stock. If working with sterling, I now use sterling wire and solder my rings to fit. The disc cutter works well with silver, and I have found that I can use the cutouts for finial coins, but there is still a lot of waste, and silver is quite expensive.

View attachment 368198
Overall cap finial. M10x1 threads. Nickel silver washer cut out and finial coin installed. Make sure you drill out your tenon to allow the nib to fit.


View attachment 368199
End milled out the channel to hide the clip ring. Notice how the nib extends past the opening.

View attachment 368200
Filed out an opening on the right so that when threaded, the ring sits flush.


View attachment 368201
Threading on the finial and fitting the clip to fit in the channel and exiting through the slot.


View attachment 368202
Fully threaded.


View attachment 368203
Blind cap on the barrel partly threaded to show.

View attachment 368205
With the above advice which I found extremely helpful , I turned my maiden pen with clip confidently . I am very satisfied wit the pen and thank you very much for the exhaustive guidance .


Materials used
Clip - Beaufortink .
Pen - Bullseye turning
Finial and Section - Semplicita
Nib - Bock 6 ( Kanwrite India )
 

Attachments

  • IMG_6155.jpeg
    IMG_6155.jpeg
    249.7 KB · Views: 28
With the above advice which I found extremely helpful , I turned my maiden pen with clip confidently . I am very satisfied wit the pen and thank you very much for the exhaustive guidance .


Materials used
Clip - Beaufortink .
Pen - Bullseye turning
Finial and Section - Semplicita
Nib - Bock 6 ( Kanwrite India )
Nice job! Congratulations! I'm glad it helped.
 
Looks good Moran. That clip compliments the shape.
One thing I would mention. It looks like there is no space between the clip and the cap. But that could also just be the picture angle. I always try to leave 1.5 to 2.5mm, to allow the clip to accommodate shirt pocket material or pages of a notebook, without over bending the clip.
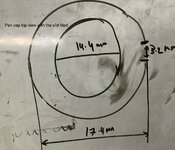
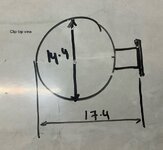
Nothing on the angle . The OD of the clip ring is 14.4 MM which I drilled 12 and finished it to 14.4 on the cap . The OD of the cap at the top is 17.4 MM which is exactly the distance between the bent potion and the OD of the circle. Other than these I did not leave any gaps . Kindly comment where I need to leave the gap .
 

Attachments

  • IMG_1475.jpeg
    IMG_1475.jpeg
    422 KB · Views: 6
  • IMG_1474.jpeg
    IMG_1474.jpeg
    654.1 KB · Views: 6
Let me see if I can explain what I mean Mohan. You need to keep a slight gap between the clip and the pen body. If it is squeezed flat against the cap, it will work fine for a roll stop, but will not function well as a clip.

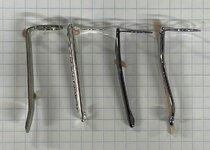
Here is a picture of 4 clips. The one on the left is my handmade nickel silver clip and the other three are all clips from various kits. You will notice that the clip is not 90deg to the washer. This allows a space behind the clip for the material the pen is clipped to, while still letting the tip of the clip touch the cap. This is how the spring tension is created to hold the pen to whatever it is clipped to. There should be only a slight amount of pressure on the clip when it is installed in the cap. If to much stress is constantly put on the clip it be difficult to clip the pen to anything, and will eventually fail due to work hardening of the metal.
IMG_6592.jpeg
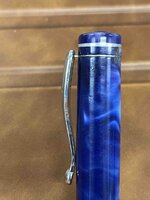
The blue pen below has a commercial Triton Clip, and as you can see, I couldn't hide the clip washer. The cap and the washer are both 14.5m,. If I had made the cap bigger, it would have put tremendous stress on the clip because there would always be force applied to the ball tip of the clip. This is the disadvantage of the commercial clip, as your design is dictated by the clip dimensions.
IMG_6588.jpeg
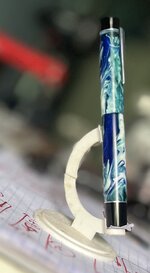
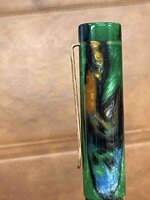
The green swirl pen has my handmade Bronze clip (the same as the Nickle-silver one above) and is designed so that there is a slight space behind the clip, but not much tension is pre applied when it is installed with the finial. This design, is still a work in progress. I think I need to leave a little more space at the top of the clip and put a little more curve at the tip.
IMG_6587.jpeg

I hope this is clear, and answers the question. I don't want to ramble on to long.
 
Let me see if I can explain what I mean Mohan. You need to keep a slight gap between the clip and the pen body. If it is squeezed flat against the cap, it will work fine for a roll stop, but will not function well as a clip.

Here is a picture of 4 clips. The one on the left is my handmade nickel silver clip and the other three are all clips from various kits. You will notice that the clip is not 90deg to the washer. This allows a space behind the clip for the material the pen is clipped to, while still letting the tip of the clip touch the cap. This is how the spring tension is created to hold the pen to whatever it is clipped to. There should be only a slight amount of pressure on the clip when it is installed in the cap. If to much stress is constantly put on the clip it be difficult to clip the pen to anything, and will eventually fail due to work hardening of the metal.
View attachment 377292
The blue pen below has a commercial Triton Clip, and as you can see, I couldn't hide the clip washer. The cap and the washer are both 14.5m,. If I had made the cap bigger, it would have put tremendous stress on the clip because there would always be force applied to the ball tip of the clip. This is the disadvantage of the commercial clip, as your design is dictated by the clip dimensions.
View attachment 377293
The green swirl pen has my handmade Bronze clip (the same as the Nickle-silver one above) and is designed so that there is a slight space behind the clip, but not much tension is pre applied when it is installed with the finial. This design, is still a work in progress. I think I need to leave a little more space at the top of the clip and put a little more curve at the tip.
View attachment 377294

I hope this is clear, and answers the question. I don't want to ramble on to long.
Thank you for the detailing. I understand the point . Inadvertently a small distance got created not by my effort but by chance and hence i did not have the problem . However I take your point which is amply clear from the explanation.
 
Back
Top Bottom