Pen Display Box

Signed-In Members Don't See This Ad
See more from SteveJ

SteveJ

Member
Joined
Jul 11, 2012
Messages
3,370
Location
Grand Junction, Colorado
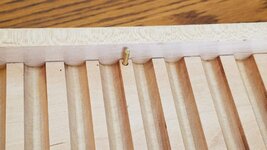
I haven't had a week off since last August 15, but was able to get this week off. I have been slowly working on a pen display box for my son and was able to finish it this week. It is modeled after a Levenger display box my brother gave me a number of years ago. I added a secret drawer to the front which is held closed both with magnets and a pin. The woods are wenge and maple. Not real satisfied with the grooves for the pens - I tried flocking them without success. Like many things it looks real nice from far away but up close I at least notice the flaws.

Display box 3.jpg

Display box 1.jpg
 

Attachments

  • Display box 2.jpg
    Display box 2.jpg
    234.9 KB · Views: 143
Signed-In Members Don't See This Ad

mark james

IAP Collection, Curator
Joined
Sep 6, 2012
Messages
12,720
Location
Medina, Ohio
Very Nice Steve. I suspect that quite a few lessons were learned. I made a display box a few years back and need to revisit it also.

Glad you had some time off, and I hope all is well with you and your family.
 

Lucky2

Member
Joined
Mar 2, 2012
Messages
1,502
Location
New Brunswick/ Canada
Steve, I think the box looks fine, you do know that, we're our own worst critiques right? Even though everything is fine, we tend to see things that aren't there. Personally, I think that that is what your doing with this box, it's gorgeous.

Len
 
Last edited:

jttheclockman

Member
Joined
Feb 22, 2005
Messages
19,082
Location
NJ, USA.
I like the combination of woods and the box looks fine. Can I ask why you did not like flocking?? You could also use some stickyback felt. I think the pens need to lay on something soft. I know flocking is not that soft but gives a nice color to it.
 

SteveJ

Member
Joined
Jul 11, 2012
Messages
3,370
Location
Grand Junction, Colorado
I like the combination of woods and the box looks fine. Can I ask why you did not like flocking?? You could also use some stickyback felt. I think the pens need to lay on something soft. I know flocking is not that soft but gives a nice color to it.

I've never done flocking before and frankly I made a huge mess of it. I think it was too hot and dry when I tried the flocking so the under coat dried to fast. I also tried the sticky back felt but the grooves that I routed were not wide enough to accept a pen and the felt.

If I do another one I will buy a larger bit and also spend more time learning how to flock. On paper it seems like it should be so easy...
 

jttheclockman

Member
Joined
Feb 22, 2005
Messages
19,082
Location
NJ, USA.
I've never done flocking before and frankly I made a huge mess of it. I think it was too hot and dry when I tried the flocking so the under coat dried to fast. I also tried the sticky back felt but the grooves that I routed were not wide enough to accept a pen and the felt.

If I do another one I will buy a larger bit and also spend more time learning how to flock. On paper it seems like it should be so easy...
Flocking is very easy and I have shown plenty of examples here when I was making pen boxes and pen stands. There are a few things that need to be done and that is have all materials laid out and ready to go once you put the undercoating on. You need to work fast and keep it wet. Need to put on evenly and when flocking just keep adding more and more. When you think you have enough use some more. Place paper under the project so later when you knock off excess you can capture it and pour it bag in the bag. Need to keep the flocking dry and out of humidity. Maybe just place cut strips of sticky back felt on bottom of slots. It will add some color if anything. anyway still a good looking project.
 

KenB259

Member
Joined
Dec 24, 2017
Messages
3,537
Location
Michigan
I like it Steve. Something like that has been on my to do list for awhile. I'll attach a picture of my pen trays that I use for shows. They were easy to make. I got some 1 inch thick pine and ran the edges over a 3/4 inch cove bit on my router table, took to my table saw and sliced them off. Ran it over the cove bit again and sliced it off. Then I just cut them to the length I needed and glued them together. Built frames for them to sit in. I just flocked them, I wanted off white, my wife said a gray would look better, she won, so the flocking is a dark gray. Glued them into the frames and they were done. If I get around to making a box, like you did, I'll probably make the inserts the same way.
IMG_1881.JPG


Sent from my iPhone using Penturners.org mobile app
 

jttheclockman

Member
Joined
Feb 22, 2005
Messages
19,082
Location
NJ, USA.
Ken, if I make another one I will first work on getting the flocking down correctly. Also I used a 1/2 inch cove bit which really is a bit too small.
Just a quick tip. Do not make sharp edges. Soften them by sanding rounded, Flocking does not like to stick to sharp edges. Do not try to do too much at once. Steve you could have done your box in 2 steps easily. Just tape off one half and concentrate on the other half.

I know you have seen these examples because they were my Bash entries in the past. I still need to make the pens for these pen boxes. Man I sure have alot to do.

Copy of IMGP0111.JPG
Copy of IMGP0193.JPG
Copy of IMGP0320.JPG
 
Last edited:

SteveJ

Member
Joined
Jul 11, 2012
Messages
3,370
Location
Grand Junction, Colorado
Just a quick tip. Do not make sharp edges. Soften them by sanding rounded, Flocking does not like to stick to sharp edges. Do not try to do too much at once. Steve you could have done your box in 2 steps easily. Just tape off one half and concentrate on the other half.

I know you have seen these examples because they were my Bash entries in the past.

JT, I have really appreciated those projects - thanks for showing them again. If I remember correctly that pool table is actually a pen box isn't it?

Are you using a flocking gun? I purchased a "kit" which was just some paint for the undercoat, the flocking and a soft plastic bottle which was supposed to blow the flocking on the painted surface. This is what I tried to use: https://www.flockingunlimited.com/collections/flocking-kits/products/tan-flocking-kit As I said it was the first flocking I've tried and although my father always said that a poor workman quarrels with his tools, I think I may have had more success with the tube type and a better undercoat!
 

jttheclockman

Member
Joined
Feb 22, 2005
Messages
19,082
Location
NJ, USA.
JT, I have really appreciated those projects - thanks for showing them again. If I remember correctly that pool table is actually a pen box isn't it?

Are you using a flocking gun? I purchased a "kit" which was just some paint for the undercoat, the flocking and a soft plastic bottle which was supposed to blow the flocking on the painted surface. This is what I tried to use: https://www.flockingunlimited.com/collections/flocking-kits/products/tan-flocking-kit As I said it was the first flocking I've tried and although my father always said that a poor workman quarrels with his tools, I think I may have had more success with the tube type and a better undercoat!

Steve I use Donjer flocking materials and I like the cardboard dispenser as shown in this video. One tip in here is a good one in that wear a mask. You do not want to be breathing those tiny wool fibers. I would not use a fan. You do not want that stuff blowing all around.

https://www.bing.com/videos/search?...647F2B8CCC1388374C99647&view=detail&FORM=VIRE

Yes Steve that pool Table is a pen box and here is a few more photos. These can be seen in my album if anyone is interested. I was offered alot of money for this box but turned it down. I still want to make the pen for it. I have the ideas for all 3 boxes but just never got to it yet. Have to say and I will toot my own horn on that project, but it has to be my best work ever. I had this idea for quite awhile and when I finally put wood to blade, every cut and every move I made came out perfect with precision and ease. Every jig I made to make all the cuts weather on a router or a tablesaw were first time perfect. It was like someone with a higher power guided me through this project. I am proud of this one for sure. Sorry could not help patting myself on the back. đź‘Ź
Copy of IMGP0105.JPG
Copy of IMGP0109.JPG
Copy of IMGP0110.JPG
 
Last edited:
Top Bottom