Not sure if I like it...!

Signed-In Members Don't See This Ad

robutacion

Member
Joined
Aug 6, 2009
Messages
6,514
Location
Australia - SA Adelaide Hills
Hi peoples,

I have been doing some testing with this "wood" that at the moment is requiring urgent attention from me, I have to "treat" it with the Cactus Juice and cooking but, I'be been testing colouring the Juice and then cast.

The "wood" if I can call it that, remind me of human finger prints, and all the light coloured areas that, the blue dye has enhanced together with the tinny borer holes on the wood, I haven't made my mind yet on what I think of it, I'm a little divided so, I show it to you guys and gals and let me know what you think.

See, you you can recognised this "wood"...!

Cheers
George
 

Attachments

  • 002.JPG
    002.JPG
    50.4 KB · Views: 310
  • 003.JPG
    003.JPG
    46.8 KB · Views: 244
  • 004.JPG
    004.JPG
    52.3 KB · Views: 233
  • 005.JPG
    005.JPG
    49.2 KB · Views: 290
  • 001.JPG
    001.JPG
    54 KB · Views: 378
  • 006.JPG
    006.JPG
    54.5 KB · Views: 292
  • 007.JPG
    007.JPG
    58.8 KB · Views: 290
  • 008.JPG
    008.JPG
    58.7 KB · Views: 269
Signed-In Members Don't See This Ad

Ed McDonnell

Member
Joined
Oct 20, 2008
Messages
2,294
Location
Melbourne, FL
To me, the blue just doesn't look right. I would like it a lot better if you used reddish brown dye in the cactus juice. I think that might look really good and would complement the natural color of the wood.

Ed
 

Justturnin

Member
Joined
Aug 19, 2011
Messages
2,235
Location
Houston, Tx
I think it is cool but would be better w/ more natural colors to me. If it took more blue it would be different but when its just a little I prefer it to look like it is natural and to accent w/ a darker natural color as opposed to a couple of little spots of bright unnatural color. Is that the Cork tree you had the other week?
 
Joined
Apr 25, 2011
Messages
922
Location
Albion, MI, 49224
As SWMBO would always say to me when I wasn't too pleased with an end result; "Just because you don't like it won't mean there isn't someone out there that will go ape ca ca over it."

And as I have witnessed, of those that I have disliked seem to be first sold off.
The down side she reps the profit off those. I like everyone I make nowadays.:biggrin:
 

robutacion

Member
Joined
Aug 6, 2009
Messages
6,514
Location
Australia - SA Adelaide Hills
Thanks peoples...!:wink:

I've got a few other identical blanks (stabilised in blue dye) that I cast in a few colours, I'm just waiting for the opportunity to turn the samples, while I'm in and out of doctors, tests and the works to try to find out why my blood pressure is so high and doesn't want to come down, at averages of 190/120 daily, the poor "ticker" ain't going to last as if I haven't had already enough problems...!:mad:

Anyway, I should be able to turn some samples tomorrow and try out also a few that I have done with blue and this evening I double stabilised with red, is in the oven as I write this so, I will have a look tomorrow.

In relation to the way this "wood" stabilises, and because the "wood" construction in based on layers upon layers, like paper-bark, the colour seems to the able to soak on the softer membrane in between layers while the rest of the wood has harden considerably, it appears that the blue colour was filtered from the juice on most of the wood as it looks as if was stabilised with the clear juice, a strange thing, indeed...!:eek::confused::)

Will be interesting to see what the double dyed with the red after the blue, will look like and where did the red went to...???

No one has yet guessed what this "wood" is, there are a few clues already, though...!:wink::biggrin:

Cheers
George
 

carlmorrell

Member
Joined
May 14, 2013
Messages
693
Location
Cary, NC
Seeing the white/brown makes me think you have both the heart and sapwood. Knowing where you are a good guess is some sort of eucalyptus :)
 

robutacion

Member
Joined
Aug 6, 2009
Messages
6,514
Location
Australia - SA Adelaide Hills
No eucalyptus, for sure...!:biggrin:

As promised, I have a 3 more samples for today, and I have a few more to go, some already done ready to turn, some I haven't done yet, One of the ones I have to try is the double dyed again, as the first one (attached here) didn't allow much of the second colour to soak/show so, I reckon was due to the fact that the first colour (blue) was stabilised at full vacuum, something that shouldn't be done, if a second colour is to be added.

I need to actually start with the second colour that in this case is the red, let that soak overnight (no vacuum) then cook it as normal. After that put it with the blue and give it full vacuum for a few hours, then cook. The results will be very different and more in tune to what double dying should be...!

The first blank in the pics is the doubly dyed (blue/red), the red is visible in among the "wood" layers but, that's it, I want more...!

On the second and third samples tests, I used a couple of the stabilised in blue blanks that had plenty of qualities to be filled with resin, this time i used a blue resin to match the blue dye, and the other is a mix of blue/red resin to make a match/contrast combination.

I'm surprised that no one has identified this "wood" and the reason why I put the word wood under brackets. Some of you have purchased this "wood" from me and since I first salvaged it I didn't know that after the natural sticky sap dries out (took about 2 years) a tinny little wood borer can very rapidly infest and destroy/eat all the light colour "wood" which as alive "wood" and not really sapwood as it may look...!

This last 12 months has been a battle to try to control this, about 30% or more of all my raw stock, has been lost and burnt to void any further spread, the rest is contaminated into various degrees, a life time supply of this "wood" has been reduced to a few years, if I can stop the few pieces that aren't yet contaminated to be so, and out of the rest 60%, half has been cut off and burnt and the other half I'm trying kill the creatures inside the "wood" and stop them from eating any more.

All attempts to kill these small creatures have failed, as they seal the holes behind then and as they eat so, the poisons can't get to them, the only way to kill them is to stabilised and cook, every single blank after being cut. Previously waxed raw blanks, are getting eaten also, the bustards were probably already inside when they were processed so, everything blank from this "wood" has to be stabilised, either without dyes for the blanks not yet contaminated an possibly some colour added to the juice to make those borer channels, a little more attractive in the blank.

Since starting stabilising (1 year ago), about 8 gallons have been used with this "wood" but now, I have to process every piece left and stabilised everything, if I'm to have same of this material in the future as the chances of getting something like this again, in my lifetime, is very slim...!

The problem is that, in between the full size blanks that aren't contaminated yet, the ones that are and the 2 types of "wood" condition on the many blanks that need to be filled with resin, the decision on how to stabilised them, has to be made now, stabilising them with the clear juice, won't work for adding any colour/colours later, and this is the reason for this thread in the first place, I can make all my decisions without consultation or, allow myself a little breathing space and as other people what they think will look best in all possible ways to have then done as, regardless of how they endup looking in the end, the "wood" needs urgently to the treated to kill the eating creatures, before I lose even more of it....!:mad:

Our friend Curtis, should be having a big smile :biggrin:, if he reads this, he know that I will need lots more gallons of Juice just to take care of this "wood" problem, probably close to 4,000 blanks that are still to be treated/stabilised...!:eek::eek::mad: , damn...!:frown:

I wish that I knew this was going to happen, when I first salvaged it, I would had make sure, I would get to this situation/point...!

On a positive note, I may be able to turn and ugly/nasty thing into something that is acceptable and, if I'm lucky, turn it into something unique and special...!:wink::)

What do you're reckon...????

Cheers
George
 

Attachments

  • 011.JPG
    011.JPG
    66.8 KB · Views: 121
  • 006.JPG
    006.JPG
    57.9 KB · Views: 110
  • 004.JPG
    004.JPG
    58 KB · Views: 125
  • 010.JPG
    010.JPG
    56.6 KB · Views: 127
  • 009.JPG
    009.JPG
    56.1 KB · Views: 130
  • 007.JPG
    007.JPG
    63.6 KB · Views: 124
  • 001.JPG
    001.JPG
    52.8 KB · Views: 138
  • 002.JPG
    002.JPG
    51.1 KB · Views: 133
  • 003.JPG
    003.JPG
    54.1 KB · Views: 138

Russknan

Member
Joined
Mar 13, 2012
Messages
537
Location
Nanuet, NY
Hi George. I really like the second batch, but am with you on being of two minds on the first. Again, regarding the first, I'm thinking that actually putting one or two on a pen may give a little more balance and push it over the line into a definite "like". To make a reference to your past military background, it really looks like you are "dialing in your mortar" on the coloring. Nice work! Russ
 

Waluy

Member
Joined
Jan 30, 2013
Messages
285
Location
Olathe, KS 66061
I really like the one that shows a red bow like shape with a blue band in the center. My guess for the "wood" is that its cork.
 

stonepecker

Member
Joined
Oct 29, 2012
Messages
4,382
Location
central Minnesota
I am of two minds.......love all the color. Don't like the 'form' it has taken. Thinking that it would be nice to see in a finished pen before making any more decissions.

Looks like a lot of work and that usually means something very special.
 

robutacion

Member
Joined
Aug 6, 2009
Messages
6,514
Location
Australia - SA Adelaide Hills
Hi peoples,

No, is not Cork wood...!:)

The "shape" of these pen blanks samples, has had a few changes over the years, the most common shape is turn round through the whole blank but, and any time possible, keep is as big/wide as possible so that the sample can still be used to make a pen from, if necessary.

Sometimes I like to shape it into a 2 barrel pen but, not all blanks are suited for that as the blank is mounted between centres and has absolutely no support within, there is, no glued tubes or anything of that nature, turning the middle false ring/band so thin, can be a bit of a challenge so, I keep it simple and quick to make, samples like that are in most cases a very accurate way to show what the blank will look like made into a pen.

There is off-course the fact that, the thinner most of these blanks are turned into, the different they will look, some marking will be cut away but new markings can appear also so, samples are not an exact science, as you never get 2 blanks the same, either...!

Based on this principal and reality, I'm trying to produce a couple or so of good looking blanks batches or at least, the best I can make from the urgent "treatment" I need to give to this "wood"...!:frown:

I done a similar process with the Truffles, the same type of worm/wood eater but these were giants compare with the small version of it that are no bigger than 2mm in length ( first 2 pics taken yesterday with my USB microscope)

There are many identical types of wood borer, these ones are the ones I see the most, all started from eggs layed either deep into the wood by channels created by the lying bug or layed in tinny crevasses that, when conditions are suitable, all hatch and start their life cycle, eating and eating...!

I never seen something so small, eat so much in a very short period of time, bustards...!:mad:

Some of these treated blanks will have a high "population" of "plasticized" tinny worms in them, they will part of the blank forever, some will endup on the pen barrels and will become part of this unusual and interesting pen making material from the land of OZ.

Maybe, a great conversation piece and a challenge to find/see a plasticized "creature" in the pen barrel(s)....! I've seen a lot worse things...!:wink::biggrin:

PS: The pic with the measuring tape, is a good example of what I found in the Truffles however, despite of similar appearance the ones I'm dealing with at the moment are about 2mm in length...!

Cheers
George
 

Attachments

  • Vine bug1.jpg
    Vine bug1.jpg
    24.8 KB · Views: 96
  • Vine bug3.jpg
    Vine bug3.jpg
    24 KB · Views: 90
  • images (3).jpg
    images (3).jpg
    8.2 KB · Views: 99
  • images (2).jpg
    images (2).jpg
    7.4 KB · Views: 93
  • download.jpg
    download.jpg
    8.8 KB · Views: 122
  • images.jpg
    images.jpg
    2 KB · Views: 180
  • images (1).jpg
    images (1).jpg
    6.8 KB · Views: 93
Last edited:

robutacion

Member
Joined
Aug 6, 2009
Messages
6,514
Location
Australia - SA Adelaide Hills
Well, 3 more samples for today, I should have edited the first pics and make a not of what they are (colours, etc.) as it start to get a little confusing to work out what each sample is about, I can not edit any of the pics on previous posts but I'm doing that on all the pics I will post here from now on...!

One of the interesting aspects of doing all these tests is that, is always some new/different way, that hasn't been tried before and while there are some recommendations on how the double or triple colour stabilizing should be made, the results will always change depending upon the wood used so, having a very unique/different "wood" type to work with in this case and after the "traditional" casting/dying methods have been used, I'm thinking is trying a couple of other ways and see what will happen.

Off-course, you will know what I'm talking about very soon, after I get those samples finished and photographed...!:wink:

For today, I've used another 2 of the blue stabilised blanks that were to be filled with resin, all colours used are within the blue, red and green shades, colours are used, according to what was went into the wood first so, from matching combinations to contrasting combinations and everything in between, we get a little bit of them all.

I may endup with 3 or 4 combinations that I like and, proceed with the "treatment" as explained, there is no shortage of blanks to try with, nor there are limitations on what I could try with them but, I have to put some limits on how far I'm ready to go, and the amount of time and expensed I'm able to accommodate so, I'm sure that, the one way or the other, I will endup with a good variety of options that will be used to finish all these blanks and store them to supply my eBay store and visitors, for a long, long time...!:eek::wink::biggrin:

OK so, here they are...!

PS: Should I charge an extra per blank, for the possible "meat" content within the blank...???:eek::wink::rolleyes:

Cheers
George
 

Attachments

  • 001a.JPG
    001a.JPG
    107.6 KB · Views: 115
  • 002a.JPG
    002a.JPG
    55.3 KB · Views: 114
  • 003a.JPG
    003a.JPG
    53.2 KB · Views: 112
  • 004a.JPG
    004a.JPG
    68.1 KB · Views: 103
  • 005b.JPG
    005b.JPG
    108.5 KB · Views: 112
  • 011m.JPG
    011m.JPG
    159.6 KB · Views: 133
  • 14m.JPG
    14m.JPG
    129.1 KB · Views: 114
  • 008b.JPG
    008b.JPG
    56.8 KB · Views: 109
  • 007b.JPG
    007b.JPG
    53.5 KB · Views: 102
  • 006b.JPG
    006b.JPG
    54.1 KB · Views: 104
  • 006c.JPG
    006c.JPG
    120.2 KB · Views: 120
  • 009c.JPG
    009c.JPG
    57.1 KB · Views: 108
  • 004c.JPG
    004c.JPG
    59 KB · Views: 105
  • 011c.JPG
    011c.JPG
    62.3 KB · Views: 109
Last edited:

robutacion

Member
Joined
Aug 6, 2009
Messages
6,514
Location
Australia - SA Adelaide Hills
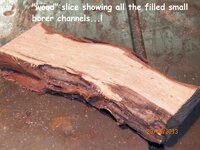
Ok peoples, I reckon I have made enough tests samples of this "wood" that no one has said its name, when some of the pics actually tell what it is...!:eek::)

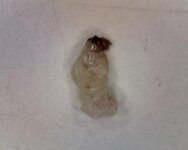
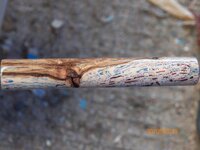
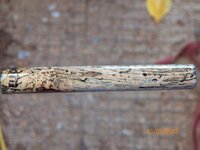
Anyway, this is the "famous" McLaren Vale Shiraz red VINE "wood"/material, this have no heartwood or sapwood, is has dead layers and live layers, those ere the ones to replace the dead ones and feed the Vine with the necessary nutrients...!

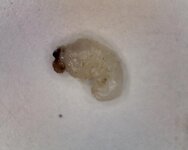
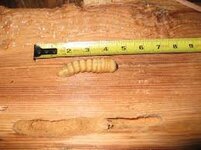
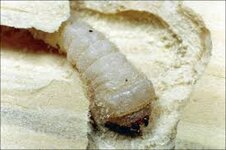
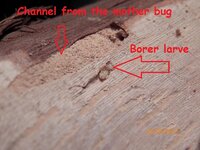
For each batch I filled the vacuum pot (about 80 blanks), cooked them and put them a side, these are treated, if was any borer in the wood, was killed and if the wood was free of it, that's how it will stay, as they (the bugs) won't touch this stuff now...!:wink::biggrin:

I have also made the decision to change my stabilising plans for all the vine I had left, stabilisation cost me about $1.50 (Juice sent to Australia and the most expensive State for Power consumption/prices), I had about 4,000 blanks to do, I then realise that I just can't afford nor I could justify spending $6,000 in the next few weeks to, treat all the vine.

I had already plenty cut but some vines that were never touched, those were some of the least affected and put a side when I first discover the infestation about 6 months ago. I simply kept bringing new wood and pile it on top so, the damn Vine was always under everything and I wasn't sure how I would go about to save the wood.

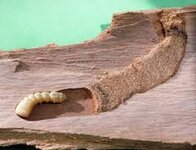
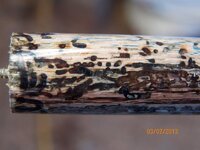
It simply took me too long to get to it and get the problem solve when I saw the vines that weren't affected 6 months ago now in very nasty condition from the bugs/borer, I wondered how the other blanks I had cut long ago, put is boxes untreated, would be and after getting them all out, I started to got through each blank and make 3 piles, not wholes (borer), a few holes, and plenty of holes...!

The pile with plenty of holes, many in fact totally useless, was the biggest by far, I stopped and though for a while how much money that I don't have, and time that would eat from me to get that lot treated/stabilised, about 2,500 blanks, I quickly come to the conclusion that, I was in no position nor I though it would worth the drama so, loaded the trailer with them, took them to the open storage paddock and set them alight, those damn bores in that lot, were going to be "roasted" good and proper so chances to spread anywhere...!

While the wife stayed keeping and eye on the fire, I went back home and got another big lot, this time were about half of the second pile, the one with a few borer holes, I quickly picked the worse ones, chucked then in the trailer and back to the paddock I went. By then, the first lot was all gone but still hot enough to set alight the second lot.

If did break out hearts to see it burn, after the horrendous amount of work, time and expense to get them in the first place but, sometimes you have to cut your losses and lose once, and not twice...!

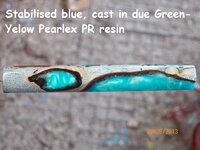
So, what I endup with is about 500 to 600 blanks, most are for Resifills, some are already stabilised blue, and the best ones (no signs of borer) are going to be stabilised in clear/natural juice, no dyes...!

Used 3 gallons these last 2 weeks, I have 4 left and I doubt they will be sufficient but maybe as most of these blanks are quite dense so, not soaking excessively as the very soft stuff, does...!

Even if the Juice I've got left is just enough to do this vine stuff, I have to find some money to order some more gallons from Curtis, there are boxes and boxes of other blanks that will need stabilising next but those, I can do with a little more time as the wood is not infested or affected with any wood eating creatures, thanks goodness for that...:)

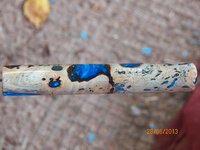
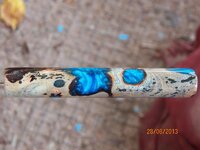
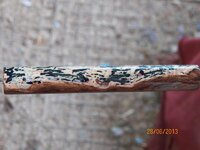
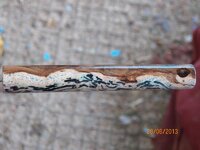
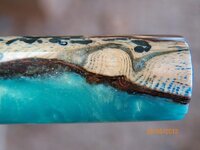
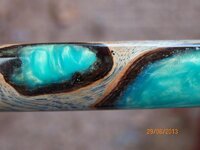
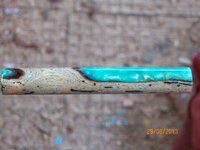
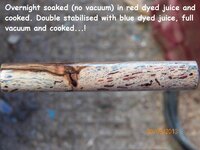
To complete these tests series, I decided to double dye the blanks, soaking the first colour (red, yellow, brown, black) for 18 hours, and then putting them all in the vacuum pot with the blue dye, and give them full vacuum for 5 hours. To note that, this time I did not cook the first colours, what I did was to let the coloured blanks (4 lots of 5 in ice cream containers) to drain overnight before I put them in the blue dyed juice and pull the vacuum on the lot.

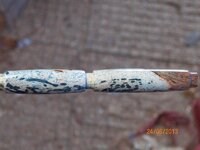
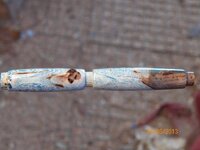
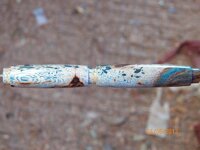
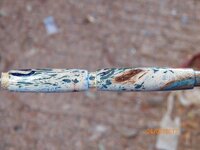
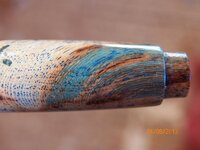
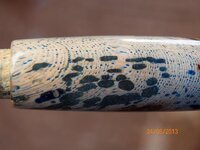
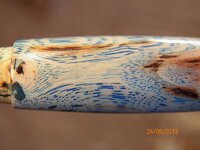
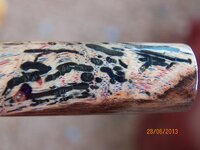
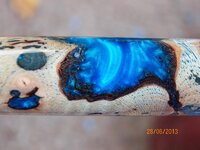
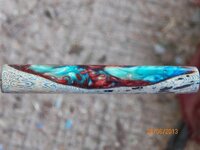
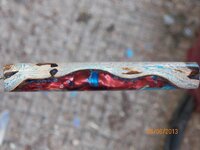
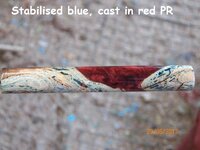
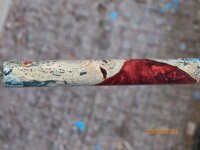
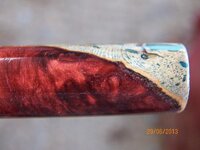
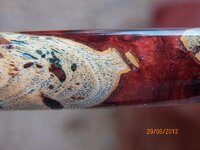
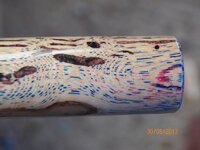
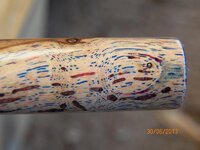
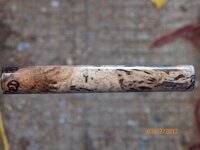
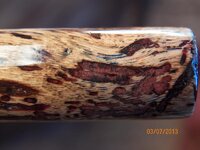
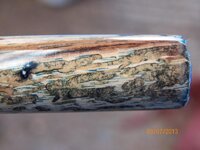
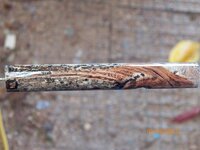
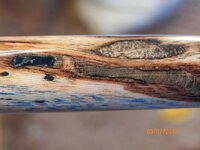
I wanted to see if the colour separation was identical to when they are cooked in between colours. After they were cooked, the 4 samples attached show a definitive separation between the first colour and the blue however, the simple soaking of the blanks in the juice dyed, does only cover/fill the borer holes and any other soft patches within the blank, while the blue juice that was been given full vacuum, is the one that always shows in between the "wood" layers...!

So it seems that, letting the wood drain properly from the first soak, and not cooking in between the 2 soakings, it still maintain some colour definition between the first and second colours. This can also be helpful for the amount of soaking the second colour under full vacuum is able to penetrated, as the wood is not "sealed" with the dry/cooked juice from the first colour...!

Now, I can also guarantee that, different results will be experienced depending upon the wood used, that is just expected, huh...???:wink::biggrin:

So, here they are, the last 4 samples, first red/blue, second yellow/blue, third brown/blue and last, black/blue...!

Note: The first colours used, were already mixed for other tests, it was become obvious that, a lot more of the Alumilite dye is require to achieve a strong/solid colour, my mixes were very mild, apart from the blue that I used the half bottle (all I had left) on a gallon of juice...!

Oh well, you game some, you lose some...!

Cheers
George
 

Attachments

  • 007.JPG
    007.JPG
    47.5 KB · Views: 124
  • 009.JPG
    009.JPG
    65.9 KB · Views: 119
  • 010.JPG
    010.JPG
    51.3 KB · Views: 117
  • 011.JPG
    011.JPG
    60.6 KB · Views: 115
  • 012.JPG
    012.JPG
    56.9 KB · Views: 120
  • 013.JPG
    013.JPG
    63.3 KB · Views: 120
  • 014.JPG
    014.JPG
    52.3 KB · Views: 121
  • 015.JPG
    015.JPG
    57.7 KB · Views: 119
Last edited:
Top Bottom