My shot at a carbide tool

Signed-In Members Don't See This Ad
See more from Skewer

Skewer

Member
Joined
Oct 8, 2014
Messages
295
Location
Kentucky
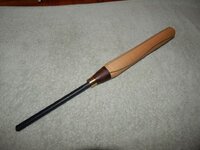
I've been seeing other posts about people making their own carbide tools, so decided to try one myself using the ideas I've seen others incorporate. I used it a bit this morning and i'm very happy with it.

I had some aluminum laying around, can't even remember what i had planed on using it for, i cut that, shaped it on the sander, and just stuck in on with some CA glue for now. Seeing that piece of carbide on the end, I felt like i was going to get it caught on something (my finger maybe) if i didn't shield it a little bit. I like it there and if/when it eventually comes off, i would probably look to tap another hole and screw it on. I also didn't do a great job of matching up the angle, but it works.

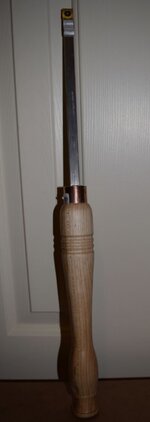
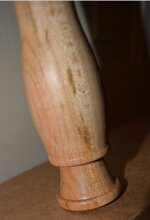
I also didn't like the options i found for making the hole for the bar to go in - cutting larger holes, making shims, etc. What i ended up doing was drilling a 1/2 inch hole and taking a 1/4 inch chisel and making the hole a square one. the bar fit in good and was 'hammer tight.' I added some gorilla glue and hammered the ferrule on.

I tried to make the handle shape after another of my tools that is most comfortable to me, then added an extra piece on the end. I thought about shortening it, but glad i didn't after using it. I'm happy with the length and weight for roughing.

Rounded up, here are the specifics of materials i have in it. I would hope these are specific enough that if you want to do this yourself, you can.

AZ carbide - carbide cutter - $6 each, $2 shipping
Lowes - Copper coupler $4 - would make two ferules(i had a brass ferule but it wasn't big enough). Dewalt #29 drill and 8-32 tap $6
McMaster Carr - 1/2 sq x 1 foot steel bar - Part number 9143K17 - $5 Each, but paid $9 shipping on two.
Woodcraft - Hard Maple 2"x2"x12" spindle - special at $2 bucks.

So i have less that 34 bucks in.

One more thing - The taped hole had to be countersunk a little for the screw to hold the carbide cutter tight on the bar. I didn't have anything to do this, so i took a dull carbide cutter from my smaller EWT easy start rougher, holding it at 45 degrees with a pair of pliers, and just reamed it out.
 

Attachments

  • Capture.JPG
    Capture.JPG
    22.4 KB · Views: 400
  • Capture1.jpg
    Capture1.jpg
    50.6 KB · Views: 324
  • Capture2.JPG
    Capture2.JPG
    30.2 KB · Views: 268
Last edited:
Signed-In Members Don't See This Ad

Dale Allen

Member
Joined
Oct 27, 2012
Messages
1,384
Location
Massillon, OH
Jeff, that looks great. So the cutters from AZ look to be the same as the $14 one from the other guys....interesting.
I like the aluminum idea. Currently I have some white silicone smeared on the other 3 edges of mine.
And are you saying that you used a carbide cutter to chamfer the hole in the 1018 steel? I would have never thought that would work.
 

Skewer

Member
Joined
Oct 8, 2014
Messages
295
Location
Kentucky
Yeah, i actually just tried to start a bigger drill bit in, but it caught and wouldn't go deeper, then used that carbide square to ream it out a little more and it worked well enough to get the screw in there a little deeper.
 

Dale Allen

Member
Joined
Oct 27, 2012
Messages
1,384
Location
Massillon, OH
I used a bigger bit on my drill press.
So, I gotta ask, what is you method of drilling and tapping the hole.
Do you run the tap by hand?
 

Skewer

Member
Joined
Oct 8, 2014
Messages
295
Location
Kentucky
I went by a family members house to use their drill press to drill the hole. I did do the tap by hand. Not until i got home and tried it out did i realize i would have to make some more room for that screw.
 

Dale Allen

Member
Joined
Oct 27, 2012
Messages
1,384
Location
Massillon, OH
OK, well, you must have a steadier hand than me cause I was having some issues with tapping. Ended up using my drill press to keep the tools lined up.
BTW, don't waste your money on a cheap drill press. You will regret it as much as I have.
 

Bobostro61

Member
Joined
Jan 5, 2013
Messages
576
Location
Chicago, IL
That's awesome! I want to give one a shot too. I have the ez-start tools myself and would like to try making some larger ones that can hit the bottom of a bowl without half the handle being inside the bowl. I have a couple questions for you though...

Is the carbide cutter you used the 15MM one that says - Fits Ci1 rougher?
What type and size screw did you use to make sure it fits the cutter?

Thanks for the great idea!
 
Last edited:

Skewer

Member
Joined
Oct 8, 2014
Messages
295
Location
Kentucky
The carbide cutter i used was the 15mm/Ci1 and it came with a screw from the store mentioned. "#8-32 x 3/8" Mounting Screw Supplied"

Dale - drill press used was a harbor frieght variety. I drilled the hole and started the tap slowly by hand with some 3-in-1 oil. I felt like the tap kind of lines up into the hole once it starts to cut the threads. i used an adjustable wrench to turn it - felt like it took forever. It would get tight at times - you could see the tap flex, at that point it would back it out a half turn. Then I would work it back and forth in any rough spots and dab some more oil on and it would be cutting smoother again. When it got to the end it got tight more frequently and I could kind of knock some of the crap out of the bottom hole. Not sure if that helps or not or where you are having issues. I'm no expert myself, but i'm sure someone in the forum here can help.
 

Skewer

Member
Joined
Oct 8, 2014
Messages
295
Location
Kentucky
Dale - I see you already got a different thread going to figure it out. :biggrin:
 

Dale Allen

Member
Joined
Oct 27, 2012
Messages
1,384
Location
Massillon, OH
Jeff, I do think I have it figured out.
But then I have had that feeling many time in my life and was sadly disappointed....but that's life.:wink:
When I was threading it by hand with no alignment fixture it would do the same as yours. Gets tight then when I'd try backing it out it would seem to get just as tight.
Apparently it was because the tool was trying to thread into the hole at an angle and it did not like that situation. It may have been cutting a thread on one side and jamming the piece against the other side.
 

Cavediver

Member
Joined
Dec 13, 2014
Messages
52
Location
Tucker, Ga
I had some aluminum laying around, can't even remember what i had planed on using it for, i cut that, shaped it on the sander, and just stuck in on with some CA glue for now. Seeing that piece of carbide on the end, I felt like i was going to get it caught on something (my finger maybe) if i didn't shield it a little bit. I like it there and if/when it eventually comes off, i would probably look to tap another hole and screw it on. I also didn't do a great job of matching up the angle, but it works.

That's a pretty good idea! I've been trying to think of ways I could accurately recess the cutter into the steel bar to protect my fingers, and have (so far) come up empty. I think I'm going to give your idea a try!
 

Bobostro61

Member
Joined
Jan 5, 2013
Messages
576
Location
Chicago, IL
Got everything I need except for the copper ferules. I'll pick that up this weekend and give making one a shot as well once it gets above zero degrees here.
 

LeeR

Member
Joined
Nov 13, 2010
Messages
630
Location
Fort Collins, Colorado
Got everything I need except for the copper ferules. I'll pick that up this weekend and give making one a shot as well once it gets above zero degrees here.

I like using copper for ferrules. Besides couplers, I've used copper caps, so they have a nice curved end. You just need to drill a hole for inserting the tool shaft. Another option is brass compression nuts from the plumbing section of your favorite hardware store. Even with the hex shape of the nut, brass can be turned with HSS tools, or a carbide tool certainly.

I just made this tool handle for a bowl gouge, and started with a scraper to shape the brass, and then used my Woodchuck Pen Pro. Worked like a charm to smooth the brass. This is my first handle completed with a skew. Over Christmas I was determined to overcome my "Skew Fear". Watched a great video on You Tube that really explained how to avoid catches.
 

Attachments

  • bowl-gouge1.jpg
    bowl-gouge1.jpg
    219.8 KB · Views: 116
Top Bottom