My First Kitless Slim Click Pen

Signed-In Members Don't See This Ad
See more from magpens

magpens

Member
Joined
Feb 2, 2011
Messages
15,913
Location
Canada
A week or so ago, I started a thread for discussing what we would want in a kitless slimline pen.

I think there was a preference for a click pen; definitely people wanted it slim and as close to the original Slimline as possible; also wanted was shirt pocket length. . An important requirement was that the refill should be a Parker-style rather than a Cross-style as in the original slimline.

Over the last few days I have been working on making such a pen. Here it is in its nearly finished form; the clip still needs some work and the final polishing process is required which will get rid of the photographically exaggerated scratches you see. .Trust me - they are very superficial. . Please excuse the photography, especially the out-of-focus first picture.

To make this pen, I used parts from the PSI Slimline Pro kit which is based on 8 mm tubes for a two-barrel pen. . I have made it as a single barrel instead, thereby omitting the centerband/tube_coupler. I also left out the brass tubes. . The other parts I have used, two of them in modified form. One feature of the Slimline Pro is that you unscrew the nose cone in order to replace the refill. . I have retained that feature. . Although the Slimline Pro kit is supplied with a gel refill, I have replaced that with the metal Parker-style; it happens to be the same length which is good.

The click mechanism, pushbutton, clip, and nose_cone coupler have been used unaltered. . The nose_cone has been reduced in diameter to 0.33" to be the same as the original slimline. . The top finial, through which the pushbutton protrudes, has been reduced to the same diameter. . You may not notice the fact that the clip support ring has not yet been reduced, but it should be and it will be when I figure out how to do that. . Obviously, I could use a fine file but I would like to find a machine method which is not so tedious.

OK, so let's see some pictures ! . I will describe my methods in the second post of this thread.

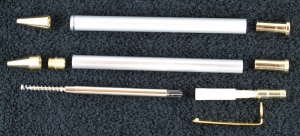
The first picture shows the unassembled parts plus the 3/8" aluminum rod that was the start at the top. Parts that were used unaltered are shown once in the picture, and parts that were altered are shown in both their original and altered form. . I hope that makes the picture meaningful.

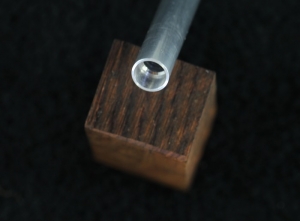
The second picture is an end view of the correctly sized aluminum barrel with the end bored out to accept the nose_cone_coupler threaded piece. . The other end of the barrel is also bored out, to the same diameter but greater depth, to accept the click mechanism and the top finial.

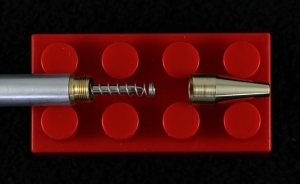
The third picture shows the nose_cone unscrewed so that you can see the threaded nose_cone_coupler, the main spring, and the method of replacing the refill.

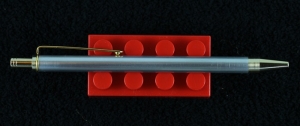
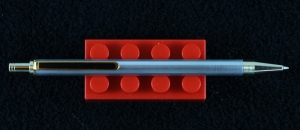
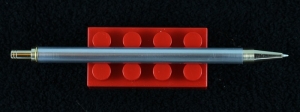
Pictures four, five and six show some views of the nearly finished pen with the refill both extended and retracted.


Last edited:
Signed-In Members Don't See This Ad

stuckinohio

Member
Joined
May 3, 2015
Messages
1,695
Location
Columbus Ohio
Very nice Mal! Interesting way of approaching the nose cone idea. For the clip, since you are using the slim line diameter, couldn't you just use a clip from a slimline?

Oh, and sorry for stealing your second post!
 
Last edited:

Dieseldoc

Member
Joined
Oct 28, 2017
Messages
1,511
Location
Livermore, Ca 94550
A week or so ago, I started a thread for discussing what we would want in a kitless slimline pen.

I think there was a preference for a click pen; definitely people wanted it slim and asl close to the original Slimline as possible; also wanted was shirt pocket length. . An important requirement was that the refill should be a Parker-style rather than a Cross-style as in the original slimline.

Over the last few days I have been working on making such a pen. Here it is in its nearly finished form; the clip still needs some work and the final polishing process is required which will get rid of the photographically exaggerated scratches you see. .Trust me - they are very superficial. . Please excuse the photography, especially the out-of-focus first picture.

To make this pen, I used parts from the PSI Slimline Pro kit which is based on 8 mm tubes for a two-barrel pen. . I have made it as a single barrel instead, thereby omitting the centerband/tube_coupler. I also left out the brass tubes. . The other parts I have used, two of them in modified form. One feature of the Slimline Pro is that you unscrew the nose cone in order to replace the refill. . I have retained that feature. . Although the Slimline Pro kit is supplied with a gel refill, I have replaced that with the metal Parker-style; it happens to be the same length which is good.

The click mechanism, pushbutton, clip, and nose_cone coupler have been used unaltered. . The nose_cone has been reduced in diameter to 0.33" to be the same as the original slimline. . The top finial, through which the pushbutton protrudes, has been reduced to the same diameter. . You may not notice the fact that the clip support ring has not yet been reduced, but it should be and it will be when I figure out how to do that. . Obviously, I could use a fine file but I would like to find a machine method which is not so tedious.

OK, so let's see some pictures ! . I will describe my methods in the second post of this thread.

The first picture shows the unassembled parts plus the 3/8" aluminum rod that was the start at the top. Parts that were used unaltered are shown once in the picture, and parts that were altered are shown in both their original and altered form. . I hope that makes the picture meaningful.

The second picture is an end view of the correctly sized aluminum barrel with the end bored out to accept the nose_cone_coupler threaded piece. . The other end of the barrel is also bored out, to the same diameter but greater depth, to accept the click mechanism and the top finial.

The third picture shows the nose_cone unscrewed so that you can see the threaded nose_cone_coupler, the main spring, and the method of replacing the refill.

Pictures four, five and six show some views of the nearly finished pen with the refill both extended and retracted.


Mal:
Very nce so call kitless,Hum!
 

magpens

Member
Joined
Feb 2, 2011
Messages
15,913
Location
Canada
My First Kitless Slim Click Pen - Construction Methods

We start with the 3/8" aluminum rod shown at the top of the first picture. . The rod was purchased in a 3-foot length from Home Depot. . The finished barrel will be 4.21" long to conform to the architecture of the Slimline Pro. . The rod used was cut about 4.5" long to allow for end trimming.

First the ends were squared up roughly with a file and then center-bored with a center drill on the lathe. . I use a metal-working lathe, but I think you can do everything with a wood-turning lathe with appropriate chuck and dead and live centers.

Next the axial hole was bored to a diameter of 15/64" which is just a shade larger than the Parker refill. . It is a 4.5" long hole, so I had to drill from one end to the middle and then repeat from the other end. . There is not problem with alignment of the two drillings if you have a decent headstock chuck, which everyone needs for serious pen turning and eveything else.

After that initial drilling, using a light lubricant, the ends are accurately squared up, removing the minimum of material.

Next, measure the length that is left. . It should be about 4.38" or so. . Ultimately we want it to be 4.21" which means we will eventually remove about 4.38 - 4.21 = 0.17". . We will plan to remove 0.085" from each end as you will see later, so make a note of that number.

To accept the nose_cone_coupler, one finished end will have to have a 0.295" hole to a depth of 0.205". . At this time, our blank is too long so we will drill the hole to a depth of 0.205 + 0.085 = 0.290" based on the existing aluminum rod length that we have at this time. . The hole diameter of 0.295" is provided by using a "M" size drill bit. . Not everybody will have that but I have a set of letter-size drills because I do not like to compromise on my sizing when I am doing fairly precise work like this.

After drilling that short hole, we will not drill a hole of the same diameter of 0.295" into the opposite squared end of the aluminum rod. . This second end hole will need to be 1.670" deep eventually, in order to accept the click mechanism and the end finial. . But remember that because out rod is, at this stage too lone, we will drill the hole 1.670 + 0.085" deep. . Go for it!

That's it for the drilling, but we won't trim the rod to length just yet.

First we will machine the diameter of the rod down from its nominal size of 3/8" = 0.375" to just a bit bigger than the final diameter of 0.330". . We will go for 0.335" at this stage and do the remainder of the downsizing later ... you will see why. . So, for now, we will take of half of 0.375" - 0.330"; half because that's how much the radius needs to decrease. That's 0.022" near enough.

A bit of methodology here ... taking off 0.022" over the full (as of now) rod length of 4.38" is not something you can do very well with multiple passes over the whole length ... at least, I don't rely on my lathe accuracy or my skills to do that, mainly because I am afraid of the 3/8" aluminum rod bowing in the middle which would make my cut less in the middle than the ends.

So, I mount the rod in the lathe chuck with only about 1" protruding. . The remainder of the rod is poking through the back of the chuck and is hidden inside the chuck and headstock (hopefully, your chuck has a through hole at its center, and hopefully your headstock has a hole at its center ... this will be the case if you mount anything like a MT2 dead center into the headstock with the chuck removed.

I carefully turn the aluminum rod protrusion down to 0.338" diameter. . Yes, I know that is bigger than we want to get to, but bear with me because we have to do this in stages. . Also, take off only a very little of the radius with each cut. . When I was doing this today on my metal-working lathe, I took off only 0.001" per pass (ie. per cut). . You are doing a fairly delicate operation here and you want it to be as accurate as possible. . Plus, if you try to take off to much in one cut you run the risk of your cutting tool exerting so much lateral force on the aluminum rod that it will deform ever so slightly ... try to avoid that.

Next, extend the aluminum rod by another 1" and turn that exposed section down to 0.338" diameter. . The increased extension of the rod probably won't be exactly 1" but we will correct for that in a moment.

Repeat the process of extending the rod and turning until you have about 1" only being gripped in the chuck. . At that stage you can reverse the rod end-for-end in the chuck and turn down the last portion to 0.338" .

What you have now, is an aluminum rod of roughly 0.338" diameter along its length. . But because of the process we have gone through there will be some slight irregularities. . We can correct those, however, because we still have 0.004" of wiggle room on the radius of the rod which we can trim off quite accurately now. . So you have some little bumps to get rid of.

Now put a dead center in your lathe headstock ... if you have a straight-sided dead center you can put it in the chuck jaws. . If you have an MT2 dead center you will have to remove your lathe chuck and insert the dead center directly into the headstock. . This is actually more accurate as it avoids any chuck run-out that is inevitably there even if it is only small.

You mount the aluminum rod between the dead center which is driven by the lathe motor and the live center which is in your tailstock. . The points nicely fit into the axial hole in your rod ends.
With the rod supported in this way, with a fair bit of pressure, but not too much, exerted by the tailstock, you can now do the final sizing of the aluminum rod.

Carefully take off about 0.001" from the radius of the rod by making passes along the full length of the rod with your cutting tool. . This will get rid of the slight irregularities that are left from the rough sizing done in multiple stages above. . The result doesn't have to be dead accurate because we still have some sanding to do but it should be pretty close.

Now you can sand the aluminum rod along its length while it is mounted between centers. . Do this with the lathe motor OFF and make your sanding strokes lengthwise along the rod for best results.
I start with 240 grit (sometimes 180 if the sanding has to remove more material ... you be the judge) and work my way up through 320, 400, 600, 800, 1000, 1200, 1500, and lastly 2000 grit.

At this point you can put a final polish on the aluminum rod, but beware that there is one more thing to do which could put scratches on it. . You can save the final polishing until after this is last step is done if you are worried about marking the aluminum surface.

So, finally, we will trim the aluminum rod to its correct length, now that it has the correct diameter of 0.33" (plus a tiny amount of 0.001" or 0.002" or 0.003" ... a little more than 0.33" is better than a little less.

To do the trimming to length, mount the nice smooth rod in the lathe chuck (which you may have to mount again) but do it VERY CAREFULLY without using too much force from the chuck jaws. . You don't need a lot of force because you will trim the length in very small steps of about 0.002" until you have removed 0.085" (in my example here) from each end.

Your nice looking rod will now be 4.21" long and you can think about assembling the parts.

First, however, you have to downsize the nose_cone from the PSI Slimline Pro kit (if that is what you are using as I did). . That is just a wee bit tricky ... see if you can figure out how to do that.
HINT: You can do it best by using a scrap piece of 3/8" rod, accurately squared on one end and downsized to about 0.300" diamter, and with a "M" size hole on its axis drilled right through its length. . Put the nose_cone_coupler on the nose_cone and insert into the hole in the scrap piece of rod which is in your lathe chuck. . The fit should be quite a snug fit. . You can now turn the shoulder of the nose_cone down to 0.330" (a little over is ok if you don't mind that look, but try to get as close to the magic slimline number of 0.330" or 0.332"). . If the fit is not snug enough for turning, then I don't know what to suggest to you ... you figure it out. . But you should avoid the temptation to clamp the nose_cone by bringing up the tailstock ... because although this may work you will most likely damage the small hole at the tip of the nose_cone where the refill will protrude.

Oh ... another thing ... you have to downsize the top end of the finial from the Slimline Pro kit. . This is pretty easy because the finial has a long hollow stub on it that you can put in your headstock chuck while you turn the finial end ring down to 0.330" or 0.332".

The final thing you have to do is downsize the ring that is attached to and which supports the clip. . If you don't do this, the ring will be a little too big in diameter. . I honestly do not know how to do this on a lathe or other machine so I am thinking of doing this with a very fine file and a great deal of patience. . Oh the joys of making kitless pens !! . Maybe you will decide to maky your clip wholly from scratch and in the process solve this remaining problem which I am leaving with you.

Thanks for reading. . I had a great deal of fun and some frustration and so will you. . Hope these tips help.

Let me know how you do, please, by posting in this thread. . Also, any and all C&C about my methods are welcome ... please post them here too. . I hope you can make some improvements on what I did. . That's how we all learn collectively !
 
Last edited:

magpens

Member
Joined
Feb 2, 2011
Messages
15,913
Location
Canada
Very nice Mal! Interesting way of approaching the nose cone idea. For the clip, since you are using the slim line diameter, couldn't you just use a clip from a slimline?

Oh, and sorry for stealing your second post!

Yes indeed, you could do that, Lewis. But you have to drill out the hole.
You don't have much material width; ie. the hole you need is not much smaller than the diameter of the clip support ring.

I think this would be very tricky to do successfully.
 

magpens

Member
Joined
Feb 2, 2011
Messages
15,913
Location
Canada
Mal:
Very nce so call kitless,Hum!
..... so-called .....

Well, Charlie, it's a first BIG step to getting to kitless.

Of course you can make your own nose_cone and top finial which is what I did in my 2018 BASH Kitless Contest entry (with no clip).

And you can make your own clip too.

That leaves us with the click mechanism (make it yourself ?), the refill and the spring.

Which part would you like me to make next ? :biggrin:

Life is a compromise and you have build on other peoples' work at some point ... but I hear you.
 
Last edited:

magpens

Member
Joined
Feb 2, 2011
Messages
15,913
Location
Canada
Thank you, Hank ! :)

It still needs some work but I wanted to get it out there for people to see and critique since I was the one who started the thread a week ago after Danny's post in another thread got me motivated.

I apologize for the fuzziness of the first photo ... also, if you notice the error, I got the nose_cone_coupler the wrong way around.
I was very tired when taking the photos as I had just finished the machining and wanted to get the first photo done before assembly.
 
Last edited:

Dieseldoc

Member
Joined
Oct 28, 2017
Messages
1,511
Location
Livermore, Ca 94550
Mal:
As of today my project hit a sag. Working on the mechanics (non kit) moving the refill in and out, keeping DIA .331 and using wood for the blank.
Got to sleep on it tonight.
Cheers:)
 

Yankee Remedy

Member
Joined
Feb 20, 2018
Messages
42
Location
Winsted CT
Very Nice Kitless Pen

Nice work Mal!
What are you gonna use to polish the aluminum after the 2000 grit sandpaper?
In the pictures it looks like the aluminum barrel of the pen has a blue hue. Did you color it somehow?

Gary
 

magpens

Member
Joined
Feb 2, 2011
Messages
15,913
Location
Canada
No attempt to color the aluminum, Gary. . The color is a photographic artifact and not real. . I don't understand how it came about but then I don't understand lighting for photography either.

As for the polishing there are a couple of options. . First, Silvo or probably Brasso metal polishes will do it ... there are others also specifically for metals.

I think I will probably try Mequiar's automotive cut polish to remove the fine scratches, followed by Novus 3 and then Novus 2 and then finally Mequiar's Plastix maybe, although that is not designed for metals. . That is my usual procedure with acrylics
 

Dehn0045

Member
Joined
Mar 19, 2017
Messages
1,533
Location
US
I like the threaded nose cone. Apparently necessary for your design to work, but even when it isn't necessary I think it's a nice feature. One of the reasons why I like the Zen kit, you can flip the barrel without disassembling, but I digress. Nice looking "Parker slim" you have there Mal. I wonder if the manufacturers could make a 7mm version of the Stratus, where the click mechanism and end cap are a single piece. This would allow for a typical wood dressing. Anyway, well done and keep it up Mal.
 

magpens

Member
Joined
Feb 2, 2011
Messages
15,913
Location
Canada
Thank you, Sam !

Interesting thought about the Stratus ... but I don't think manufacturers pay any attention to what pen turners really want !! :frown:
 

DJBPenmaker

Member
Joined
Nov 10, 2016
Messages
539
Location
Cheshire, UK
Well I've tried to follow this but my skills obviously lack in this direction, it's all way above my head[emoji19] I take my hat off to you Mal.

Sent from my SM-G955F using Tapatalk
 

magpens

Member
Joined
Feb 2, 2011
Messages
15,913
Location
Canada
I wouldn't say that, Derek. . It is like so many other things ... once you get stuck into it you realize what you can and can't do, you do what you have to do, and it all works out when the constraints are recognized and dealt with. . Don't forget that I had been thinking about this for several days ... probably longer ... and the steps eventually became clearer as I went along. . If you have any questions be sure to ask. . Thanks for the kind words.

And don't forget ... the goal of this presentation was not a perfect realization of the objective, but just a step in the right direction which can be improved upon.

I left some things undone and "rushed to press" because I didn't want people who had contributed to the earlier thread to forget about what they had contributed, or think that I had. . So I wanted to get more feedback about the project by showing a nearly finished possibility for a pen.
 

stuckinohio

Member
Joined
May 3, 2015
Messages
1,695
Location
Columbus Ohio
Very nice Mal! Interesting way of approaching the nose cone idea. For the clip, since you are using the slim line diameter, couldn't you just use a clip from a slimline?

Oh, and sorry for stealing your second post!

Yes indeed, you could do that, Lewis. But you have to drill out the hole.
You don't have much material width; ie. the hole you need is not much smaller than the diameter of the clip support ring.

I think this would be very tricky to do successfully.

Oh yeah, I forgot you were using the collar from the pro kit!
 

PatrickR

Member
Joined
Apr 8, 2017
Messages
1,423
Location
Rural America
Nice work Mal. I'm looking forward to seeing how it progresses.
Reducing that clip diameter will be interesting. I'd think a mill would be the tool.
You may be able to save some time by starting with aluminum tubing. I have used some that is roughly .311 OD x .240 ID.
 

magpens

Member
Joined
Feb 2, 2011
Messages
15,913
Location
Canada
That specific size tubing would not work, Patrick, because it would need to be bored out to an ID of 0.295" at each end to accept the nose_cone_coupler (at one end) and the click mechanism (other end). . The resulting wall thickness would be only half of 0.311 - 0.295 = 0.008" and that would destabilize and crack in the drilling process.

Of course, a tube of OD 0.33" is really what is needed. If that size is available, then, after the boring, the wall thickness would be 0.017" and that might we able to withstand the stresses of drilling.

If you can, please suggest a source for aluminum tubing of such sizes.

If Al (or other) tubing of a little bigger than OD 0.311" is indeed available to me, then it could be used in the manner that brass tubing is used for pens (ie. glued inside a wood or acrylic blank) and that would strengthen the tube for careful drilling and might allow my type of pen to "wear" a wood or acrylic dressing.

That would be an interesting challenge !


Nice work Mal. I'm looking forward to seeing how it progresses.
Reducing that clip diameter will be interesting. I'd think a mill would be the tool.
You may be able to save some time by starting with aluminum tubing. I have used some that is roughly .311 OD x .240 ID.
 

PatrickR

Member
Joined
Apr 8, 2017
Messages
1,423
Location
Rural America
Mal, looks like the suitable size has been found. I'll bookmark online metals.
What I was referring to I get at a local hobby shop.
To Dans point, the act of drilling a tube will increase its OD if its not restricted in a collet. I think I'll try it and report back.
I fully expect you to develop a version that's "dressed".
 

PatrickR

Member
Joined
Apr 8, 2017
Messages
1,423
Location
Rural America
FWIW
I drilled a small section (all measurements with a cheap digital, so +/-)
Tube .311 OD, .235 ID
I tried a .294 bit . No Way
Next a .292 bit. The OD became .320, ID .304. Making a flexible yet sound tube with a ribbed exterior.
5848842ab927b740c40bb1514d96503a.jpg
 

magpens

Member
Joined
Feb 2, 2011
Messages
15,913
Location
Canada
Thanks, Lewis, but there is a strength reduction with using that tube.

I assume the wall thickness is 0.049. . So 0.375 - 0.049 - 0.049 = 0.277" bore.

Currently I axially drill 15/64" = 0.234", so I would be losing (0.277 - 0.234)/2 = 0.021" .

That may or may not be satisfactory ... actually, I think it would be OK as aluminum is fairly strong.

Current wall thickness is (at center) (0.332 - 0.234)/2 = 0.049 ... I think I calc'd that right.

Your suggestion would certainly be OK on the ends where I bore out to "M" size = 0.295"

Do you think 6061 would be a better grade to use ? . I do not know what grade I bought for this job at Home Depot.
 
Last edited:

magpens

Member
Joined
Feb 2, 2011
Messages
15,913
Location
Canada
Patrick,

I don't know about what you are doing there ... I mean I get it ... but I have serious reservations about the "flexible ... with ribbed exterior"

I think we can get to a dressed design but not via the route I am on. Will have to reduce the "M" size hole in both ends ... Maybe revert to a 7 mm full length brass tube, which is probably the minimum to accept a Parker ... hole is right around 0.250 and the Parker is 0.226, so that means 0.012 clearance ... OK. . Obviously we already know how to dress that.

That clicker becomes the clanger. . I won't be able to use the clicker mech I currently use. . An alternative is the Schmidt clicker from Greenwald or Milan but I think its OD is too big (bigger that 0.332).
 

stuckinohio

Member
Joined
May 3, 2015
Messages
1,695
Location
Columbus Ohio
I think 6061 would be one of the better grades. I think there are stronger grades of aluminum, but not sold in tube form.

I choose that size because you needed a size thicker than .33 and with an ID that could be bored out to .28 or .29

I do like Dan's idea of threading the bar stock to accept the nose cone and skipping the adapter.
 

PatrickR

Member
Joined
Apr 8, 2017
Messages
1,423
Location
Rural America
Mal, just showing what happened when I drilled that tube to that size. Useless for your intent.
I measure the Schmidt clicker at .323 small enough, a much better mechanism and it would remove the need for a screw on nib.
 

Yankee Remedy

Member
Joined
Feb 20, 2018
Messages
42
Location
Winsted CT
Thanks for the Reply

No attempt to color the aluminum, Gary. . The color is a photographic artifact and not real. . I don't understand how it came about but then I don't understand lighting for photography either.

As for the polishing there are a couple of options. . First, Silvo or probably Brasso metal polishes will do it ... there are others also specifically for metals.

I think I will probably try Mequiar's automotive cut polish to remove the fine scratches, followed by Novus 3 and then Novus 2 and then finally Mequiar's Plastix maybe, although that is not designed for metals. . That is my usual procedure with acrylics

Thanks for the Reply Mal.
 
Joined
Aug 13, 2016
Messages
1,460
Location
Surprise, Arizona
That didn't take long! I mentioned that I'd prefer a centerband but truthfully with that slim profile I don't miss it at all. Excellent job, congrats on getting it done.
 
Last edited:

magpens

Member
Joined
Feb 2, 2011
Messages
15,913
Location
Canada
Last edited:

OZturner

Member
Joined
Aug 5, 2013
Messages
6,663
Location
Sydney. NSW. Australia
Mal, Thank you for the Enormous Amount of Research, Work, and Communicating you have done in Presenting this Project in such Comprehensive Detail.

While it may be beyond the scope of some members, it obviously has sparked considerable interest, in a Significant number of members.

I for one, am looking forward to seeing where it will take us, as I enjoy looking out side the Box.
Great work.
Brian.
 

magpens

Member
Joined
Feb 2, 2011
Messages
15,913
Location
Canada
Thank you, Brian !

I too like the challenge of doing something a little bit different and using some neglected brain cells !
 

Yankee Remedy

Member
Joined
Feb 20, 2018
Messages
42
Location
Winsted CT
Best Way to Color Aluminum

Mal, I came across this video while doing some research for another project and immediately thought of you. It's a little involved but doable.

This has to be the best way to color aluminum. It is a process called Anodizing Aluminum and it actually oxidizes the color into the metal using electricity. It is a very durable and beautiful finish.You might want to give it a try.


On Youtube - ShopBuilt - How to Anodize Aluminum!

https://youtu.be/P8oesBi7_II
 

magpens

Member
Joined
Feb 2, 2011
Messages
15,913
Location
Canada
Gary,

Thank you so much for this reference. . It describes techniques I have been interested in learning about for a very long time. !!!

Gotta try that ..... Time, Lord ..... please give me more Time !!!!
 
Last edited:
Top Bottom