My Ballpoint Contest Entry - Dowel Segmentation

Signed-In Members Don't See This Ad
See more from magpens

magpens

Member
Joined
Feb 2, 2011
Messages
15,913
Location
Canada
This was my entry. . I am quite pleased with both the idea and the result. Unfortunately it didn't rate very highly. Do you think my description of my method is understandable ?

All comments would be appreciated ... don't hold back !!!! :) .
Do you think it would have ranked more highly if I had entered it in a different contest ?

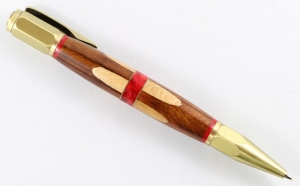
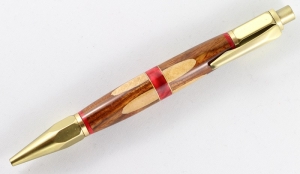
Diagonal Dowel Segmentation

My pen is a PSI Vertex Click BP with a novel segmented barrel, finished in CA.

The segmented barrel consists of a Chechen blank, 1/4" Birch dowel, red Box Elder, and brass.

The square-cross-section blank was trued for squareness and cut a little longer than required.
One dowel hole was drilled between diagonally opposite corners and the dowel was glued in.
The next dowel hole was drilled in the same way after the glue for the first dowel had dried.

After all four dowels had been inserted in this way, the ends were again squared.

The blank was then cut accurately in half, and each half was reversed end-for-end. Now,
each outer end showed a nice cirle of Birch in the center where all four dowels crossed.

The brass shims and red Box Elder burl adornments were glued in and the whole clamped tightly.

Then the segmented blank was rounded, tubed, shaped, and CA-finished with usual techniques.


Last edited:
Signed-In Members Don't See This Ad

jttheclockman

Member
Joined
Feb 22, 2005
Messages
19,082
Location
NJ, USA.
I voted for it Mal. I believe you did just fine explaining and the contest you entered was the right one. Many times people do not even read the description and just look at the eye candy. So do not fret that. Also with so many entries you all can't be in the top 3. But they all are winners. I am not fond of that kit but that did not stop me to vote for it to move on but it may have others. Be proud of what you did and try again next year or in the Summer. Nice job.


One other thing I should have mentioned, I can easily see past the exterior of a segmented pen of any kind and i realize the work that goes into it to pull off some of these ideas. Yours was no exception. Remember that when looking at final vote numbers. Not all see what we see.
 
Last edited:

jttheclockman

Member
Joined
Feb 22, 2005
Messages
19,082
Location
NJ, USA.
No problem Mal. Want to take that idea to the next level??? Do the same thing and now square the blank again and drill within the dowel and add a thinner one of a different color. Something like doing scallops. Do you see how easily an idea can evolve and things get even more interesting. Good luck and happy turning.
 

magpens

Member
Joined
Feb 2, 2011
Messages
15,913
Location
Canada
No problem Mal. Want to take that idea to the next level??? Do the same thing and now square the blank again and drill within the dowel and add a thinner one of a different color. Something like doing scallops. Do you see how easily an idea can evolve and things get even more interesting. Good luck and happy turning.


Shhhh, John !! . Don't give any ideas away !!:biggrin:

I have already thought of that, and a couple other extensions as well !
 
Last edited:

Dale Lynch

Member
Joined
Dec 12, 2011
Messages
1,819
Location
Hastings,NE
It certainly would have done better than me in the pen photo contest.I liked the concept of using dowels but I didn't vote for it in the end.The reason is, the swapping the ends around turned me off.I think it would have shown better whole, maybe with the ruby accents off the center on each side. What jig setup did you use to get an accurate hole drilled corner to corner?
 

magpens

Member
Joined
Feb 2, 2011
Messages
15,913
Location
Canada
Dale, why does swapping the ends around turn you off ? . It doesn't look like anything unless you do that. . Please think about it and comment again if you wish to. . You think it would look better with the white "parabola bases" at the top/bottom ? . Could try that.

As for drilling, I did not use any jig. . The process was as follows:

I carefully measured, marked and center-drilled the hole centers on both ends.
I mounted the drill bit in the headstock chuck, and used the live-center in the tailstock.
The drill bit tip and live-center tip were pointed into diagonally opposite markings.
Lightly tightened things up and turned on the lathe at low speed (400 rpm ?) while holding the blank with my left hand.
Began cranking the tailstock quill inwards with my right hand, while holding the blank.
I started the drilling with a stubby drill bit then switched to a jobber length drill.
Continued until the drill bit tip nearly reached the live-center tip.
Backed off the tailstock and proceeded to finish the hole, turning the headstock chuck by hand until the hole was finished.

I hope that makes the drilling process fairly clear.

Oh, thinking about not swapping ends ..... because the blank is bulged in the middle and tapered towards the ends, doing as you suggested would have meant that the parabolic shapes would have become truncated ellipses due to the tapered shape, if you know what I mean. . I didn't want that this time, but I might try it in future ... thanks for suggestion.

Also, thanks for compliment on the photos ... just luck, I assure you. . No special setup except a light booth. . Canon EOS Rebel T5i with 100mm macro lens with auto-exposure (which amounted to approx 1/25 sec at f 8; no tripod).
 
Last edited:

Skie_M

Member
Joined
Aug 7, 2015
Messages
2,737
Location
Lawton, Ok
Saw a similar idea to this on youtube .... someone used a Kreg hole drilling jig to drill diagonal dowel holes to pin the corners of a box, glued and cured the dowels, cut them off with a flush cut saw and sanded them smooth, and then did it again using a different size and color dowel to accent the original (round dovetail box joints). It was an intriguing concept, and the result was visually appealing.


In my voting, however, I was looking at fit, finish, and the gorgeous detail that came through the material itself. If there was any segmenting present, I looked very closely at the join lines for tearout or damage. I can see in your pen that there are several locations that appear to have suffered from some tearout damage at the edge of the diagonal dowel rods. I suggest next go round that you stabilize with thin CA and sand it to final dimensions for a much neater finished appearance!


As for how I would build a blank of similar style ....

I'ld mock up a jig to drill at a single angle with a single bit size and use that as the guide to hold the blank against while drilling, much like how a Kreg Jig works... but my jig would have a single major difference in being that I'ld design it to hold a ROUND blank for the drilling procedure, and that it would drill dead on center, so that I could be assured that the design would be centered on the blank itself. The blank would also be pre-drilled, but not yet tubed. Once all the holes were drilled and the dowels glued, I'ld re-drill the center hole for the tube and glue it in, and then using a mandrel shaft and a belt sander, I'ld take the nubs of the dowel rod down to the blank diameter before going to the lathe.

Any other embellishments, such as the beautiful red accents and the brass accents would be added prior to gluing the tube in, of course.
 
Last edited:

stuckinohio

Member
Joined
May 3, 2015
Messages
1,695
Location
Columbus Ohio
Mal,

I like symmetry/things in line, so when I saw the dowels offset it didn't appeal to me. But like you said to Spanx, if you didn't do that, it wouldn't be the same. Also, there's not too many segmented pens I like, though I am in the minority around here.

I love the box elder, brass and chechen. I like the contrast between the colors. I also like the way the kit plating matches the body. It's turned perfectly. I also know it took a lot of work and it is perfectly proportioned.

Very nice work!

Lewis
 

Dale Lynch

Member
Joined
Dec 12, 2011
Messages
1,819
Location
Hastings,NE
Mal,this is what I was picturing from your description of the drilling process.
DSCF4407.jpg can't draw 3D so double the drill holes.
It made me visualizes a long intersecting eliptical celtic knot type pattern,which dissappears into the main body at the center.Which was then changed when you divided it and swapped the ends around.I don't know if I'm describing it effectively.I'm better with my hands than with words.I have probably misunderstood what was being done.
 

magpens

Member
Joined
Feb 2, 2011
Messages
15,913
Location
Canada
Dale, you seem to have the idea, allright.

The holes do go completely through the ends of the blank though. . And, of course, you need to visualize it in 3 dimensions ... the holes are not in the plane of the paper, but, rather, angle through the paper, and the 4 holes all cross each other in the very center of the blank. . I was quite amazed actually at the accuracy with which they met at the center. . When I cut the blank in half there was only one circular spot where all dowels crossed.

It's not really akin to a Celtic knot pattern ... at least in my mind.
 
Last edited:

Dale Lynch

Member
Joined
Dec 12, 2011
Messages
1,819
Location
Hastings,NE
Limited vocabulary,knowledge and intellekt,I figured my description was off.Masterful work on getting all the dowel crosspoints to line up.Especially freehand. It takes skill to accomplish that.I couldn't go out to the shop tomorrow and do it.Wish I could have seen it before the split to help me understand.
 

magpens

Member
Joined
Feb 2, 2011
Messages
15,913
Location
Canada
Dale, I'll take some intermediate pictures of the next one I make ... that will help you visualize what's going on. . But I think you have a pretty good idea already.

I also want to try your suggestion of leaving things the right way around !
 
Last edited:

Bikerdad

Member
Joined
Apr 4, 2009
Messages
237
Location
Utah Valley
Did you use dowels, or dowel rod? If the former, that likely accounts for the apparent tearout noted previously. Most dowels are fluted for glue dispersion/escape, so no perfectly circular cross section.
 

Cwalker935

Member
Joined
May 18, 2014
Messages
3,506
Location
Richmond, Va
Mal,
I like the wood and color combination and the use of the dowels but like Dale, I do not like the break in the dowels. What if you drilled at a steeper angle so that you could see where both sides of where the dowel enters and exits, cut in the center but put in a thinner segment and kept the dowels in alignment?
Just a thought.

Cody


Oh and drill the dowels on different sides.
 

magpens

Member
Joined
Feb 2, 2011
Messages
15,913
Location
Canada
Thanks for the comments, guys ... I appreciate your suggestions . . To answer:

John (Bikerdad) - I used dowel rods, not fluted dowels. . Four one-piece dowels, each inserted from one blank endface to the other endface as per my method given in post #8. . Each dowel was just slightly longer than the blank, and the drilling was end to end.
It could be done with shorter dowel rods and drill in from both ends (8 shorter holes instead of 4 through holes)


Cody (Cwalker935) - by "keep the dowels in alignment" I think you mean "don't offset rotationally by 45 degrees". . I did the offset because I liked it at the time (still do, actually) but a couple of people find the offset unattractive. . By offsetting as I did, it achieves a kind of sine-wave effect around the middle and I like that.

By drilling steeper, the dowels would enter/exit the sides of the blank rather than the ends. . The angled side-drilling would be harder to do and would yield a shorter exposure of the dowel. . Could be done with a Kreg-style jig, perhaps, but I used no jig at all using the method I described in post #8. . I could try your suggestion but would have to make a jig (not sure if the Kreg jig angle and drill hole size would be appropriate). . Now, in your suggestion, would you cut in the middle and then reverse the two halves so that the dowel exposures would be in the middle as I did ? ... or would you keep the dowel exposure at the ends and just do the red insert in middle ?

By "drill the dowels on different sides" ... of course ... one dowel per side of a square-sided Chechen blank.

A Chechen blank may not have been the best choice. . I found that Chechen has a slight tendency to weakness and tearing.

Please correct me if I have misunderstood any comments.
 
Last edited:
Top Bottom