My Alternative to MM & Wet Sanding

Signed-In Members Don't See This Ad

TonyL

Member
Joined
Mar 9, 2014
Messages
8,904
Location
Georgia
I had a nice description of the process composed; and I lost it after attaching the image and attempting to preview the post.

If interested in the details, send me a PM. I am late for a church thing.

Left to right:
  1. Tripoli
  2. White Diamond
  3. Caswell 6163
  4. Caswell 6165
Then Meguiars 205 for residual compound removal, followed by Rejex synthetic wax.

I used this on all materials with excellent results.

I hope this helps someone.
 

Attachments

  • Buffing Station.jpg
    Buffing Station.jpg
    240.4 KB · Views: 536
Signed-In Members Don't See This Ad

TonyL

Member
Joined
Mar 9, 2014
Messages
8,904
Location
Georgia
Some asked for more details:

Turn pen to size.
Dry sand 320 (or lower if needed) to 600: reverse 500 rpm with Abranet or AO.
Go to Buffing Station: All 1500 to 1800 rpms (forwrad).

Left to right:
Tripoli: Fast Cut Greasy Tripoli Compound T-12 - Caswell Inc

White Diamond: Everyone has WD
Caswell 6163: Search results for: '6163' - Caswell Inc

Caswell 6165: Search results for: '6165' - Caswell Inc

Then Meguiars 205 for residual compound removal, followed by Rejex synthetic wax.


12 Buffs (3 per compound): Canton Flannel Wheel 8" x 1/2" - Caswell Inc

I substitute 2 cotton sewn buffs around 1 canton flannel for the Tripoli compound. Spiral Sewn Cotton Wheel - 8" x 1/2" - Caswell Inc

I am sure there are another thousands ways to approach this. This is just what I happen to try.

Used 1/2 inch All Thread, 1/2 inch by 2 inch fender washers, split lock washers, and 1/2 inch hex bolts.

Made a wooded 2MT and drilled a 1/2 hole about an inch deep. Epoxied the ALL Thread into the hole. On the tail stock side, I removed the spur on the live center than came with my lathe.

I buff on the tripoli wheel until the surface produces a light orange peel finish. Everyone will have their own approach.
 

raar25

Member
Joined
Mar 29, 2011
Messages
770
Location
Glastonbury CT
Tony is this done before or after you apply finish or is the rejex your finish? Have you ever over buffed and done damage to the pen finish?
 

TonyL

Member
Joined
Mar 9, 2014
Messages
8,904
Location
Georgia
If I understand your questions:

Rejex is my last step regardless of the process that I use to polish/remove fine scratches (finer than 600 grit). It is merely serves to protect and add some depth of shine; it doesn't last forever. It serves as "wax" without an abrasive.

In an attempt to improve the finish (remove very, very fine scratches) of an assembled pen, I did remove the black paint or whatever it is, from a thin ring that surrounds the center band. I was glad to find what looked like a copper colored metal which I preferred to the black ring given the color of the blanks.

Yesterday, I intentionally buffed a spare chrome clip. It didn't remove the finish. I am sure it could have been removed if I applied enough compound, pressure or speed/rpms.

Buffing/polishing removes or cuts material. I would think anything most surfaces. coatings, etc. are vulnerable.

I use this dry method just to remove the fine scratches that 600 grit Abranet leave behind. I don't like wet sanding. I find it boring and a risk to my CA finishes - no matter how careful I am.

Many achieve the same, if not better results using everything from brown paper bags to steel wool. I have not shared their success. I will be in big trouble when I get bored of buffing LOL.

I hope I answered your questions.
 

ChrisN

Member
Joined
Mar 23, 2013
Messages
730
Location
Denver, PA
Sounds like you've had the same idea I had. That's similar to my current setup as far as compounds, but my last two buffs are string buffs. I just wasn't getting great results with my sanding & buffing setup, so I switched to 4 buffs. Great minds think alike, right?:biggrin:
 

TonyL

Member
Joined
Mar 9, 2014
Messages
8,904
Location
Georgia
I don't know how great my mind is...it just gets bored very quickly.
I also bought 9 string buffs, and after trying both, I like the Canton flannel better.

I will probably make a smaller 4 stage with the string buffs. We will see.

Enjoy!
 

TonyL

Member
Joined
Mar 9, 2014
Messages
8,904
Location
Georgia
You are welcome.

Hi Carl:

The descriptions/products names/application grits/sequence confused the heck out of me.
The sequence that I described above (and would be delighted to talk to you about over the phone) was recommended to me by two very experienced IAP members and Caswell's technical support (excellent BTW). That doesn't make it right or the best way to do it; it is just what I decided to do.


I have finished close to a dozen pens this way, and I am very impressed. I did have a short learning curve, but was impressed for the first pen. I bought a 20x loop which should arrive today. So far I can't see any scratches with a 10x loop. Once I get that electron microscope, I may have a real process to brag about (as well as discover any microscopic civilizations living in between the scratches LOL).

As I stated above, I do use a little 205 polish to remove the any residual dry powder dust (Caswell actually sells a compound for that, but 4 wheels is enough for LOL).
The 205 also prepares the surface for your protectorant/wax/Rejex.

Last 3 points:

I do seal the ends of my blanks with 2 coats of CA by apply to small pool on to a paper towel and dabbing the ends. I do not use accelerator.

I also make sure that I don't skimp on my dry sanding steps.

Lastly I remove sanding dust from wood (prior to CA application) by spraying accelerator onto a paper towel and wiping the wooden barrel clean while rotating at 1000 rpms. I then wait a few minutes and start applying CA. This is not the case with non-wood pens.
 

Carl Fisher

Member
Joined
Jun 7, 2011
Messages
2,761
Location
Cape Coral, FL
I remember Texatdurango's old thread where he said that you use the P-22 and P-112 backwards per a conversation he had with Caswell. I'm guessing this is along those same lines.

I grabbed a bar of each to play around with. Currently I still use the blue jewelers rouge as it's a great all around compound and is safe on plastics, but I've been wanting to play with something a bit different. I figure I'll charge a wheel each up with the Caswell stuff and see where that goes.
 

TonyL

Member
Joined
Mar 9, 2014
Messages
8,904
Location
Georgia
I actually traded a buffing system that included the blue rouge when I started using Meguiars 105 and 205, that was 400 pens ago :).

I have seen amazing finishes with it, but they all included wet sanding.

Les Elm's finishes are outstanding! I believe his process is much simpler than mine and he uses 0000 steel wool and no MM. I just can't get the hang of it.
 

Carl Fisher

Member
Joined
Jun 7, 2011
Messages
2,761
Location
Cape Coral, FL
I've got mine down to 3 dry sandpaper grits and then buff. 400-600-800 - blue wheel - dry wheel. But since I'm almost out of my blue again I figured I'd give something else a try just for fun.

buffing is so much nicer once I added a little foredom variable speed buffer to my arsenal. No more swapping around stuff on the lathe to buff, just turn and walk to the buffer.

Just goes to show, ask 5 pen turners how to finish a pen and you'll get 492 different answers. And at least half of those probably get you to the same end result.
 

Charlie69

Member
Joined
Apr 12, 2013
Messages
189
Hi Tony, this finishing method reminds me of Texatdurango's 6 year old post
http://www.penturners.org/forum/f30/buffing-kicked-up-notch-55476/

Turners here at iap and other forums have shown me that there are numerous ways to get high gloss finishes through various methods. I finish turning with a carbide tool, sand with 600 & 800 then tripoli and white diamond on cheap HF 4" wheels mounted on a pen mandrel and am completely satisfied with the results. When my bars and wheels wear out I might spring for the gear from Caswell just to satisfy my curiosity.
 
Last edited:

TonyL

Member
Joined
Mar 9, 2014
Messages
8,904
Location
Georgia
For all intents and purposes, they are the same. It seem to have stirred a debate and ego-fest. That's too bad.
 

Carl Fisher

Member
Joined
Jun 7, 2011
Messages
2,761
Location
Cape Coral, FL
LOL. I was going to say I didn't think anything I said was negative :biggrin:

Although I ordered from Caswell today and they called a few times and finally left a voicemail about some problem with my order. Guess I'll have to call them tomorrow and find out what's up. I ordered 4 new canton flannel wheels (2 per side so I could double up) and P-22 and P-112.
 

TonyL

Member
Joined
Mar 9, 2014
Messages
8,904
Location
Georgia
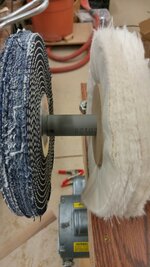
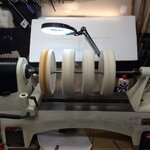
For whatever it is worth, each of my stages (Tripoli, WD, 6163, and 6164) are 3 buffs. I only came up with that number because I was trying to approximate the number of plys used by the Beall buffs; they were pretty thick. I am sure 2 or even 1 works, but it is nice to have that width to move the barrels about. They do tighten-up (narrow) considerably when spinning over 1000 rpms.

Separately, according to his video, he uses linen with the Tripoli and linen and cotton flannel with the WD, and all cotton flannel with the carnuba wax). I couldn't find linen buffs 8 inch, with an 1/2 inch hole even though I could have made it work. To emulate the abrasiveness of the linen, I sandwiched the a single canton flannel between two cotton sewn buffs for the tripoli station. I was/am really just experimenting as you can see. I have no idea if what I did emulates the cotton linen. The Caswell tech said that the sewn cotton wheels are used with tripoli....but remember these guys are really more into metal polishing. My stuff arrived in about 4 days.

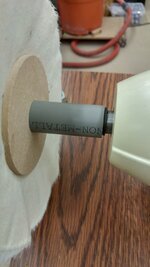
Have you though about how you are going to mount the wheel? I made a wooden 2MT with 1/2 inch female thread in the center about 3/4 inch deep. Then I used gorilla glue epoxy to glue in the 1/2 inch all thread. I was hoping a craftsman like Rick H would make a 2MT with 1/2 inch female thread.

Anyway, enjoy!
 
Last edited:

Carl Fisher

Member
Joined
Jun 7, 2011
Messages
2,761
Location
Cape Coral, FL
My buffer has a tapered threaded mandrel on each side that should work with a 1/2" center hole. If not, I'll use some 1/2" all thread and make a mandrel to fit in place of the tapered ones.
 

conandy

Member
Joined
Feb 18, 2015
Messages
102
Location
Denver, CO
4 wheel buffing system

Realize this thread is a little old, but it inspired me in my buffer set up. I had decided to go with some Caswell buffs and the plastic polishes, but wanted to be set up for just about anything, not just pens. So I ordered the Shop Fox buffer arbor and picked up a used 1 HP motor from Craigs list.

Originally thought I could just have 2 buffs on at a time, then realized that with a little inginuity, I could set this up for 4 buffs like Tony's set in the OP. This will be great for pens, and I can easily swap down to a single buff on each arbor end for doing larger pieces or whatever.

I found that by reaming out the inside of a piece of 3/4" pvc schedule 80 electrical conduit (just happened to have some laying around)with a 3/4" drill bit, it made perfect spacers on the 3/4" arbor. The spacers snug right up against the split rings next to the housing. I then made some extra washers to hold the buffs using some 1/4" MDF.

Still need to make some storage hangers for the buffs not in use and a place to store buffing compounds and stuff, but I'm excited to try my hand at buffing out pen finishes.
 

Attachments

  • 20160512_220032.01.jpg
    20160512_220032.01.jpg
    189.9 KB · Views: 216
  • 20160512_220055.01.jpg
    20160512_220055.01.jpg
    122.6 KB · Views: 192
  • 20160512_220104.01.jpg
    20160512_220104.01.jpg
    163.5 KB · Views: 196
Last edited:

larryc

Member
Joined
Oct 2, 2009
Messages
1,135
Location
Mableton, GA (Near Atlanta)
Tony
It's been over a year now with your 4-stage buffing system and I am wondering how it is holding up over the stretch of time.
At the time of the OP I was (and am still) using the Beal system but it is getting a bit worn and I am looking for alternatives.
Have you made any changes to the setup or to the buffing compounds?
Is there anything you would do differently?
Any comments would be appreciated.
Larry
 

TonyL

Member
Joined
Mar 9, 2014
Messages
8,904
Location
Georgia
Hi Larry. I just finished 2 CA pens and one Hut Resin pen with it. I did experiment with a different brand of 3rd and final stage compounds, but that was it. The Caswell compounds are fine though. Here's the Castellar that I just finished and photographed 20 minutes ago.

Therefore, the answer is "no" for all intents and purposes.

"My" system is nothing more than added two finer compounds to the Bealle system.

I am using the same mops/buffs from a year ago.

PS. CA, I run at 1200 to 1400 rpms; PR, Alum..etc., I run at 1600.
 

Attachments

  • Castellar Huts Red Resin..jpg
    Castellar Huts Red Resin..jpg
    62.3 KB · Views: 189

SteveG

Member
Joined
Dec 21, 2009
Messages
2,985
Location
Eugene, Oregon 97404
I had a nice description of the process composed; and I lost it after attaching the image and attempting to preview the post.

Before preview, ALWAYS ctrl A & ctrl C!!!


Would you care to please explain what you are referring to with this statement. It might be of value to me, if I knew what it is and what it would accomplish. :confused:

Thanks! :)
 

edstreet

Member
Joined
Aug 12, 2007
Messages
3,684
Location
No longer confused....
My Alternative to MM & Wet Sanding

What would you say or do if I told you could to equal if not better results with a fraction of the tools and cost and time ?

Oh and it does not involve wet sanding or micromesh.
 
Last edited:

leehljp

Member Liaison
Joined
Feb 6, 2005
Messages
9,314
Location
Tunica, Mississippi,
What would you say or do if I told you could to equal if not better results with a fraction of the tools and cost and time ?

Oh and it does not involve wet sanding or micromesh.

I'm Listening! love to hear it.

A side note: I created one pen back in '08 or '09 (correct year is '06 - July) that when I finished, it was hard to hold. VERY slick. I think I used some Japanese waxes and polishes. (I was still in Japan) It was like it had oil on it. It was stayed that way for months, until I lost it, then found it two months later when a co-worker came out with it. He said, "Oh, I thought you left it at my house on purpose."

By this time, the slicky smooth finish was gone. It still shined.

I never did get any other pens to have that kind of "feel." I think I posted about it back then.

EDIT: Found that post - I used TSW, not the Japanese waxes. But I also had a reference to some automotive polishes in it and as KenV replied in it - probably some silicone additive. The post: http://www.penturners.org/forum/f14/too-smooth-finish-21365/
 
Last edited:
Top Bottom