
NotURMailman
Member
So, I figured I'd try to make one of PSI's egg shaped kaleidoscopes.
When I ordered it I looked at the required tools as usual. Ordered the bushings, already have the mandrel. 13/16" forstner bit, I'm sure my Porter Cable set has one of those...
So I got home from work tonight and grabbed one of my 2x2x12 Queenwood spindle blanks. I cut off a 2 1/4" block. Well, sort of. The Ryobi tabletop bandsaw I bought doesn't seem to want to cut very straight even though I spent 3 hours adjusting and setting it up when I took it out of the box.
No problem, I squared it on the belt sander and it still measured 2 1/8". I was sure I could make that work.
So I swapped jaws on my chuck and locked down on the block. Opened my forstner bit set, and (I'm sure you can guess what is coming) no 13/16"! I figure I'll just drill it out to 3/4" and fit the rest of the way with a Dremel sanding drum. And that probably would have worked.
But, I grabbed the 7/8" bit by mistake! So when I went to mount it all up the bushing went all the way in to the blank. Hmm... what to do?
Genius idea! I sliced 3/8" off the block and cut two 2x2x1/4" pieces of Purpleheart. I proceeded to drill a 3/4" hole in the center of these "fitting shim segments". Then I used the bushing to center them up over the other holes (conveniently, the major OD of the bushings is 7/8"). Then I glue them up to either end of the blank with thick CA and clamp the snot out of it. Leave it in the clamp for 30 minutes and... voila!
So, now I carefully measure out what the gap between the bushings will be inside the blank and cut a 5/8" dowel to length. The I switch back to my pin jaws and drill the spacer 7mm through the center. (I figured I didn't want the bushings pressing on the 1/4" pieces of Purpleheart with no support in between.) Everything mounted up on the mandrel and I'm feeling pretty cocky.
Turn away... looking good. I was afraid the egg shape would be hard to manage. But, it turned out pretty good. And I'm really digging the contrasting end bands. Just about there and a chunk flies out of one of the end bands!
No problem, I've been quite the problem solver all night. So I drip some thick CA in the hole, pick up some Purpleheart dust from the workbench and cram it in the hole. The I flood the repair with thin CA. Pretty normal stuff.
I notice that there is a slight gap at the segment seems. Ok, so I run a bead of thick CA around both seems. I figure while I'm there I'll just go ahead and flood the whole blank with thin CA.
I let it sit for a minute or two and the spray it down with accelerator. The I turn the lathe back on and cut the high spots down. After it is pretty close to smooth I sand it with 80, 120, 220, 400. Then I sit back and look. Man, this is turning out great!
So, I apply three thin coats of medium CA. Then I sand with 80, 120, 220, 400 and the run through all of the MicroMesh pads with water. I forgot to cross sand, so I run all of the MM pads across it and turn the lathe back on and polish with the 12000 MM. The I finish it off with some Hut Plastic Polish. There are still some lines going around the outside, but I'm OK with it. It's just going to sit on my desk at work, and it's getting cold out!
I remove the "egg" from the spindle, rather pleased with myself (other than the finish).
One bushings comes right out, the other is not budging! So, I score around it with a razor, just in case I CA'd it to the egg. Still nothing. So I grab a hold of the bushing with some pliers and rotate it inside the egg. It turns... "huh?"
So I grab a scrap of particle board and drill a 1" hole in it with my trusty forstner bits. Open my vise to about 1 1/4" and grab the largest punch from my HF transfer punch set. Set the egg (busing side down) over the hole and I give it a solid smack with my little rubber mallet. Success! The bushing pops out...
But, wait a minute, little chunks of Purpleheart everywhere. Now what? The end ring has busted apart. I give a minute or two of thoughts and attempts to piece it back together and then I notice it is detaching from the main body of the egg.
Remember how the inside of the egg bore was "stepped"? Remember the chip out repair? Apparently The CA from the repair made a bead on the bushing inside of the end ring and it grabbed hold of the ring as I knocked the bushing out and reeked all kinds of destruction.
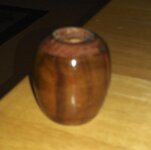
I finally give up. I grab my pliers and pop off what is left of the destroyed end band. So, now I have what looks like a miniature "honey pot" with no bottom. But, it does look kind of cool.
I think Ill try to turn a tiny 3" platter to sit it on and plant a tiny cactus in it!
Anyway, I had some fun, learned some lessons, and at least there was no harm done to the kaleidoscope kit! I hope you got a laugh out of my night's story, and here's a picture of what I'm left with...
When I ordered it I looked at the required tools as usual. Ordered the bushings, already have the mandrel. 13/16" forstner bit, I'm sure my Porter Cable set has one of those...
So I got home from work tonight and grabbed one of my 2x2x12 Queenwood spindle blanks. I cut off a 2 1/4" block. Well, sort of. The Ryobi tabletop bandsaw I bought doesn't seem to want to cut very straight even though I spent 3 hours adjusting and setting it up when I took it out of the box.
No problem, I squared it on the belt sander and it still measured 2 1/8". I was sure I could make that work.
So I swapped jaws on my chuck and locked down on the block. Opened my forstner bit set, and (I'm sure you can guess what is coming) no 13/16"! I figure I'll just drill it out to 3/4" and fit the rest of the way with a Dremel sanding drum. And that probably would have worked.
But, I grabbed the 7/8" bit by mistake! So when I went to mount it all up the bushing went all the way in to the blank. Hmm... what to do?
Genius idea! I sliced 3/8" off the block and cut two 2x2x1/4" pieces of Purpleheart. I proceeded to drill a 3/4" hole in the center of these "fitting shim segments". Then I used the bushing to center them up over the other holes (conveniently, the major OD of the bushings is 7/8"). Then I glue them up to either end of the blank with thick CA and clamp the snot out of it. Leave it in the clamp for 30 minutes and... voila!
So, now I carefully measure out what the gap between the bushings will be inside the blank and cut a 5/8" dowel to length. The I switch back to my pin jaws and drill the spacer 7mm through the center. (I figured I didn't want the bushings pressing on the 1/4" pieces of Purpleheart with no support in between.) Everything mounted up on the mandrel and I'm feeling pretty cocky.
Turn away... looking good. I was afraid the egg shape would be hard to manage. But, it turned out pretty good. And I'm really digging the contrasting end bands. Just about there and a chunk flies out of one of the end bands!
No problem, I've been quite the problem solver all night. So I drip some thick CA in the hole, pick up some Purpleheart dust from the workbench and cram it in the hole. The I flood the repair with thin CA. Pretty normal stuff.
I notice that there is a slight gap at the segment seems. Ok, so I run a bead of thick CA around both seems. I figure while I'm there I'll just go ahead and flood the whole blank with thin CA.
I let it sit for a minute or two and the spray it down with accelerator. The I turn the lathe back on and cut the high spots down. After it is pretty close to smooth I sand it with 80, 120, 220, 400. Then I sit back and look. Man, this is turning out great!
So, I apply three thin coats of medium CA. Then I sand with 80, 120, 220, 400 and the run through all of the MicroMesh pads with water. I forgot to cross sand, so I run all of the MM pads across it and turn the lathe back on and polish with the 12000 MM. The I finish it off with some Hut Plastic Polish. There are still some lines going around the outside, but I'm OK with it. It's just going to sit on my desk at work, and it's getting cold out!
I remove the "egg" from the spindle, rather pleased with myself (other than the finish).
One bushings comes right out, the other is not budging! So, I score around it with a razor, just in case I CA'd it to the egg. Still nothing. So I grab a hold of the bushing with some pliers and rotate it inside the egg. It turns... "huh?"
So I grab a scrap of particle board and drill a 1" hole in it with my trusty forstner bits. Open my vise to about 1 1/4" and grab the largest punch from my HF transfer punch set. Set the egg (busing side down) over the hole and I give it a solid smack with my little rubber mallet. Success! The bushing pops out...
But, wait a minute, little chunks of Purpleheart everywhere. Now what? The end ring has busted apart. I give a minute or two of thoughts and attempts to piece it back together and then I notice it is detaching from the main body of the egg.
Remember how the inside of the egg bore was "stepped"? Remember the chip out repair? Apparently The CA from the repair made a bead on the bushing inside of the end ring and it grabbed hold of the ring as I knocked the bushing out and reeked all kinds of destruction.
I finally give up. I grab my pliers and pop off what is left of the destroyed end band. So, now I have what looks like a miniature "honey pot" with no bottom. But, it does look kind of cool.
I think Ill try to turn a tiny 3" platter to sit it on and plant a tiny cactus in it!
Anyway, I had some fun, learned some lessons, and at least there was no harm done to the kaleidoscope kit! I hope you got a laugh out of my night's story, and here's a picture of what I'm left with...
")