I working on a design for a lathe stand. I thinking of using 2x4s with a 3/4" top and shelf the size I'm thinking about is about 30" high 28" long and 12" wide. I'm thinking about uing double 2x4s with a 3.5" step top and bottom for the uprights threr would be two of these on each side. This design would be fairly heavy and I think this would be a plus... my thoughts are this weight should help dampen vibration or am I wrong. I dont have any think drawn out just a picture of it in my minds eye.

You are using an out of date browser. It may not display this or other websites correctly.
You should upgrade or use an alternative browser.
You should upgrade or use an alternative browser.
Lathe stand
- Thread starter Band Saw Box
- Start date
Signed-In Members Don't See This Ad
Signed-In Members Don't See This Ad
Hey Dan... just wanted to pass along this link as I think it may help you visualize what you are looking for and perhaps find some good ideas to add in along the way... Hope this helps - Andy.
lathe stand - Google Search
lathe stand - Google Search
Thanks for the link Andy, lots of nice looking stands. I kind of like the one made from an I beam. I wonder if I could talk Evelyn into letting me buy a welder.
healeydays
Member
I built one using an old pedal type Singer sewing machine base. It is sturdy, compact, and on wheels and can be found locally cheap as folks tend to want to get rid of them especially if the sewing machine itself is junk.
I took off the pedal on the bottom so the bottom is open. You do need to build it up to get to the height you want, but I used a few 2x8 I had lying around and drilled out tool holders in the front of it for the tools I use the most...
Mike B
I took off the pedal on the bottom so the bottom is open. You do need to build it up to get to the height you want, but I used a few 2x8 I had lying around and drilled out tool holders in the front of it for the tools I use the most...
Mike B
Attachments

Last edited:
avbill
Member
my lathe stand: the two sides are 1x1 with 3/4 plywood. sand was poured into center for weight. the center hallow area I placed my compressor .
Charlie_W
Member
Like Bill said, build it so you can add weight. Turning something off balance can give your lathe and you the shakes.
A 3/4"top should be doubled to 1 1/2" thick, glued and screwed to make a solid top. Just build everything strong and heavy. The mass of weight will dampen the vibration and you will have a better turning experience. One flimsy piece can make the rest of your stand fall short of top notch.
Create hollow leg ends that can be filled with sand, gravel or concrete. Don't just put a 3/4 piece of plywood on the floor, screw the stand to it and add weight to the plywood. Add the weight to a sturdy lower shelf so it holds the legs/feet down with force.
Hope this and all the great images help.
colinp
Member
- Joined
- Dec 9, 2009
- Messages
- 14
bench
 Hi Andy I have just made a bench for my Vicmarc . I used 3x3 for the legs and connected these using 4x2. The top was made from 8x2 side by side. The end frames tapered from bottom to top to give the bench stability. It is very heavy as i placed the motor directly under the Head section of the lathe. I put a skin of 3/4 inch ply on the top of the 8x2 onto which the lathe was bolted. Result is no vibration but lots of shavings. I made the end frames first and then connectd them together with 4x2
kind regards Colin(retired carpenter/joiner
Hi Andy I have just made a bench for my Vicmarc . I used 3x3 for the legs and connected these using 4x2. The top was made from 8x2 side by side. The end frames tapered from bottom to top to give the bench stability. It is very heavy as i placed the motor directly under the Head section of the lathe. I put a skin of 3/4 inch ply on the top of the 8x2 onto which the lathe was bolted. Result is no vibration but lots of shavings. I made the end frames first and then connectd them together with 4x2kind regards Colin(retired carpenter/joiner
hazmat74
Member
This thread may also be helpful.
http://www.penturners.org/forum/f30/lets-see-your-lathe-stands-112762/
http://www.penturners.org/forum/f30/lets-see-your-lathe-stands-112762/
gregs4163
Member
I'm still not sure how I'm going to build my stand but I do want to be able to move it around in my shop which is also my garage and we do use it to park our car. I know that I will have a power outlet installed on it with a 8 to 10 foot cord. I did the same thing with my table saw it works great and allows me to move it around the shop and reach a wall outlet without the power cord being a trip hazard and I have an outlet to use other power tools when I use the table saw table as a work bench.
Swagopenturner
Member
Dan;
I built my stand for my Rikon out of used cabinets. I mounted the cabinets on a piece of 3/4 ply, then bolted 6 all-way locking casters to the bottom of that. It ended up being 72" long and 24" deep. The cabinets were such that I have only one door to a large storage area, and the rest are drawers for all the turning tools and equipment that I've accumalated. I topped it all off with three layes of 3/4 MDF which was then covered with laminate to make it very easy to clean up. This top added significant weight. But then so did the lathe and extension! Once set in place, and the wheels are locked, it doesn't move or shake. One last thing I added was a multi-outlet strip on the left end, under the top. This way I can turn off the lathe power, the lights, and the vac all at once.
I built my stand for my Rikon out of used cabinets. I mounted the cabinets on a piece of 3/4 ply, then bolted 6 all-way locking casters to the bottom of that. It ended up being 72" long and 24" deep. The cabinets were such that I have only one door to a large storage area, and the rest are drawers for all the turning tools and equipment that I've accumalated. I topped it all off with three layes of 3/4 MDF which was then covered with laminate to make it very easy to clean up. This top added significant weight. But then so did the lathe and extension! Once set in place, and the wheels are locked, it doesn't move or shake. One last thing I added was a multi-outlet strip on the left end, under the top. This way I can turn off the lathe power, the lights, and the vac all at once.
ironman123
Member
Dan, my wood lathe stand is a Kitchen Island with 1 Drawer and 2 Doors, on casters.
Also have 2 work benches. 1 that I made about 35 years ago from 2X4s and 3/4 Ply top 30 X 68. The other one is 2X4 frame and legs with a salvage house $20 dollar Solid 2" thick Door on top.
Ray
Also have 2 work benches. 1 that I made about 35 years ago from 2X4s and 3/4 Ply top 30 X 68. The other one is 2X4 frame and legs with a salvage house $20 dollar Solid 2" thick Door on top.
Ray
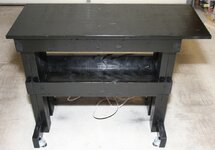
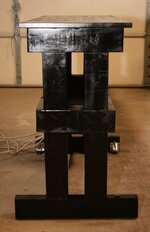
I finished my lathe stand today. I made the base from 2x4's and the top and shelf form 3/4" plywood. The stand is 31" high, the top is 14" x 39" and is has screen molding around it just to dress it up a bit. The shelf or bin is 12" x 28". I have leveling feet n the legs to that no matter how uneven the floor I set it on is I can keep is from rocking. If your wondering what the cord is under the stand, I put a power strip on the back. I painted it black since I had it in the shop. I'll post some other pictures of the stand with my lathe once it get here which should be around Friday. Any and all comments are welcome.
Attachments
monophoto
Member
I used the base from a retired gas grill. The top was made by edge-gluing some sections of 2x8s to create a top that is 31" wide, and then attached the top using screws. The base itself was a bit flimsey, but it was much sturdier once the top was attached.
The center-to-center spacing of the holes in the feet of my new lathe is about 30 1/4", so I wanted to attach it to the top to prevent it from 'walking off' (hollowing tends to cause the lathe to move toward the left - DAMHIKT). So I cut a couple of lengths of 2x4 to fit directly under the feet on the lathe - attached the 2x4 sections to the top using carriage screws, and then bolted the lathe to the 2x4s. This also lifted the lathe off the table a bit to facilitate cleaning under the bed.
The center-to-center spacing of the holes in the feet of my new lathe is about 30 1/4", so I wanted to attach it to the top to prevent it from 'walking off' (hollowing tends to cause the lathe to move toward the left - DAMHIKT). So I cut a couple of lengths of 2x4 to fit directly under the feet on the lathe - attached the 2x4 sections to the top using carriage screws, and then bolted the lathe to the 2x4s. This also lifted the lathe off the table a bit to facilitate cleaning under the bed.