Issue with chipping during drilling

Signed-In Members Don't See This Ad

Jmaxcy

Member
Joined
Mar 28, 2021
Messages
179
Location
Pittsburgh, Pennsylvania
Hi there

recently had issues with chipping when the drill bit exits the blank. Doesnt happen on entry. Wood I'm using is fairly brittle. Do you think it would help if I applied some thin CA to the end prior to drilling? Only other thought is to cut the blank significantly longer than needed and mill it down afterwards.
Thanks in advance!
Jerald
 
Signed-In Members Don't See This Ad

monophoto

Member
Joined
Mar 13, 2010
Messages
2,545
Location
Saratoga Springs, NY
For pen blanks, the options I would consider are either to start with a blank that's a bit longer and plan to trim off the excess length after drilling, or else find a way to mount a bit of scrap wood against the end of the blank so that the drill bit will pass into the scrap before the chipout occurs.

In situations other than a pen blank, a solution would be to drill the hole in at least two passes, first from one end, and then from the opposite end, meeting somewhere in the middle. But that's not wise for pen blanks because its possible that the two holes won't be on exactly the same axis which means that the hole will have a slight jog along its length - not a real issue in flat work, but could be a serious problem given the depth of holes required for pens.

Not sure that CA would work all that well to prevent chipout, and since it is known to have other unwanted side effects (staining, and just nasty to work with), I would avoid that approach.
 

Jmaxcy

Member
Joined
Mar 28, 2021
Messages
179
Location
Pittsburgh, Pennsylvania
For pen blanks, the options I would consider are either to start with a blank that's a bit longer and plan to trim off the excess length after drilling, or else find a way to mount a bit of scrap wood against the end of the blank so that the drill bit will pass into the scrap before the chipout occurs.

In situations other than a pen blank, a solution would be to drill the hole in at least two passes, first from one end, and then from the opposite end, meeting somewhere in the middle. But that's not wise for pen blanks because its possible that the two holes won't be on exactly the same axis which means that the hole will have a slight jog along its length - not a real issue in flat work, but could be a serious problem given the depth of holes required for pens.

Not sure that CA would work all that well to prevent chipout, and since it is known to have other unwanted side effects (staining, and just nasty to work with), I would avoid that approach.
Thanks!

other option I was considering was to drill the blank first, then cut it down to size with my mitre saw, rather than cutting down to size first then drilling. I think that would work for single barrel kits, but would be more challenging for the likes of a cigar kit as I would need to drill pretty deep.
 

David350

Member
Joined
Sep 10, 2017
Messages
423
Location
Dallas, TX
Hi Jerald, yes a very common practice is to stop short of exiting the blank when drilling and my standard practice. I do this and then trim the end off on my miter saw until I have exposed the full diameter of the hole. Are you using brad point drill bits? I seem to have more issues with them when exiting the hole, especially with acrylic blanks...
 

Brian G

Member
Joined
Jul 2, 2013
Messages
1,571
Location
Bloomington, MN
Thanks!

other option I was considering was to drill the blank first, then cut it down to size with my mitre saw, rather than cutting down to size first then drilling. I think that would work for single barrel kits, but would be more challenging for the likes of a cigar kit as I would need to drill pretty deep.
For a two barrel pen, cut the barrels long but drill from the middle out and trim the ends.
 

Jmaxcy

Member
Joined
Mar 28, 2021
Messages
179
Location
Pittsburgh, Pennsylvania
Hi Jerald, yes a very common practice is to stop short of exiting the blank when drilling and my standard practice. I do this and then trim the end off on my miter saw until I have exposed the full diameter of the hole. Are you using brad point drill bits? I seem to have more issues with them when exiting the hole, especially with acrylic blanks...
Yes I am using brad point, which I haven't had any issues with any other woods other than this buckeye burl I'm using which is particularly brittle. On the flip side, the fact it's brittle makes the drilling much easier.

I think I'll cut each blank very long, drill all the way through and cut it down again with the mitre saw to be closer to the right size for the barrel, and then mill it the rest of the way to ensure it's square, etc.

thanks!
 

Jarod888

Member
Joined
Mar 11, 2012
Messages
467
Location
Brighton, Colorado
As most others suggest, cutting it's wood blank long and sanding or trimming to final length is the tried and true method.

You might try hot gluing a waste block to the end of the blank. Only put the hot glue around the outer edge.

You can also finesse the last part of drilling by marking the length of the tube (just slightly shorter) on the drill in an easy to see color. When you get to that mark, retract the drill bit out of the blank, ensuring it is free from chips, etc. Then when you put it back in to finish drilling, go very slow. Let the drill cut, rather than pushing it through.

The end blows out because the wood isn't supported, this is the case with all cutting instruments - drill bits, saws, etc. If the wood isn't supported, it will tear out.
 

Jans husband

Member
Joined
May 4, 2020
Messages
278
Location
Doncaster England
Have you tried using a smaller drill bit as a pilot hole and then creeping up with a slightly larger bit and then the final size drill bit.

Also advance it very slowly as you approach the end of the hole. Mark the drill as mentioned in the above post

Mike
 
Joined
Feb 25, 2010
Messages
1,799
Location
webberville, mi
Good stuff above. Also - MAKE SURE YOUR DRILL IS SHARP! Even one that feels sharp may actually not be sharp. Brad point bits are problematic on this point. I'm not sure they can be sharpened.
Also - feed rate and clearing the flutes on the bit often is important.
 

howsitwork

Member
Joined
Jul 9, 2016
Messages
2,321
Location
Thirsk
As most others suggest, cutting it's wood blank long and sanding or trimming to final length is the tried and true method.

You might try hot gluing a waste block to the end of the blank. Only put the hot glue around the outer edge.

You can also finesse the last part of drilling by marking the length of the tube (just slightly shorter) on the drill in an easy to see color. When you get to that mark, retract the drill bit out of the blank, ensuring it is free from chips, etc. Then when you put it back in to finish drilling, go very slow. Let the drill cut, rather than pushing it through.

The end blows out because the wood isn't supported, this is the case with all cutting instruments - drill bits, saws, etc. If the wood isn't supported, it will tear out.
Absolutely agree with this.

I found putting a ply sacrificial piece in CLOSE FIRM CONTACT with the base of the blank sorted this issue for me in th drill press. Also making sure the blank is supported as much as possible at the sides near the end so the wood fibres ( and even acrylic or plastic ) end is supported . Drill with frequent clearance of the hole so chips don't clog the flutes and try to force their way out beyond the drill as you break through.

I use a drill designed for cutting into tubes with a sort of brad point but not highly protruding peripheral cutting lips. This tends to go straight as the pronounced brad point drills , for me any way, tended to follow the grain a little in dense woods. The drills are "BD piranha CNC Hi tek" not cheap but I find them very effective.
 

leehljp

Member Liaison
Joined
Feb 6, 2005
Messages
9,331
Location
Tunica, Mississippi,
Pen turning is a peculiar field and preconceived notions are brought into it from other fields of work. I realize that most people do not have a machinist background or "woodworking for a living" background.

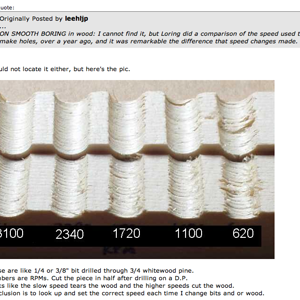
The slower the drill press turns, the more likely chips will occur. Full speed ahead in the RPM and slow, slow slow entry.

Recently a couple of guys had problems with turning certain cast blanks - chipping out. They were both coming into pen turning from bowl turning. They were turning at about 1000 rpm. Experienced turners here (including me) said try 3000 rpm. One tried and settled on 2000. One said at the bowl turning Demonstration at the local wood retail shop, the instructor said "Never turn more than 1000 RPM." Well - that rule is for bowls, not pen blanks.

That speed made all the difference. Slower speeds cause more catches than faster speed. But faster speed creates more heat, which can destroy a cast blank and dull the blade fast. A forced dull blade can cause the blank to blow out. Experience helps decide the best combination. But faster speed to start at the beginning.

YES, ditch the brad points. I have used them without a problem, but the tips get hot fast and get dull quick and catches occur.

I post this often:

Look at where the "tear out" is! The proof is in the pudding - so to speak.
 

monophoto

Member
Joined
Mar 13, 2010
Messages
2,545
Location
Saratoga Springs, NY
Hank has offered some excellent advice.

There are three common problems when drilling wood.

1. Friction causes heat, and the rotation of the bit against the wood causes everything to get warmer. An even greater source of heat is from the friction between the swarf build-up in the flutes of the drill bit at the surrounding wood. The ideal solution is to periodically stop drilling, withdraw the bit from the hole, and clear that swarf. Not only does that totally remove a major source of frictions, it also allows the bit and surrounding wood to cool down a bit. It is also true that using a slower rotational speed may reduce friction, but a slower speed also reduces the efficiency with which the bit cuts into the wood. My view is that a better solution is to use a faster rotational speed to improve cutting efficiency, in combination with periodically stopping to clear the swarf and allow for intermittent cooling.

2. Wood grows seasonally - faster in warm weather, and slower in cold weather. As a result, wood naturally alternates between harder layers (winter growth) and softer layers (summer growth). (this characteristic is more pronounced in woods like ash and oak, and less noticeable but still present in fine-grain woods like maple, walnut and cherry). Its easier to drill if the bit stays within one of the softer layers. What that means is that if you advance the bit too rapidly, there can be a tendency for the bit to 'wander' in order to stay within a softer layer. Solution: slow down the rate at which the bit advances into the wood. Allow the bit to cleanly cut the hole at its leading edge before trying to force the bit to advance into that hole.

3. Drilling a 'blind hole' is easy because the bit never leaves the wood. But when drilling a through-hole, the problem is that when the bit comes close to breaking through the end of the hole, the force of advancing the bit tends to tear the fibers surrounding the exit hole. Forstner bits produce clean holes because the wings cut the surface fibers at the circumference of the hole before the planer portion of the bit removes the interior portion of the hole. And to get a really clean hole with a Forstner bit, you can drill far enough for the center spur to penetrate through, stop, and then reverse drill from the exist side. But that's not practical when drilling axial holes through pen blanks. Instead, you need to do something to support the fibers around the exit hole to prevent tearout. There are two ways to do that - either start with a blank that is longer than required, and then trim away the excess length along with any torn fibers around the exit hole, or else clamp a sacrificial bit of wood at the end of the blank to support the fibers at the exit hole. Slowing down the rate at which the bit advances into the wood also helps; allow the bit to actually cut the hole rather than forcing the bit through that last thin layer of wood at the bottom of the hole resulting in tearout.

Finally, all three problems can be minimized significantly by having a sharp bit. Dull bits don't cut well which leads to additional friction and heating, and requires additional force to advance the bit which can result in the bit wandering off axis and also increases the risk of the bit busting through the bottom of the hole leaving ugly tearout.
 

KenB259

Member
Joined
Dec 24, 2017
Messages
3,577
Location
Michigan
I use brad point bits almost exclusively on both wood and acrylic, with no problems.
A lot depends on the types of pens you make. I do mainly segmented pens. If you're just doing plain wood or acrylic, a perfectly straight hole isn't important. Can't usually say that about segmented blanks. Brad points in end grain will follow the grain, whether it's straight or not.
 

Jmaxcy

Member
Joined
Mar 28, 2021
Messages
179
Location
Pittsburgh, Pennsylvania
A lot depends on the types of pens you make. I do mainly segmented pens. If you're just doing plain wood or acrylic, a perfectly straight hole isn't important. Can't usually say that about segmented blanks. Brad points in end grain will follow the grain, whether it's straight or not.
I didnt realize brad points followed the grain.

If you don't use brad points, what do you use? Forstner?
 
Top Bottom