Inspired by Everyone!

Signed-In Members Don't See This Ad
See more from Gersh

Gersh

Member
Joined
May 22, 2018
Messages
111
Location
Newbury oh
So I very rarely post but I habitually check the forums multiple times a day to see what is going on. Honestly I can say almost every day I see something new or inspiring that I file away for later use.
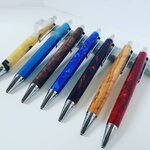
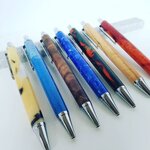
Well I think it was last week I saw Magpens post around his modified slimline pros and I knew I had to give it a try (I was not brave enough to go tubeless like him.) Below are the results.
One last note... the kits are from Ed and Dawn (who I found out about from IAP), the olivewood and walnut were from the estate sale (Mark James), the green and gold micarta blank from the going out of business sale (Huzzah) and the rest from wooden whimsies sale (man I can not remember who posted about that.) So in other words every part of these pens was because of the IAP.

Thank you to everyone for the inspiration. If i didnt mention you above that just means I used something you posted on a different pen!
 

Attachments

  • IMG_20190503_182314_129.jpg
    IMG_20190503_182314_129.jpg
    172.7 KB · Views: 302
  • IMG_20190503_182314_133.jpg
    IMG_20190503_182314_133.jpg
    174.6 KB · Views: 297
Signed-In Members Don't See This Ad

magpens

Member
Joined
Feb 2, 2011
Messages
15,911
Location
Canada
Nice work, Billy !!

Just as a matter of interest, did you machine down the centerband and use the tubes supplied with the kits ? ... or did you scrap those and go with a full length brass tube ?

There is an advantage to using the centerband because it provides the correct positioning for the click mechanism. . If you provide your own, long, tube you would have to find another way to block the click mech from sliding down towards the nib.
 

Gersh

Member
Joined
May 22, 2018
Messages
111
Location
Newbury oh
Mal,
I went with a full length brass tube. I didn't have to use anything to hold the clicker mechanism in place? I simply slide the pre assembled clicker mechanism in from the top and then inserted the ballpoint cartridge in. I made sure the click mechanism would work and then inserted the guide and clip into the tube.

I've tested it and everything still seems to be working. I'm sure there are downsides to how I did it but unless someone pushes down on the clicker mechanism to the point both springs are fully compressed the click mechanism shouldn't slide or at least that was my thought process. If I'm wrong well these are thank you gifts to my team so they know they can always have me fix it.
 

magpens

Member
Joined
Feb 2, 2011
Messages
15,911
Location
Canada
Billy,
That is good to know. . Thanks for doing your pens and conveying this info. . Perhaps I have had a misunderstanding up until now.

Looking at the centerband piece, I note that it is asymmetric ... it has a long side and a short side. . The long end goes to the top, and I have assumed it is designed to prevent the click mech outer sleeve from sliding down. . I made measurements and designed my tubeless pen to match those. . But maybe all that is unnecessary.

From your work, it seems that the refill does the job of keeping the click mech up where it belongs, and it makes sense that it should.

I'll think some more and I might try making a pen like yours to experiment a little. . I'll report back.

Thanks again for your work and for your reporting.
 

magpens

Member
Joined
Feb 2, 2011
Messages
15,911
Location
Canada
Billy,
Had a closer look at some things today. . I have been making these pens "my way" for so long that I had overlooked some features of the original kit. . The only difference between "my way" and "your way" is that I don't use any brass tube, whereas you use a single full length brass tube. . We both omit the centerband.

One feature of the kit design, and which is relevant to "your way", is that the click mech outer sleeve is a quite tight fit inside the brass tube. . That fact, in itself, means that you are not going to have the click mech slide towards the nib. . So I should not have even raised that.

In the original design, using the original two tubes and the centerband, it is true what I said that the centerband, on its upper end, has an extension of exactly the right length to prevent any possible sliding of the click mechanism. . But that fact is hardly relevant because the click mech is such a tight fit inside the brass tube that it won't slide anyway, either in the original two tube design or in your full length single tube design.

There is still one other issue that I want to check on, so I'll get back here in a day or so about that.
 

magpens

Member
Joined
Feb 2, 2011
Messages
15,911
Location
Canada
Brent,
I don't think there is a "how-to" document, as such. . It is pretty straight forward to just replace the two tubes and centerband with a single long tube (4.230"). . You just have to make the measurements carefully and do the drilling of the long blank (4.230") carefully. . Do the drilling on the lathe after you have rounded the blank to a size of about 3/4". . Turn to correct size/shape after drilling and gluing tube in. . Be sure to paint the inside of the blank if it is acrylic.
 

Gersh

Member
Joined
May 22, 2018
Messages
111
Location
Newbury oh
Mal
I'm glad my approach led to a new thought process. Honestly I've got a kit or 2 left and was thinking about giving it a try without the tubes. Thanks for turning me onto this style.
 

magpens

Member
Joined
Feb 2, 2011
Messages
15,911
Location
Canada
Billy and others,
I have confirmed that it is mandatory for the outer sleeve of the click mech to be held in such a way that the internals of the click mech can "do their thing".

It is the internals moving relative to the sleeve, in a direction towards the nib, that result in the "click" and subsequent locking of the refill, either in the extended position or the retracted position.
If the outer sleeve can slide freely (towards the nib) the actions of the internals cannot happen.

The brass tube plays an important role by frictionally holding the sleeve (which is a quite tight fit inside the brass tube).

Without the brass tube (as in "my" design), and its frictional holding of the sleeve, some other means of holding the sleeve must be provided. . I do this by a stepped hole formed by drilling 15/64" all the way through the blank, and then drilling an "M-size" hole to a certain depth (1.70" from top end). . The sleeve fits somewhat (but not too loosely) inside the M-hole and butts up against the step which prevents further motion. . That depth of the M-hole is just the right amount for the internals to "do their thing".
It may be worth pointing out that in the original kit design, the M-hole is provided by the inside diameter of the brass tube. . The M-hole bottom (which may not even play a significant role) is provided by the metal upper extension of the center band.

I say that this metal upper extension may not play a role because the brass tube tight fit on the sleeve must certainly play the most significant role. . In "my" design, I cannot choose an M-hole diameter that provides that friction, so I rely on the M-hole bottom.

Hope this is a little "clearer than mud" !
 
Top Bottom