Bob Wemm
Member
About 18 months to 2 years ago I tried to make some Black wood. I asked you guys and did a lot of reading about "Ebonising" but that seemed to revolve around ebonising after the shape was achieved, or just before the finish was applied.
I needed the wood to be totally black all the way through, so it could be worked and still remain black.
One of the things I was advised about was that Walnut wood was the best to ebonise because of the natural tannin in the wood.
In my first experiments, I used Queensland Walnut and soon realised that this wood is not Walnut at all, just a local name. So I purchased some Proper USA Walnut and cut it into strips of 3/16 and 1/4inch, I also decided to try some lovely creamy white Tasmanian Oak (Eucalyptus Regnans) just to see what would happen. The strips were put into a length of PVC pipe about 30inches long, Vinegar and dissolved steel wool was added and the pipes sealed for about a month/6 weeks.
By then I just couldn't wait any longer, every time I walked into my shed those pipes leapt out at me, so finally I opened them up and took out the black strips of wood.
I layed them out to dry and the following day cut a couple of them and found they were still the natural colour on the inside but very black on the outside. My heart sank with disappointment and the strips were set aside on the heap of scraps, until just before Christmas this year.
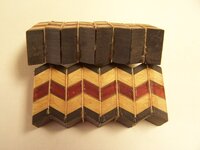
I decided to make another Segmented piece and needed some black wood. My first thought was to try and buy some, but then remembered the failed strips laying in the scrap heap. I dug one out and cut about 1inch off the end, then I cut the worst wobbly one in half.
YAHOO they were both completely black, as were all the others.:biggrin::biggrin::biggrin::biggrin:.
YES YES YES.
I knew that time flies, but it also does other things as well, really special things like turning my white wood black.
Have a very successful new year.
Cheers,
Bob
I needed the wood to be totally black all the way through, so it could be worked and still remain black.
One of the things I was advised about was that Walnut wood was the best to ebonise because of the natural tannin in the wood.
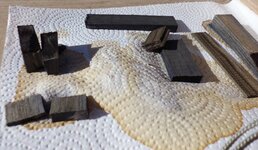
In my first experiments, I used Queensland Walnut and soon realised that this wood is not Walnut at all, just a local name. So I purchased some Proper USA Walnut and cut it into strips of 3/16 and 1/4inch, I also decided to try some lovely creamy white Tasmanian Oak (Eucalyptus Regnans) just to see what would happen. The strips were put into a length of PVC pipe about 30inches long, Vinegar and dissolved steel wool was added and the pipes sealed for about a month/6 weeks.
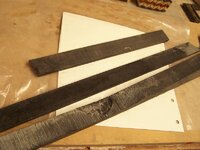
By then I just couldn't wait any longer, every time I walked into my shed those pipes leapt out at me, so finally I opened them up and took out the black strips of wood.
I layed them out to dry and the following day cut a couple of them and found they were still the natural colour on the inside but very black on the outside. My heart sank with disappointment and the strips were set aside on the heap of scraps, until just before Christmas this year.
I decided to make another Segmented piece and needed some black wood. My first thought was to try and buy some, but then remembered the failed strips laying in the scrap heap. I dug one out and cut about 1inch off the end, then I cut the worst wobbly one in half.
YAHOO they were both completely black, as were all the others.:biggrin::biggrin::biggrin::biggrin:.
YES YES YES.
I knew that time flies, but it also does other things as well, really special things like turning my white wood black.
Have a very successful new year.
Cheers,
Bob