How do I make brass and aluminum accents

Signed-In Members Don't See This Ad

Niels

Member
Joined
Apr 29, 2022
Messages
68
Location
eindhoven
Hello,
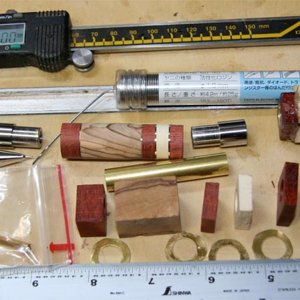
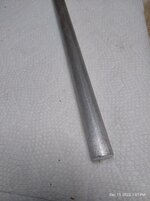
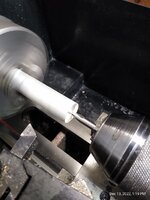
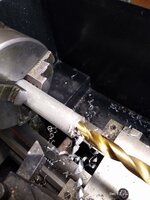
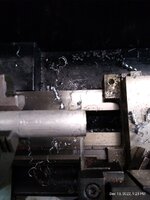
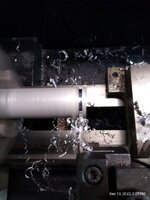
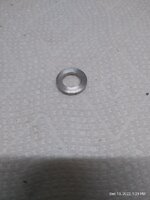
I have a question in my penmaking journey. I am getting better at the whole process and I managed to make some pens with multiple segments. I made two parts which are attached to one another with threads. What I wanna do now is make brass / aluminium accents. I was thinking of 1 mm brass rivets ( I dont know how they are called in English) the ones you use with a bolt and screw. I ordered some M14 with a hole of 10mm. Or should I order a small plate of brass and aluminium and drill holes and cut em?
Do you make 2 parts without threads and then glue it together with the rivet inbetween or make threads and glue it to the male part?

What's the way to go about it? If I know how to do it I can practise.

Niels
 
Signed-In Members Don't See This Ad

Alan Morrison

Member
Joined
Jan 15, 2019
Messages
3,092
Location
N Ireland
I think 'washers' is the word that you are looking for.
Some folk here use aluminium from drinks cans, which I find a bit thin and fiddley.
I use brass and aluminium sheets 0.3 and 0.4mm thick, drilled with the appropriate drill size and rounded with snips or a scroll saw.
Sometimes I have been able to borrow a jewellers punch shown here
Hope this helps
Alan
 

Kenny Durrant

Member
Joined
Sep 11, 2012
Messages
2,510
Location
Sachse Tx. 75048
I'll second what Alan said. Although I use the drink cans. They are flimsy but readily available. I buy thinker sheets from Michael's or Hobby Lobby. I cut the sheets close to the size of the blank and glue them together. Then I drill the blank with the desired bit. The thing to remember is that the metal will build up heat and that will cause the glue to fail. You'll need to keep heat to a minimum. Good Luck.
 

Niels

Member
Joined
Apr 29, 2022
Messages
68
Location
eindhoven
Aluminum from drink cans. Really. Do you have a photo of that? Is 1 mm to thick then? So copper and aluminum sheets of 0,3 or 0,4 mm thick...

I can search those online.

Is there a good thread that explains a bit how to do it or with some photos?
 

Oliver X

Member
Joined
Jun 12, 2021
Messages
68
Location
Pacific Northwest
I think we're talking about two different things here. If you could possibly provide more explanation of what you're trying to achieve, we may be able to offer better advice.

I was convinced you were talking about rings typically found between barrels and finials or next to windows on a piston filler, for instance, but I'm not sure if you mean that or the sort found in segmented wood pens where there is a thin accent line or a small stack of contrasting material. I say this as I read another of your posts that mentioned you don't use wood or pen kit tubes.
 

gbpens

Member
Joined
Jul 1, 2011
Messages
821
Location
Homer Glen, IL
I use aluminum or copper flashing to separate segments. When drilling back up the segment and metal to another, tape the two together and drill both at once to avoid a burr as the drill exits the metal. CA does not always hold so use epoxy to glue the metal.
 

magpens

Member
Joined
Feb 2, 2011
Messages
15,911
Location
Canada
@Niels
This thread (found by searching for "accent ring" or "accent" may give you ideas for adding metal rings as accents to your kitless pens . . .


I believe you are interested in an "accent ring" and searching for that term here on IAP may yield more information relevant to your needs.

My personal feeling is that the aluminum from drink cans is too thin for your purposes.
You probably want to use metal of thickness 1mm or greater because you want the accent ring to be noticably significant in the overall appearance of the pen.

With regard to which approach you should use, you ask the question :
"Do you make 2 parts without threads and then glue it together with the ring (not rivet) in between or make threads and glue it to the male part?".

I think you could use either approach depending on where you intend the accent ring to be in relation to other parts and the ends of the pen.
For example, if you want the accent ring to be in the middle of the cap or body section then your first method (without using any threads) would work fine. But if you want your accent ring to be up against a possible "end ring" near the cap's opening, then using the second method might be more appropriate because structural integrity could be an issue. However, diameters and sizing of the mating parts is always going to be a consideration when you are making kitless pens . . . both from an appearance point of view and also because the required sizing could affect the manufacturing methods you use to make the accent ring. The threaded method will necessarily increase the diameter and thickness of the accent ring.

If you could post some photos showing examples of pens that you want to "decorate" with the accent rings, I believe that would help to clarify your intentions and would probably enable other members to offer specific suggestions.

I hope you will show us a few pictures of your work, both in-progress and finished, as you proceed towards your goals.

I also hope that I am interpreting your opening post in an appropriate way. There are differences in the processes involved between simply making a segmented pen blank, and embellishing a pen design through the addition of accent rings (most often near the ends of the cap and/or body). The latter is a more delicate process because you are working near the thinnest portions of the material comprising the pen cap and body.
 
Last edited:

leehljp

Member Liaison
Joined
Feb 6, 2005
Messages
9,331
Location
Tunica, Mississippi,
My method of making washers is a three step process.

1. I make and made "washers" for brass and aluminum for years by laying a sheet of .5mm brass or aluminum between two sheets of plywood and screwed the plywood together well - sort of like a sandwich of meat between two slices of bread. Then I drew out a diagram of where I wanted holes and drilled them the size needed. The plywood prevents the drill bits from distorting the thin metal sheets as it drill through.

2. After I drill them, I take the sheet out from between the plywood and use shears to cut a reasonable circle around each hole. This distorts the "washers" considerably, which takes me to step three:

3. I use a hammer to flatten the "circles".

here is a picture of 4 brass ones (at the bottom of the picture) that have been drilled, cut and flattened:

Alan has the best tool and I also have a different tool for punching, but I just like the old way of drilling them.
 

jttheclockman

Member
Joined
Feb 22, 2005
Messages
19,151
Location
NJ, USA.
I agree I do not think we are following what you are asking. I do not believe you are asking about washer of any kind that separate segmentation of blanks. I believe your question has to do more with kitless blank work. Maybe wrong and if you could show us some examples of what you are after will help us help you.
 

Niels

Member
Joined
Apr 29, 2022
Messages
68
Location
eindhoven
Thanks everbody for replying so quick. My English is ok but when it gets so specific it's difficult to find the right words.

I do mean the washers that Lee and Magpens describe. I made straight forward pens from Diamond cast and Acrylic blanks so far. ( I must say it's a joy to work with Alumilite instead of Acrylic) My focus until now was on the finishing but I got that working.

I made a pen with a threaded endcap on the barrel. I like the pens with different blanks and accents in them so that would be the next step.

About photos. I am experimenting on them and find it's not easy to make good ones. Especially since I am not very interested in photography besides this and the occasional family photo so the only things I have are my phone and an old 6MP digital camera.

I ordered washers on amazon but im more inclined to send em back and find myself some sheets of copper and aluminum. Should i order them 1 mm or 0,5 mm?

Thanks Niels
 

Niels

Member
Joined
Apr 29, 2022
Messages
68
Location
eindhoven
20221025_140326.jpg
 

jttheclockman

Member
Joined
Feb 22, 2005
Messages
19,151
Location
NJ, USA.
OK now we see what you are trying to do. By the way nice pens. Here is the situation. You are talking kitless pens. Huge difference with construction of kit pens and kitless and that is no tube in kitless pens. I say that because with kit pens that tube acts like an extra support for fragile blanks such as segmented blanks with rings in them. Usually they are glued between a couple piece of blank materials with CA or epoxy and then this whole blank has a tube inserted in the middle and it helps add support to those otherwise weak segmented joints. I do not care what glue you use they are compromised if dropped on a hard surface. With kitless there is no tube so that fragile blank is suspect to failure. But one great article that is in the library was written by a member here and he explains his method to get around this and is quite simple and elegant. That is tenons and how they are used in kitless pens. To me this is a great method and makes for a great read. There probably other ways around this but check it out and see what I am talking about.

https://www.penturners.org/resources/adding-bands-to-your-caps.235/

One other note I would not use washers because then you would have to match your work to the already drilled hole in washer. You can use whatever size material you like if you buy sheets or blocks of material. Again there are a list of places where people get materials of all kinds in the library ( I believe that was added, it was being worked on). Very easy to drill materials any size hole you need. You can get brass, copper, aluminum, silver, and other materials. You can use different acrylics as well as bands. But again as I said everytime you cut a solid blank and add a joint you created a weak link. Support will help that.
 
Last edited:

Niels

Member
Joined
Apr 29, 2022
Messages
68
Location
eindhoven
These are a few of my pens together. I used ebonite too. I really like the look it has. Very rich. I'm kind of happy with the result.
I really like the instructional article you put in. Working with tenons is my most likely way to go. But he does not show what he uses and how he finishes it.good to know I will have to get epoxy glue.
 

jttheclockman

Member
Joined
Feb 22, 2005
Messages
19,151
Location
NJ, USA.
These are a few of my pens together. I used ebonite too. I really like the look it has. Very rich. I'm kind of happy with the result.
I really like the instructional article you put in. Working with tenons is my most likely way to go. But he does not show what he uses and how he finishes it.good to know I will have to get epoxy glue.
Very nice. Chuck is here all the time. Any questions just ask him. He has one of his pens in his avatar. He also discussed his method in various threads here. if you do a search under his name you should be able to find them. Good luck.
 

Oliver X

Member
Joined
Jun 12, 2021
Messages
68
Location
Pacific Northwest
I thought that's what you were getting at, but I didn't want to be too presumptuous. I don't make kit pens or turn wood, so my mind doesn't go there.

There's a ton of ways to go about adding rings and trim. You can buy pre-made trim bands from a supplier. You can punch them from sheet. You can saw them from sheet with a jewelers saw, or you can cut them from tube or bar stock. I use metal lathes for most of my work, so making them from tube or barstock is easiest for me. If you're using silver or other precious metals, the standard practice is often to form the ring from wire or flat stock and solder it closed. Whatever method you use, I recommend finishing them completely before adding them to the pen. So, if you plan to have a band between the barrel and finial, I'd make the band exactly to size and finish the barrel and finial to final size and then assemble them as a finished piece. If you use screw in finials, it's up to you whether or not you want to add any sort of glue or epoxy to the assembly. I typically don't, but it's up to you. If you were to epoxy the pieces together with the trim ring left oversize, unless it's keyed, it's likely to break the bond while being finish turned. You don't have to thread the pieces together. A simple, unthreaded tenon works fine. Even if it seems like it's quite thin, once everything is epoxied together, it's typically plenty strong.

Cap bands are assembled onto pens in a number of ways. Some are stacked onto a tenon and glued, some are swaged into a groove, while others are pressed onto the the pen and again rest in a shallow groove. (This is, of course, ignoring all the pens that have the material injection molded with the bands in situ.) For larger cap trim bands, I occasionally thread them onto the cap with a very fine pitch thread.
 

magpens

Member
Joined
Feb 2, 2011
Messages
15,911
Location
Canada
@Niels

Here is another link that you might find interesting and/or helpful


Dalecamino

Local Chapter Leader
Joined
Jan 2, 2008
Messages
14,572
Location
Indianapolis, In.
Niels, I was alerted about this thread. Good question. I'll see if I can get some photos of the process posted this afternoon/evening. This might actually be another tutorial opportunity. But briefly, all I do is put aluminum or brass rod on the lathe, drill the appropriate size hole that will fit over the tenon. Then part off whatever thickness is desired for the bands. These can then be cleaned up with file (if needed) then slide the pieces on a piece of sand paper. But it's worth posting some photos, which is always helpful.
 

jttheclockman

Member
Joined
Feb 22, 2005
Messages
19,151
Location
NJ, USA.
Niels, I was alerted about this thread. Good question. I'll see if I can get some photos of the process posted this afternoon/evening. This might actually be another tutorial opportunity. But briefly, all I do is put aluminum or brass rod on the lathe, drill the appropriate size hole that will fit over the tenon. Then part off whatever thickness is desired for the bands. These can then be cleaned up with file (if needed) then slide the pieces on a piece of sand paper. But it's worth posting some photos, which is always helpful.
I believe photos would help and to add to the questions do you turn entire blank down to size first and then cut tenon? Then do you make rings to size before installing on pen? Also do you polish ring ahead of installing or do you just turn everything together and polish the finished sized pen all together?
 

Niels

Member
Joined
Apr 29, 2022
Messages
68
Location
eindhoven
I made a endcap with thread. I found it to be very solid when I was working on the cap with my chisel. I made sure I had extra body to the cap for the live center. I'll make a photo tomorrow.

But I just had an idea out of the blue. What if I for instance make a barrel up to the point I need to sand and polish only and then part it with my 1,5 mm parting chisel at the spot I want the accent.
Then I take a piece of tube off approx 2 cm from a kit and glue the pieces back together on the tube with the accent inbetween.

I hope I explain it right. That would be very solid and then you only have to put the skew or tenon chisel on the accemt ring till it matches the barrel Sand and polish and done.

But that would mean I need tubes in size 9mm and 12,2mm or I guess 11mm would work too if you drill with 11mm first and then 12,2mm for the threads and mandrel.

What do you think? Do those tubes exist
 

Dalecamino

Local Chapter Leader
Joined
Jan 2, 2008
Messages
14,572
Location
Indianapolis, In.
Keep in mind, this is just an example of the process. Dimensions will depend on what size threads you are using 12mm, 13mm etc. Which will also dictate what size drill bit you will use. I think you will be safe using 10 or 11mm. When you make your tenon, bore a small hole all the way through the piece. This will allow air to escape when the pieces are glued together. Drill and tap the threads before turning down the blank. You want the blank to be as rigid as possible when drilling and tapping. Go slow so you don't melt or weaken the glued joints. Yes, speaking from experience! Keep in mind you are drilling through plastic and metal. I bring the live center up to the blank for stability, while I begin reducing and shaping the cap. Second picture just shows making a center point for the drill bit to start. You likely already know this.

Drill into the metal stock deep enough to allow you to part off several rings at the thickness you desire. I got lucky on this one. No filing or sanding. It is worth mentioning, I use a metal lathe. It makes it much easier.

You can refer to the posted tutorial for the assembly of the cap. I hope this helps.
 

Attachments

  • Cap Bands 1.jpg
    Cap Bands 1.jpg
    82.1 KB · Views: 90
  • Cap Bands 2.jpg
    Cap Bands 2.jpg
    235.3 KB · Views: 84
  • Cap Bands 3.jpg
    Cap Bands 3.jpg
    280.9 KB · Views: 86
  • Cap Bands 4.jpg
    Cap Bands 4.jpg
    260.2 KB · Views: 99
  • Cap Bands 5.jpg
    Cap Bands 5.jpg
    232.8 KB · Views: 98
  • Cap Bands 6.jpg
    Cap Bands 6.jpg
    202.3 KB · Views: 88

Niels

Member
Joined
Apr 29, 2022
Messages
68
Location
eindhoven
That's very cool but it needs a metal lathe. And you basically make an accent. That's about 25 steps and some investments away from where I am now.
 

Niels

Member
Joined
Apr 29, 2022
Messages
68
Location
eindhoven
That's also one the questions I have. Not in this thread but along the way. I have a ok woodlathe. Nothing fancy but it runs straight.
One day I would like to invest in either a good woodlathe or a metal lathe. But that's for later.
 

Dalecamino

Local Chapter Leader
Joined
Jan 2, 2008
Messages
14,572
Location
Indianapolis, In.
Since you do not have a metal lathe, your other option is to drill on your wood lathe, and use a hack saw to cut the bands off. They will be rough, but a file and/or sandpaper will clean them up.
 

hooked

Member
Joined
Mar 25, 2019
Messages
284
Location
Boston
I have been purchasing my rings since I do not have a consistent way to make them yet. My attempts have looked awful. A metal lathe is coming for Christmas, so I hope to make myself soon. I was purchasing from a U.S. based penmaker, but he recently retired, so I started looking for other sources. I don't know if you have looked at Etsy or a similar site, but I have recently found some rings and have them on order to test. I wasn't going to post since I haven't tested them yet. You can order these in different sizes, and they are pretty cheap at about $3 for a dozen. You can find others on Etsy from jewelry makers.

Silver plated
Gold plated
 
Last edited:

duncsuss

Member
Joined
Jun 29, 2012
Messages
2,160
Location
Wilmington, MA
I was purchasing from a U.S. based penmaker, but he recently retired, so I started looking for other sources.

Richard Greenwald posted on Facebook that he's sold his entire inventory and "the operation" to somebody based in Florida. When I find out who has taken over, and whether they intend to continue his tradition of making custom rings, I'll post.
 
Top Bottom